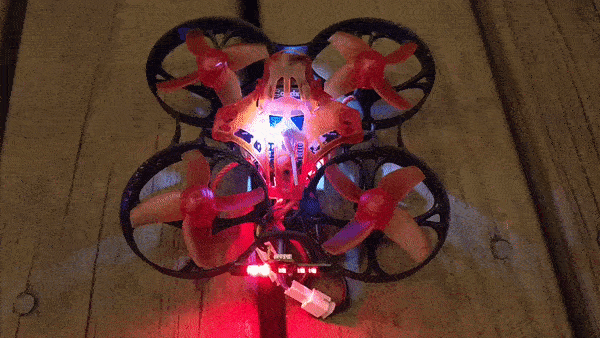
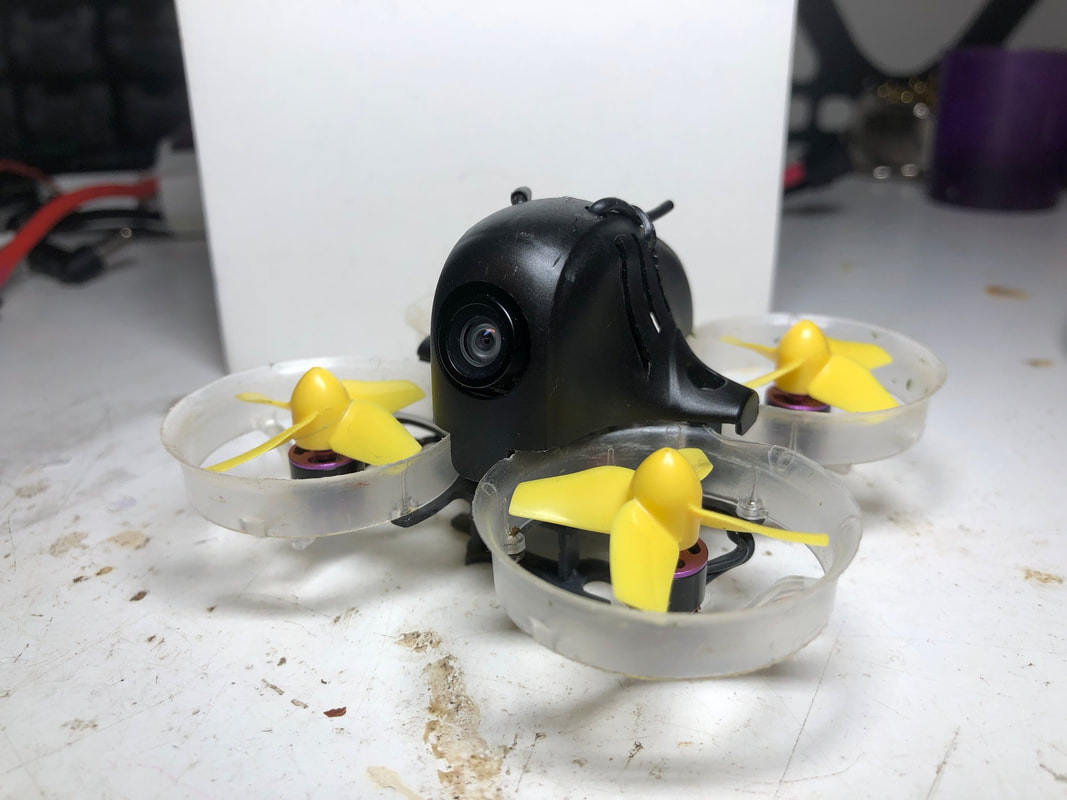
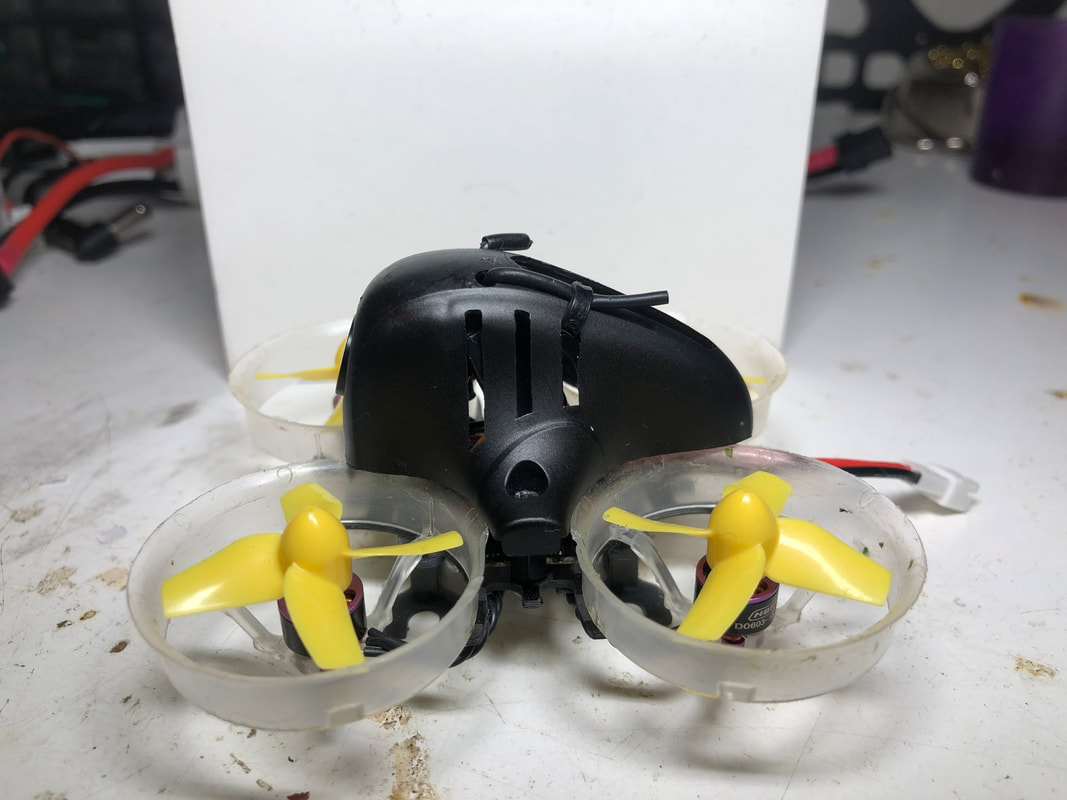
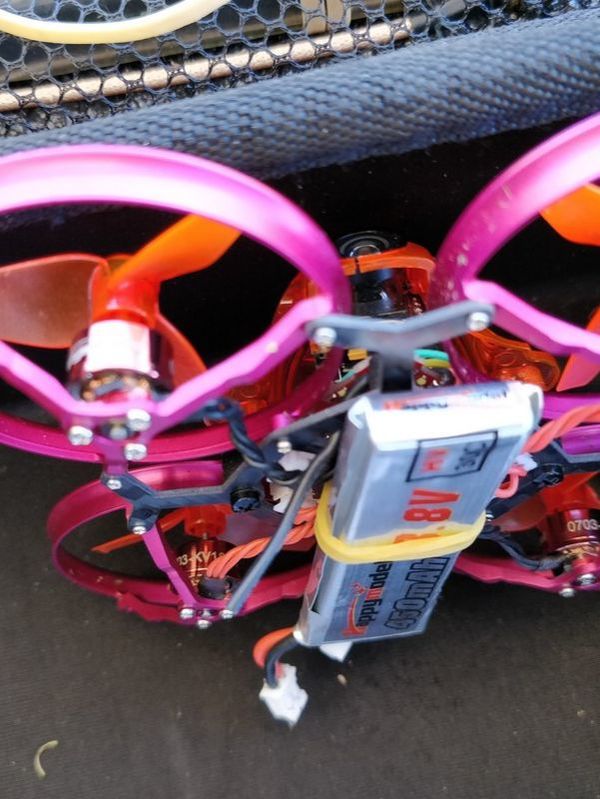
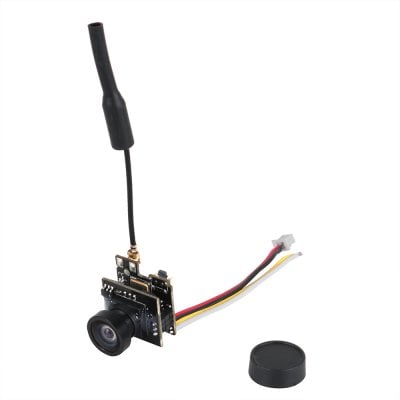
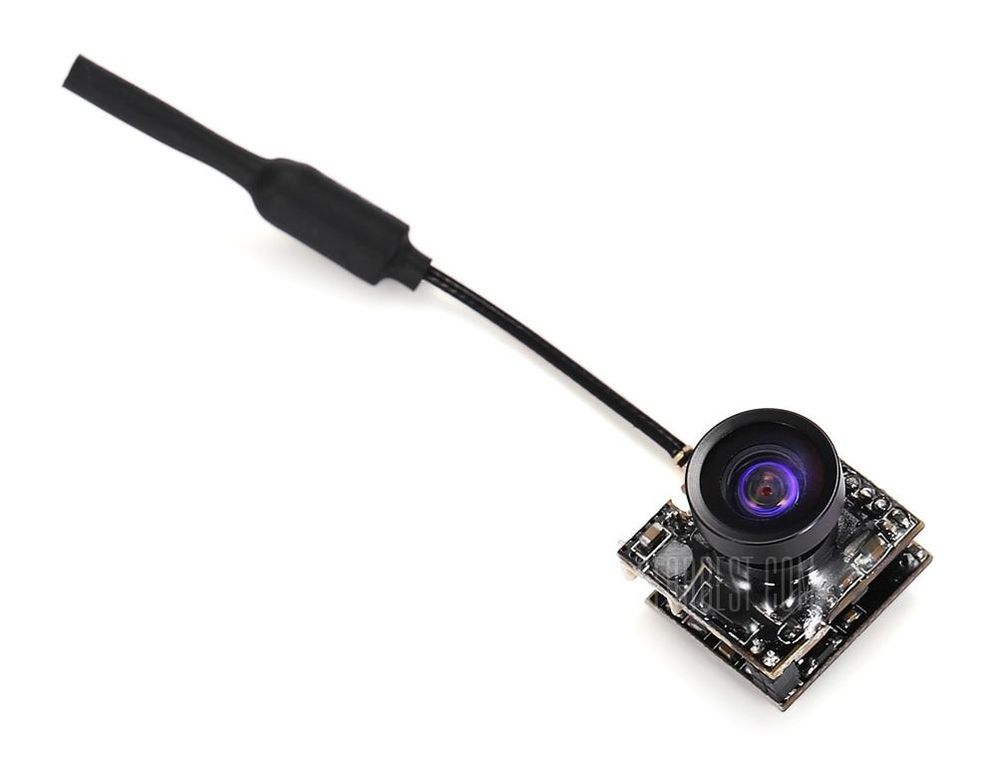
 Thanks for visiting QuadifyRC.com. Be sure to check out our other reviews, tip and tricks and coupons and discounts Introduction In the world of brushless ducted quadcopters (whoops) I have been lucky enough to review most of the big hype products - Happymodel Snapper7 and upgrades, Happymodel Mobula 7, Full Speed TinyLeader and now the Eachine Trashcan. Clearly it is a silly but memorable name and it will surely be easy to search for online.
It is great to see a case included here and like the mobula7, enough battery power to get flying in earnest. The included XT30 is a small gesture but a nice touch nonetheless.
20 Comments
 Introduction
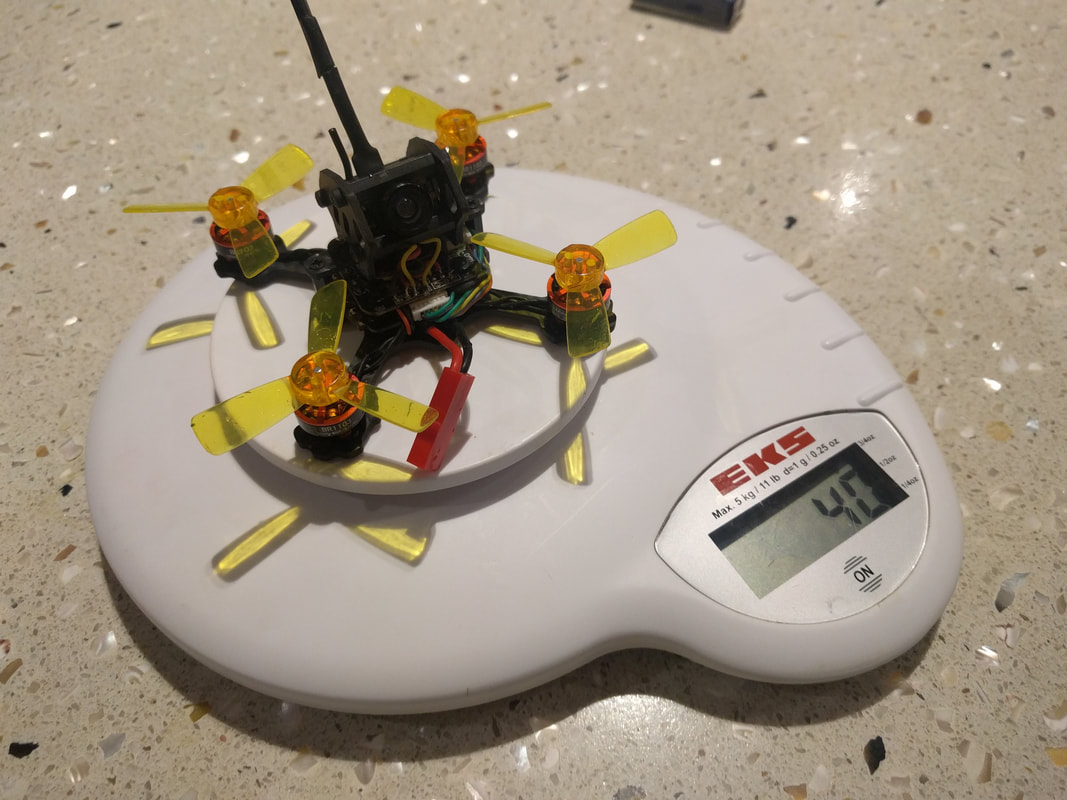
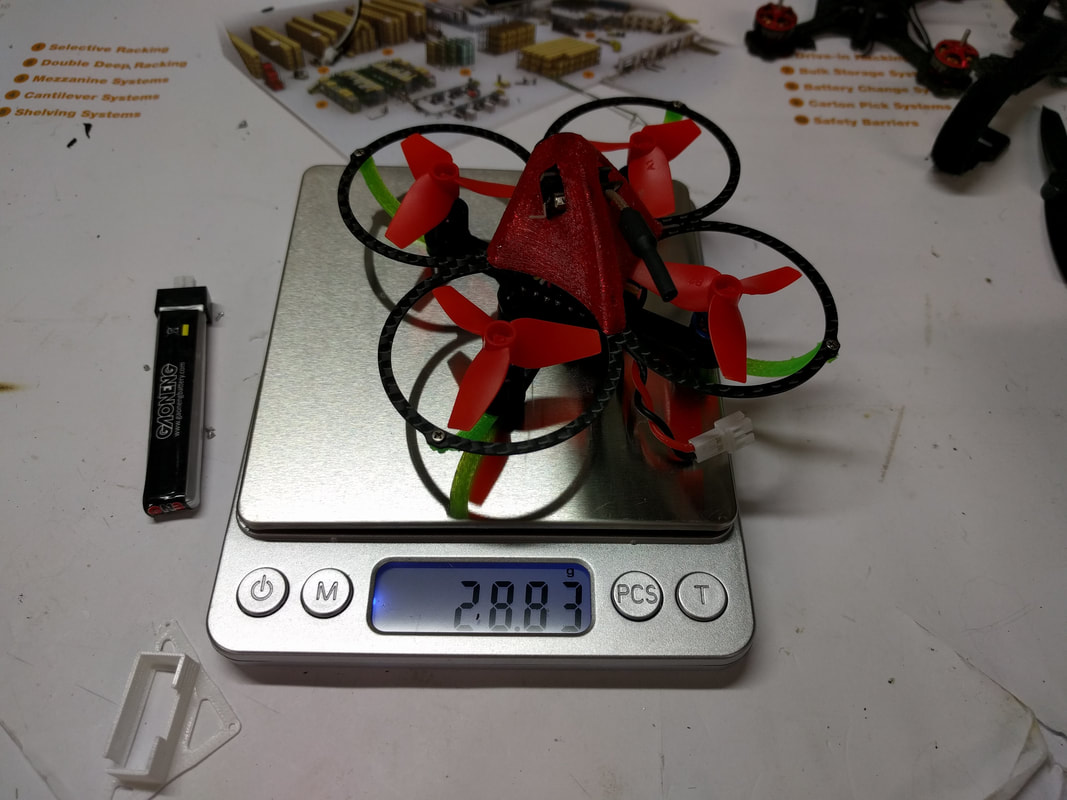
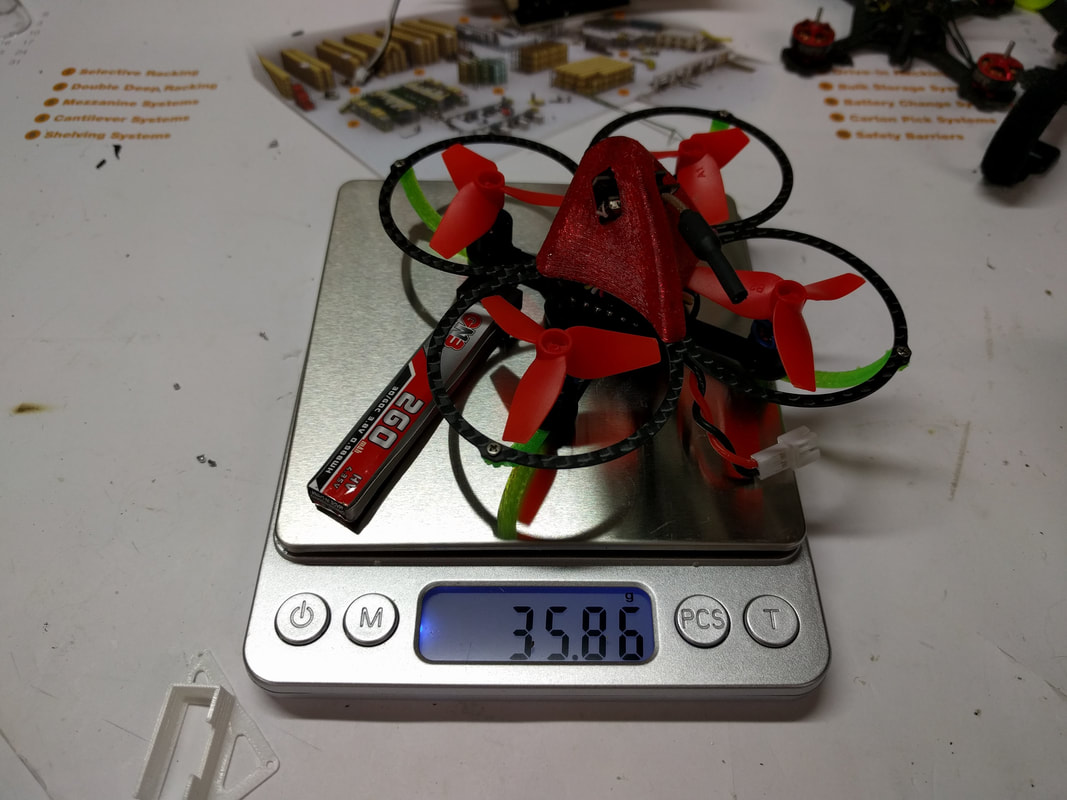
The Mobula7 is made by Happymodel who also released the popular Snapper7 which I reviewed here. Like the Snapper 7 it is a 75mm brushless whoop but it is lighter and more importantly, designed for 2s batteries. The Mobula 7 is not the first ready to fly 2s brushless whoop to the market but it is by far and away the lightest at just 28g without battery. That means the small and light 0802 16000kV motors are able to reach their power potential even on the small 260mah batteries included in the kit and make this quadcopter move very quickly with extremely nimble handling. 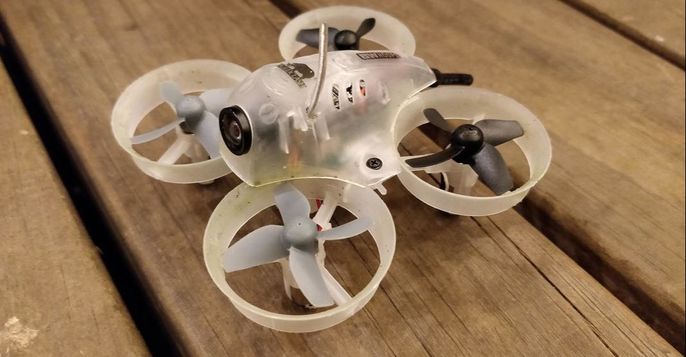 Introduction
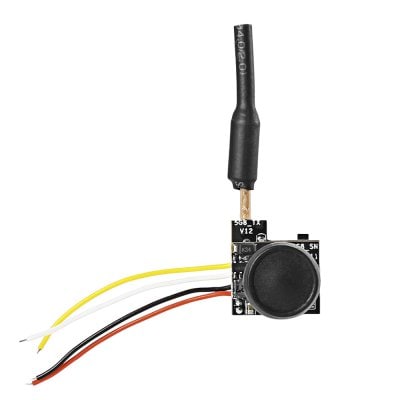
Boldclash have recently released a new all in one plug and play fpv solution for brushed and brushless whoops called the F02H PRO following on from the F02H which I reviewed here. This includes:
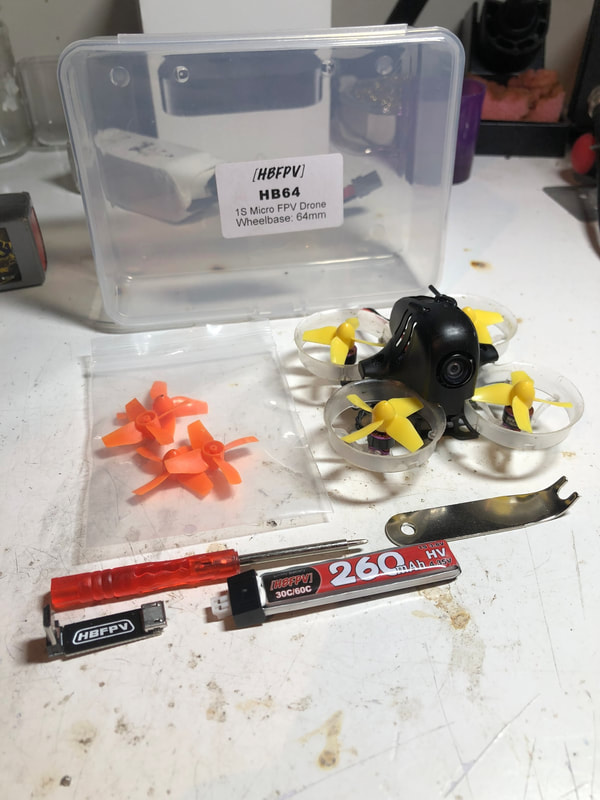
This review has been kindly written by @fpv_airborne who is looking to become a regular contributor here.  Introducing the HB64 The HB64 64mm micro brushless quadcopter is available as a plug and fly kit from HobbyCool.com with either 14000kV or 16000kV 0603 motors. This review is based on the 16000kV variant and is my pick of the 2. It is just 1mm smaller than a traditional brushed tiny whoop but has much more powerful motors. It is 11mm smaller motor to motor than the brushless Happymodel Snapper7 (review here). I am happy to say that the HB64 has impressed me very much!
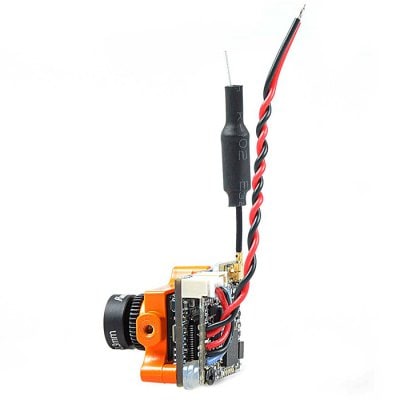
Quad specs: The HB64 brushless quad has a 4 in 1 esc and a F3 flight controller onboard. The 4 in 1 esc is rated to 5A and is Dshot compatible and has BLHeli_S configured onto it. These days, we are seeing several companies who are making AIO FC combo with built in esc but this stack seems to work very well. Added unnecessary weight is a big issue for micros but the HB64 weighing in at only 24 grams without battery or 30 grams all up including battery. This weight is impressive knowing all that is included. 4 in 1 esc, FC, battery, motors, props, frame and cam/vtx combo. The camera/vtx combo works much better than expected. It has a discrete monopole/whip antenna just from vtx to top of frame pod. This antenna is great for the quad because of its extremely light weight. It is also unlikely to be broken because there is little surface area of the antenna to hit objects in crashes. This is an improvement from the original tiny whoops which had the cloverleaf antennas that are easily bendable and breakable.
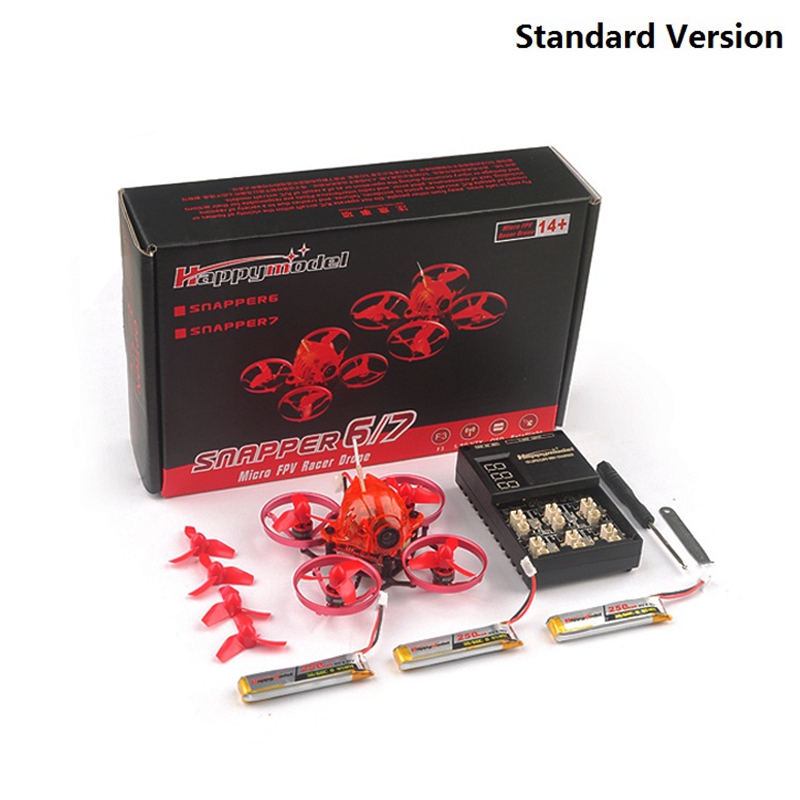
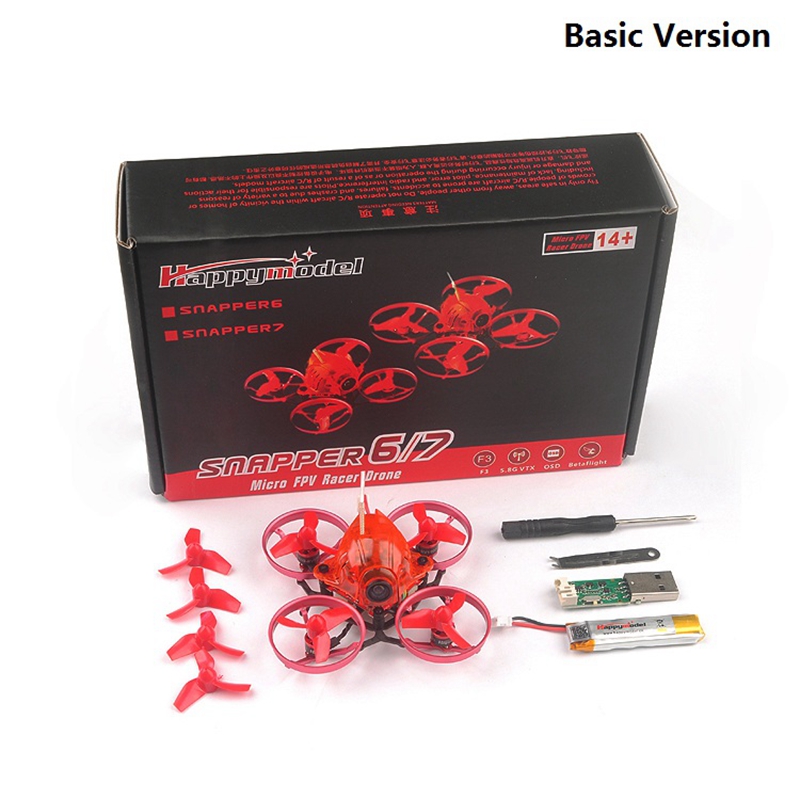
Setup: The instructions that come with this micro quad are insufficient for the full setup of this quad. Included with my quad, there was a little sheet which had a diagram and labeling of the FC. This diagram only showed the FC and nothing else like the 4 in 1 esc, VTX diagram or receiver setup. Even though there is information on Google, it would have saved a lot of time and effort for the buyer to receive more extensive instructions. To that end I have spent some time here documenting what has worked in case others are looking for this information. I was pleased to find that the betaflight firmware was fully setup with Betaflight 3.2 and only needs to be bound to the transmitter to be ready to fly. The pids and (ALL) settings have been adjusted to suit the quad. All that needs to be done is to bind the receiver to the quad, setup switches for arm etc. in the receiver tab and you’re ready to fly! While I was setting up switches, after I setup arm, I also set up ‘flip over after crash’ which is a MUST for anyone that crashes a lot because it prevents those awkward walks of shame to rescue your quad. To use flip over after crash, just switch the switch which is assigned to flip over in the receiver’s tab and then arm using the arm switch, tilt the pitch or roll depending on the angle and objects around the quad until the quad is upright, then disarm both switches and re-arm the arm switch. You will then be upright and ready to rip again! Since I run a Flysky radio, I used a small FS-RX2a pro receiver but the SBUS-based FRSKY receivers will work in the same manner. To set up the FS-RX2A Pro receiver, all that is required is the receiver to be soldered to FC by the GND, 5V and ibus. Then hold the bind button on the receiver while powering on from lipo. Now turn on the transmitter and go into bind mode and that's it! As simple as that and it is bound together. This receiver only works for flysky transmitters but works amazingly well for the purpose and size it is. Next step is to go into betaflight and make sure the serial based receiver (SBUS AND IBUS receiver) is selected and Sbus or ibus in configurators tab, Then in receivers tab, select switches for arm and I strongly recommend you try flip over after crash and beeper in case it is lost or hidden behind something because this quad is surprisingly easy to lose behind a cabinet etc. Flying: Finally a good flying micro brushless! Before I saw this I was hesitant to try another micro build after my previous Eachine H8 with AIO camera and tiny whoop. This is because back when I had those 2 quads, the power and components were not up to acceptable standard and the power was unbalanced so one motor would normally be powered more than the other 3 which created a lot of issues for the pilot. That is why I did not recommend them before. But all I can now say is “WOW”. From the first battery of this quad, I have been impressed. Within a year and a quarter, I can see the huge improvement that has been made in the performance and quality of micro quads, especially since they are now brushless which allows them to have more power and a much longer flight life. Moving forward into the future, brushless is becoming very popular because it allows for a lot more power than the brushed micros, lasts much longer and is more durable and can save weight because of the new ‘Naked bottom’ motors. While flying this micro, using the first 30 batteries, I was very impressed with the 3 - 3.5 minutes of continuous flying which is great flight time for a micro like this. But after the first around 50 packs through this micro, the battery life shortened to 2 minutes to max of 2.5 minutes before I started to feel the battery sag. This is not that much of an issue because it was only because of the batteries’ life time. You would have much more fun if you purchased at least 4 260mah 3.8V batteries and gain longer battery life because the flying time would be more spread out over multiple batteries versus the 1 260mah battery that is included with this micro quadcopter. I was really happy when flying this quad with the AIO camera quality. The quality and zoom of the lens on this camera cannot be changed, but as a stock unit they perform amazingly well. Everything in the camera’s sight is visible and surprisingly clear for a nano camera. The quality of this camera in my opinion is comparable to the “Stock” Foxeer HS1177 fpv camera with all the colour and clarity in the view. The camera however is fixed view. This means that the camera is fixed at a 20° angle. However, it works very well with the power and the weight of the quad while keeping the speed fast. The video I experienced with this quad has been more than enough for what it has been designed for. Flying this quad indoors, the video feed can travel through a couple of walls before severely breaking up. The antenna is well covered and at 25mw at 12 channels, I have not had many issues with the range unless flying between multiple walls. Conclusion: In conclusion, the HB64 micro brushless quad is an excellent micro quad for anyone from a beginner just getting into FPV to a long-timer FPV pilot for those indoor sessions or just some fun for those rainy days. It has more than enough power for indoor races or to rip around the house/warehouse. Its size and power also allows it to hit those extra small gaps that are impossible for larger micros or 3” quads to hit. Its advantages overlap the advantages from any brushed “Tiny Whoop” and for the HB64’s price point, it is definitely worth checking out and potentially worth buying if it ticks your needs. This quad is also very very durable. I have crashed it from high, slammed into many obstacles and it has just held up without any bent props because of the included prop guards. Within my first 20 flights, I crashed into a deep puddle of water where this quad was fully submerged for several minutes but after putting it under the hair dryer and letting it dry off, I plugged it back in and it worked like it did before the soaking. My last point is to address the quality of the solder joints and construction of the quad. Every part of this quad appears to be well thought out and as a result is strong and durable against many obstacles. In my opinion, I would recommend this quad 100%. The HB64 micro brushless quadcopter is available at HobbyCool.com: 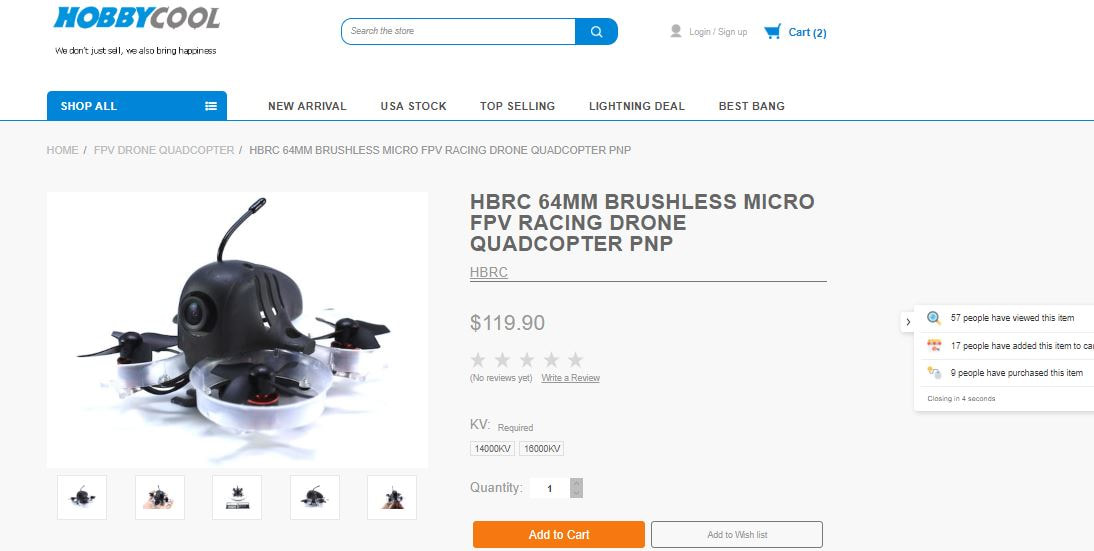 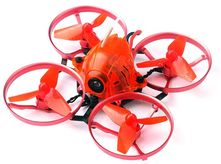 The Happymodel Snapper7 is available from Gearbest The Happymodel Snapper7 is available from Gearbest After several false starts including the FullspeedRC beebee66 which looked so promising (review here) I've finally found a real brushless tiny whoop - the Happy Model Snapper 7. This 75mm brushless quadcopter is 10mm larger in diagonal motor to motor distance than a typical tiny whoop or clone but can still be very much classified as an micro indoor quadcopter. I'm pleased to say that the awfully named Happy Model Snapper 7 exceeded my expectations in practically every area. What is included? The standard version is $10 more than the basic version and simply speaking offers superior value for money. Included is:
As you can probably see above the standard version includes 3 batteries instead of 1 and a 6 channel charger instead of a single USB charger. Because I was so impressed by the charger, I'll call out here the details of what made it so special:
 Awesome charger! Quad specs and discussion Key specifications of the quad are:
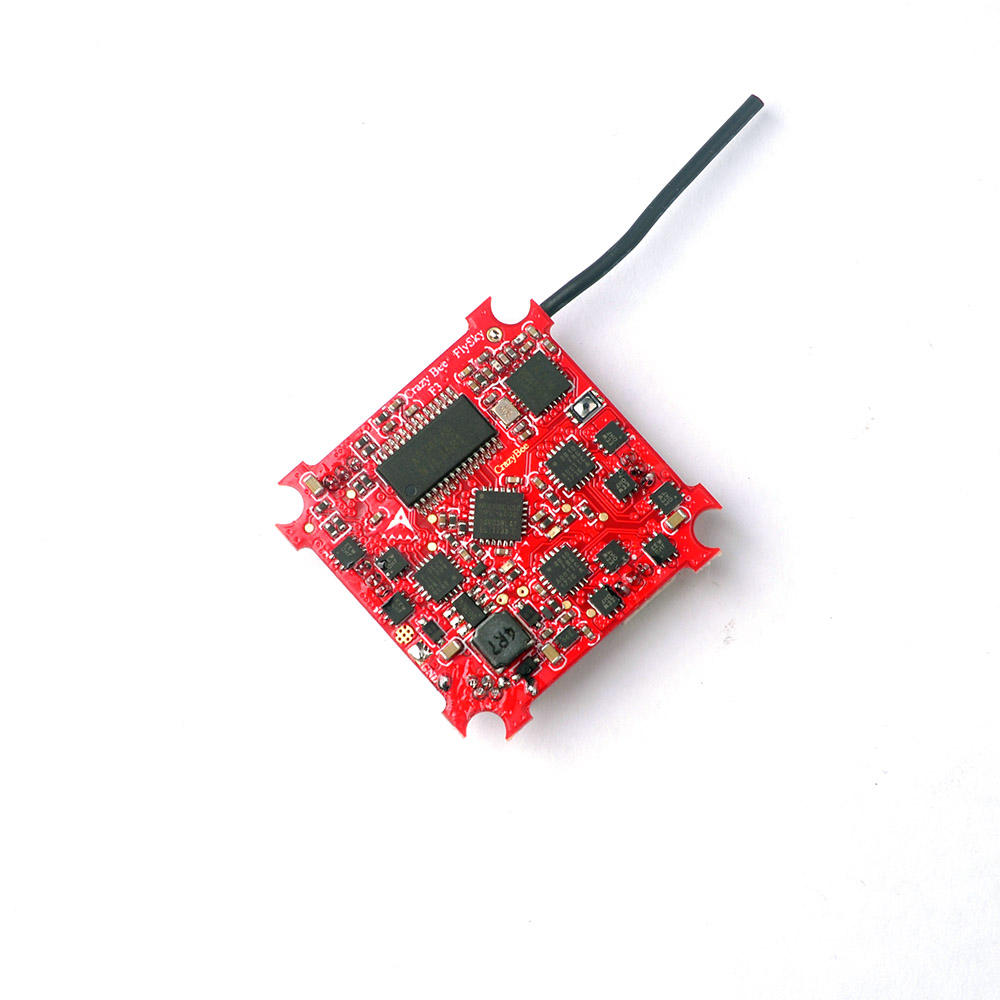
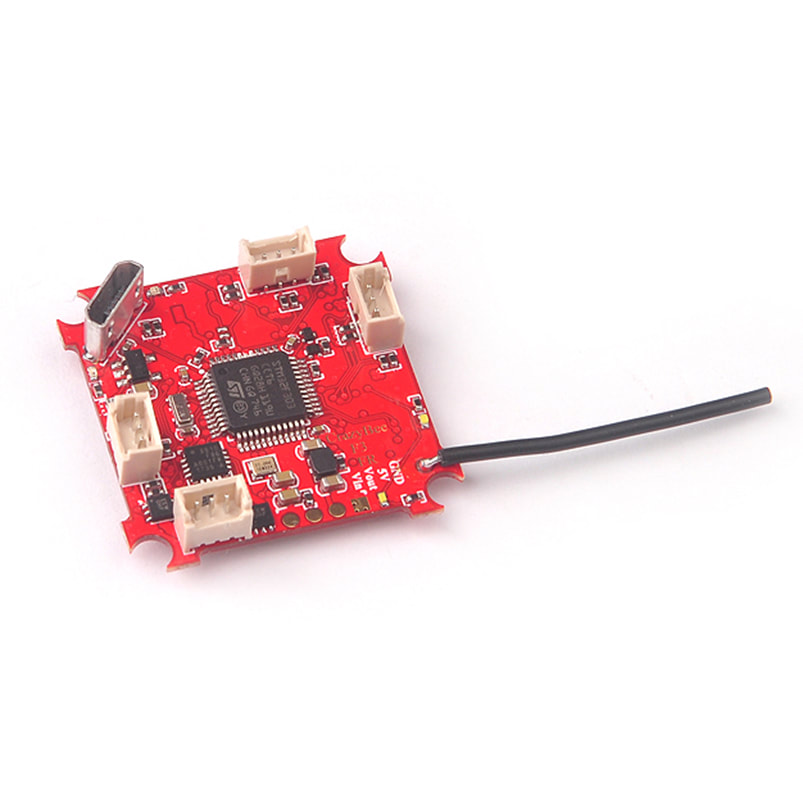
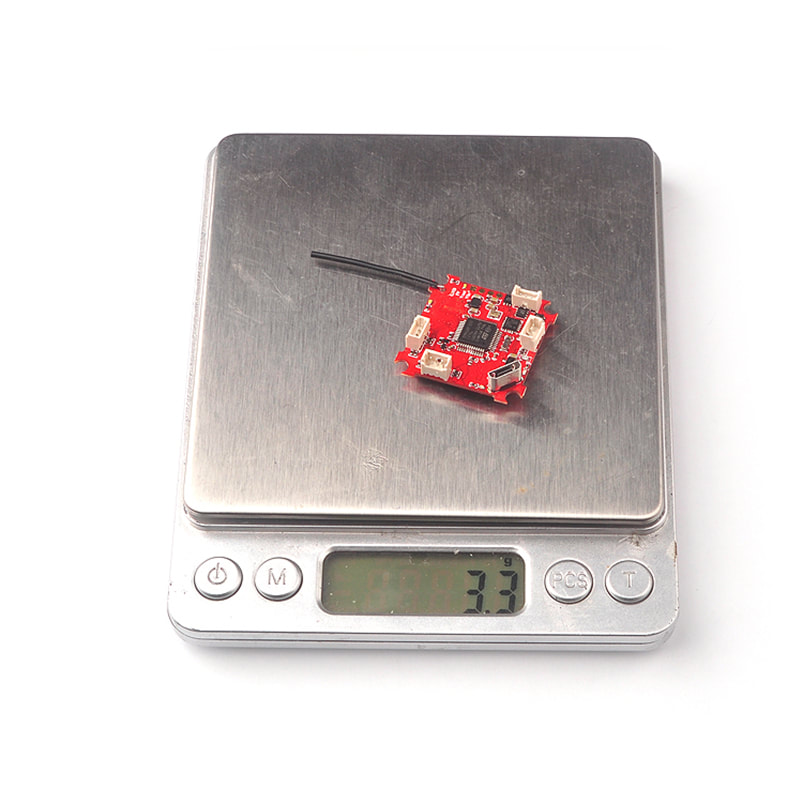
The real innovation and star of the show is the integrated flight control/ESC/receiver. The flight control and BLHeli_S ESC on the same board is nice and a useful step forward from spearate boards as on the BeeBee 66 that mean it is more compact and weighs less (4.3g for this board). We've seen integrated receivers before but not with an SPI interface as this one has. In theory the SPI interface is much faster than the SBUS interface (gyro is connected via SPI) but for practical results this frees up a spare UART and ensures you get FULL telemetry (confirmed on my Taranis Q-X7s). Addionally it means that rather than choosing a serial receiver in betaflight, you choose a dedicated SPI receiver and can choose between D8 or D16 for FRSKY or AFDHS or AFDHS2a for FRSKY. Lastly binding is easy! you no longer need to use 3 hands to hold the tiny button down while binding - power on and then hold the bind button down for 2 seconds. Bliss!! The Crazybee F3/ESC/RX is available separately in FRSKY and FLYSKY versions
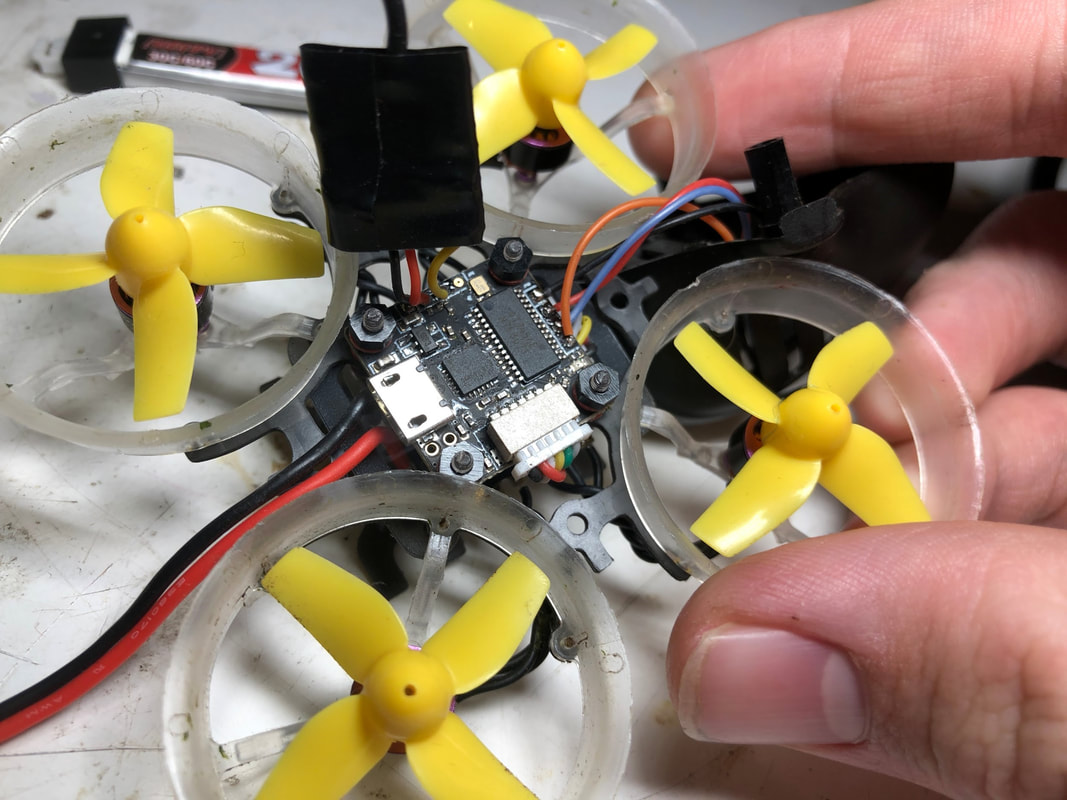
Nothing much to note about the AIO camera from spec perspective, nor the motors - the real test will be in flight. The frame however is intersting. The rings around the props look like ducts but are actually just protectors meaning you should expect flight performance more like a typical guard-less quadcopter rather than a ducted whoop. Guards look to be cast from 7075 aluminium and are integral to the frame, i.e. cannot be removed.  Can't take these gaurds off unless you want to remove the motors too. Setup The instructions that come with this model are succinct, well written and complete. It goes into detail with receiver choice in betaflight and binding procedure due to the SPI interface. As mentioned above: Easier to bind and choose the correct recevier. For flysky users it is particularly useful that you can choose between AFDHS and AFDHS2a. You'll be pleased to know that betaflight has been full set up from factory for all the elements that are unique to this quad althought the PIDs are stock (yet run fine). Please see below for stock betaflight setup and my comments in the gallery below: It's worth noting that since this runs BLHeli_S, all of the latest Dshot commands are available including motor beep and anti-turtle mode aka 'flip over after' crash. Both work very well :)
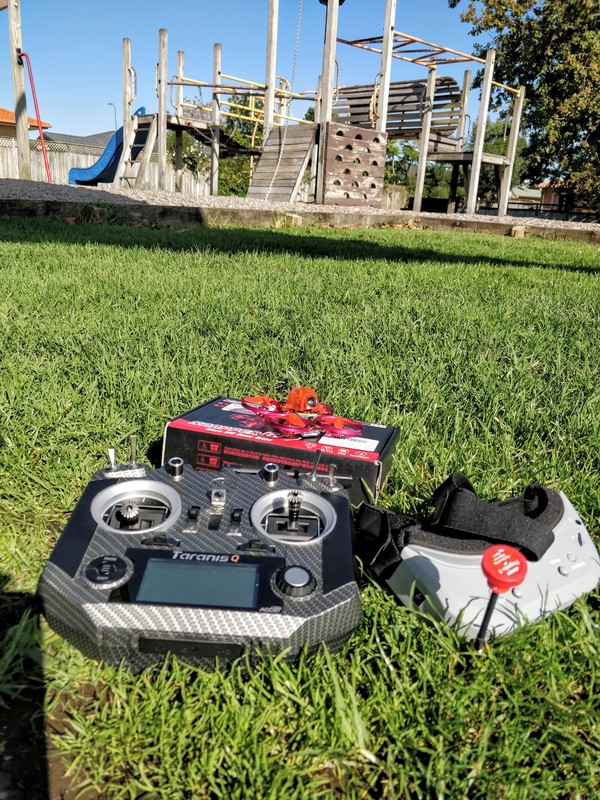
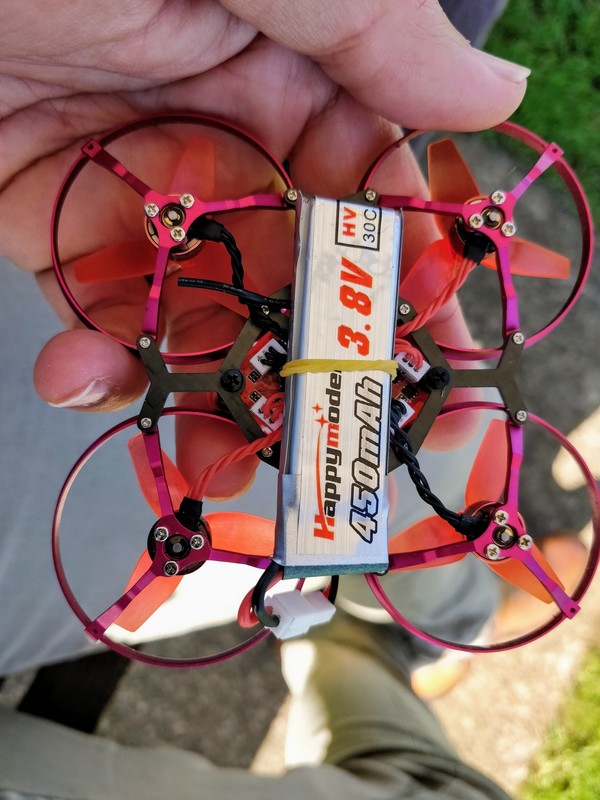
Flying I've seen a number of brushless whoops that have looked great on paper but none yet have actually bettered the flight experience by a simple brushed whoop like my santa whoop (part 1 and part 2 reviews here). That's because until now the brushless motors haven't scaled down well and offered poor power and efficiency. This meant they had no better thrust than a good brushed whoop and much worse battery life. I'm really pleased to say that this model is different. Yes I know it has a 10mm larger frame and a 450mah battery but performance is superior to even a heavily modded whoop. What does this mean? It can better recover from manouvers and it is a more viable outdoor flier on still days. Punch outs are surprisingly good! As you can see from the video it will happily navigate a playground and trees. The flight characteristics are really interesting. I'd liken it more to a micro burshless than a whoop because of the extra power and lack of full ducts. This means I can be more aggresive with cornering using more roll rather than the yaw-heavy flying I do with whoops. Further to this it makes me more confident in acro mode whereas I find a whoop in acro mode really foreign. In tight spaces and obstacles and at lower speed (e.g. indoors) I still feel more comfortable in angle mode, just like a brushless whoop. For flight time I got about 3 minutes when charged to 4.2v or 3.5 minutes when charged to 4.35v. Open field flying dropped battery life to about 2 minutes but this is not typical flight with a micro like this. This tells me these motors are most efficient in the 30-80% throttle range which is where most tighter flying is done - like the playground, indoors or around small trees. Nice to know the power is there if needed though. I'm not a fan of brushless motors smaller than 1102 but think these 0703s are actually pretty good - particularly with this combination of components. Furthermore they are the quietest sub-1102 motor I have heard. Spares are available here: https://www.gearbest.com/motor/pp_1717534.html I was really pleased with the image out of the little AIO cam - it was as crisp as I've seen with as good a colour handling as you can expect for this type of camera. The camera angle adjustment was really nice and with the power this offered a well thought out capability. Video signal was very good even around trees and I started to drop RSSI on the control link well before video deteriotation before travelling out on an open field. I think the receiver antenna location could be optimised (below) but think you'll struggle to get the 300m claimed range... <Quick update> I've since routed the antenna up through the canopy rather than underneath. I think the reception may be marginally better but certainly no more than 100m in line of sight conditions.
Conclusion The HappyModel Snapper7 is an excellent supermicro brushless whoop-style quadcopter that is available in a great value 'standard' pack which includes 3 batteries and and versatile charger. For it's size it is very light weight thanks to the heavily integrated FC/receiver/ESC board that includes the very latest receiver interface that makes setup extremely simple. By combining this with well made 19000kV motors and a suprisingly good AIO camera they have created a brushless tiny whoop that lives up to what we've wanted - a familiar whoop style quad that is suitable for indoors with a level of power and response that micro brushed quads just cannot achieve. Furthermore it feels much more at home in rate mode (acro) flight compared to a ducted whoop. Unlike earlier brushless models this does not come at the cost of battery life where 3-3.5 minutes flight time is realistic. Only time will tell how the motors and aluminium prop guards will hold up but with 20 or so packs through I've not caused any permanent damage plus the motors are still running quietly. The Happymodel Snapper7 is available in a basic bind and fly package with 1 battery and a simple charger for just $85 in flysky or frsky versions but I'd recommend instead going for the $95 standard package which includes 3 batteries and an excellent 6 port charger.
Recommendations:
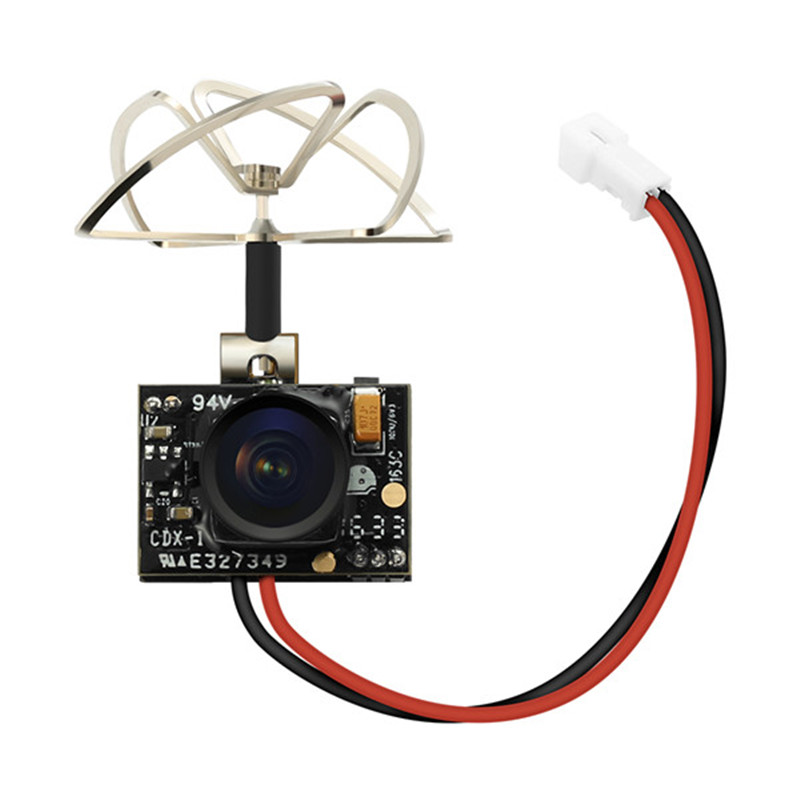
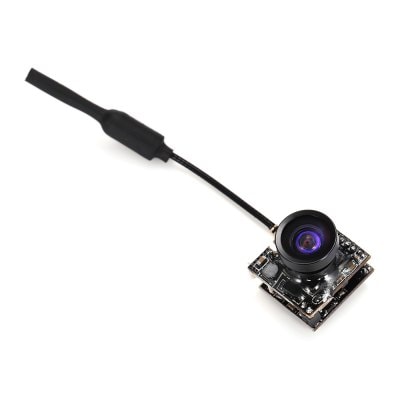
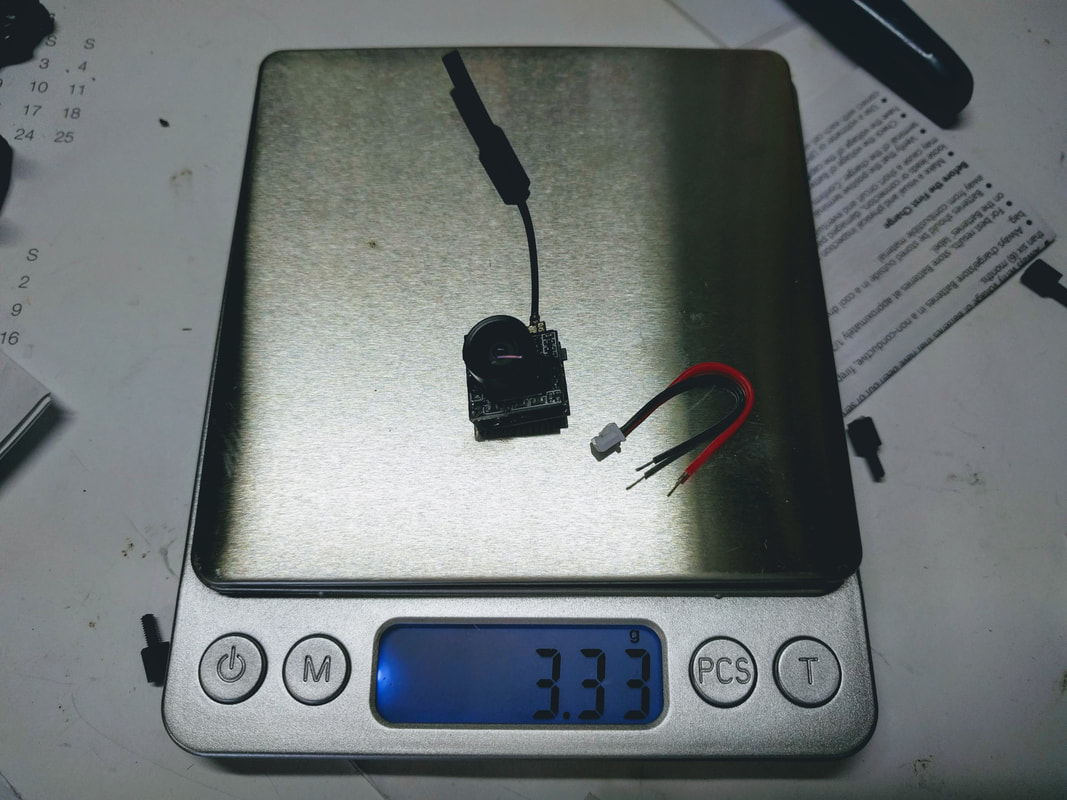
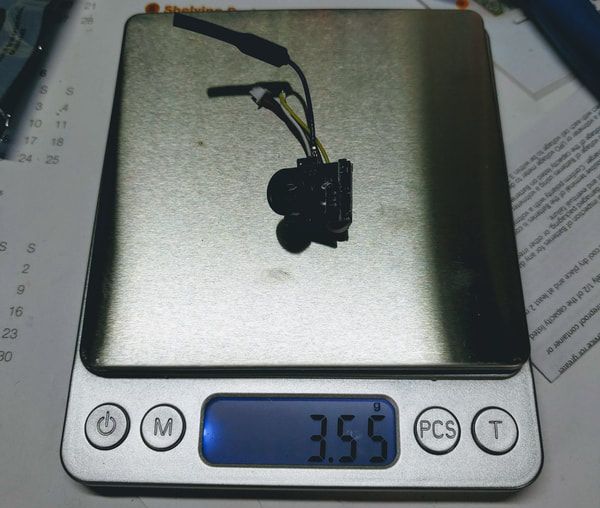
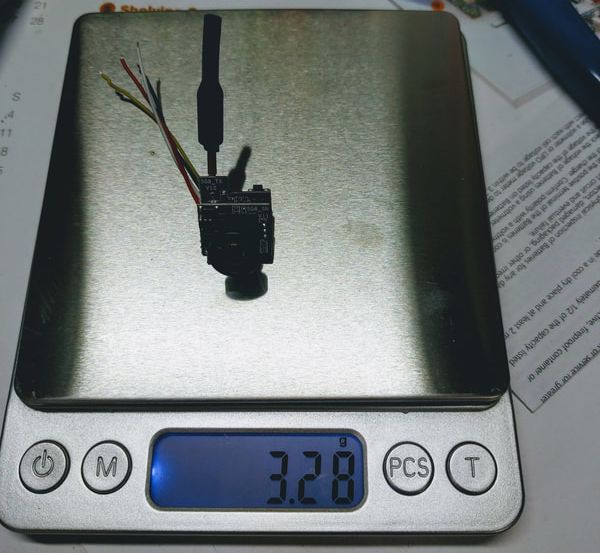
I'd happily recommend this as more powerful alternative for a brushless whoop for indoor flying and even outdoor flying in no or low wind. Unlike a the heavier brushless ET100, ET115 and ET125 models, the light weight will have much less chance of damaging your home with crashes when flying indoors.  Typically AIO cameras are limited to brushless quads now. Here is my santa whoop with the LST S2 Typically AIO cameras are limited to brushless quads now. Here is my santa whoop with the LST S2 Since half of the planet is currently having weather that is forcing people indoors at the moment (not me haha!) I've reviewed some All In One (AIO) camera and VTX combos. Traditionally these have been used on tiny whoop style indoor brushed quads and smaller micro brushless quads although more and more brushless quads are using slightly heavier micro CCDs as standard. Weight is still very much the name of the game in brushed quads as you'll struggle to get a 4:1 power to weight ratio even on the larger 8520-based brushed micros. This means CMOS-based AIO cameras are still the norm because they are so light. In this round up I've gone for some of the lightest cameras I can find and best of all, 2 include video in / video out so that no tricky wiring hacks are needed to run betaflight OSD. Note: This is clearly not an exhaustive test, I happened to have a number of AIO camera at the same time I ordered for various micros so had a chance to compare. I though the improvements over the Eachine TX01 were impressive so thought it would be work sharing. The Contenders:
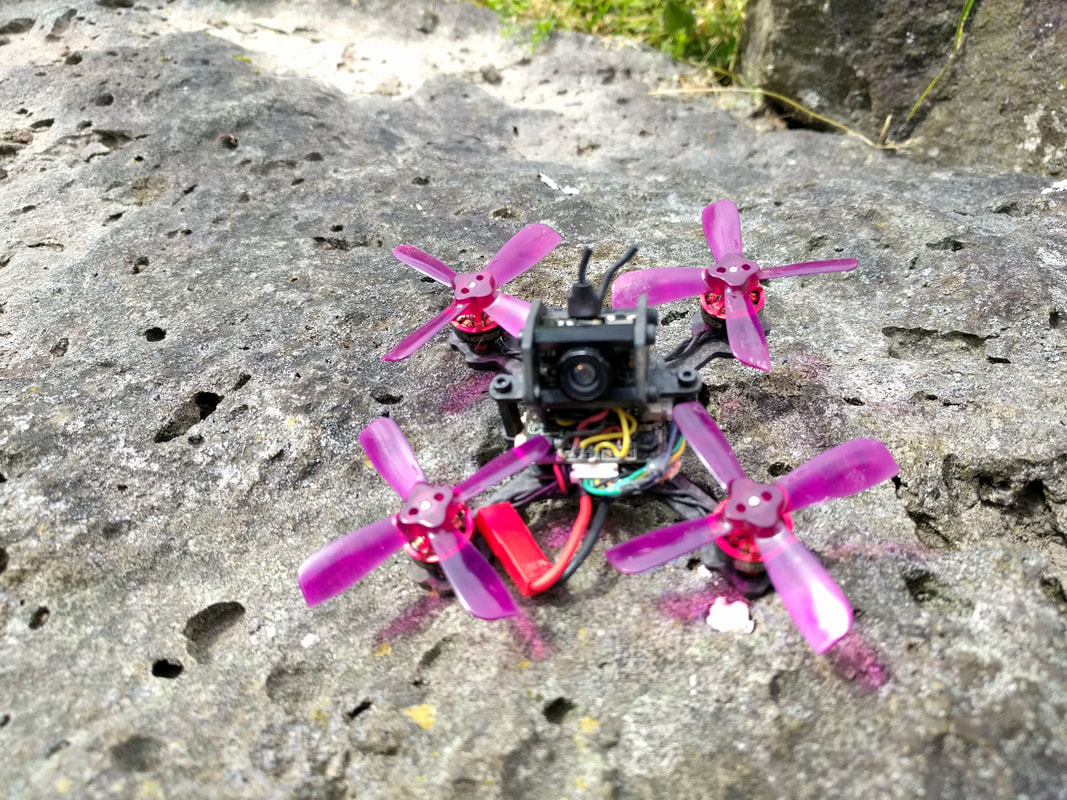
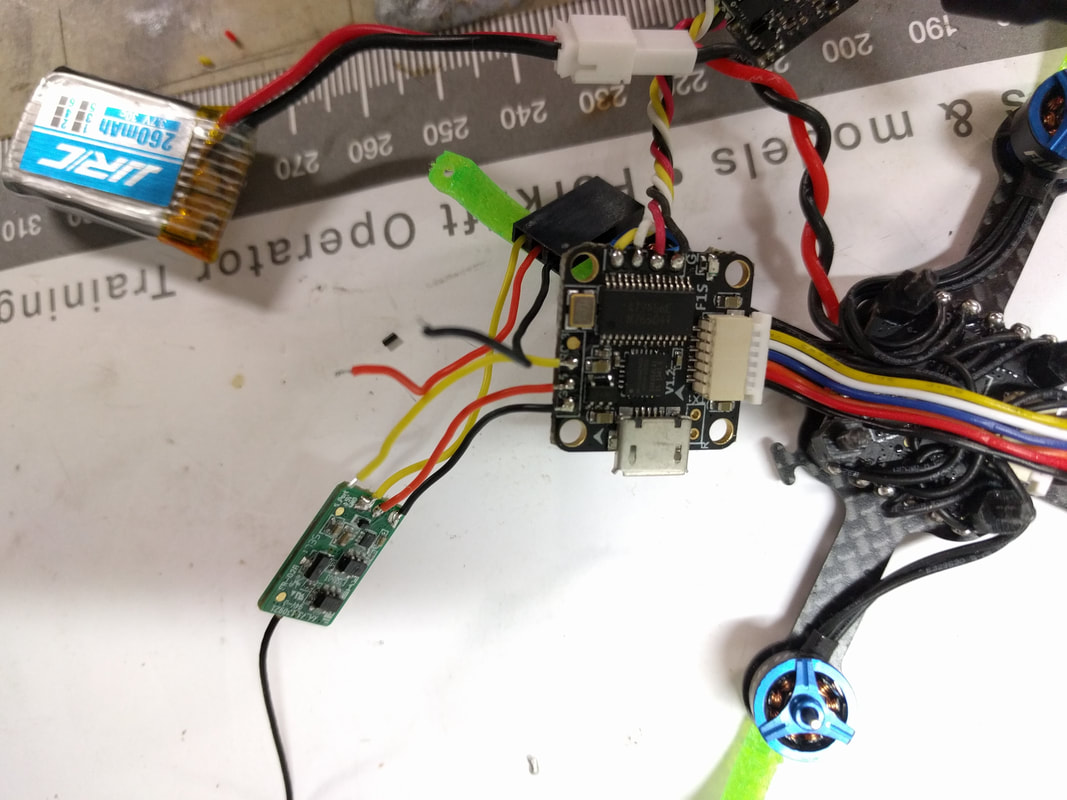
Results Clearly discussion on image quality is missing here - I found the 4 CMOS AIO camera above very similar and wouldn't be able to tell apart in a blind test. The only AIO I've picked up which is clearly inferior is the VM2751 standard on the leader which is not included in this shootout. I thought this camera/vtx was the weak point of the Leader 120 quadcopter. Recommendation For a micro brushed quad without an OSD I'd recommend the LST S2. For goodness sakes it is only $9!!! Further to that it is light, easy to change channel / band / video format and small. For a micro brushed quad with OSD or if you are after every milligram of weight savings, get the CM275T. It is CRAZY light at 3.2g and has a very convinient video/in out so that you don't need to mod your cam just to enjoy betaflight OSD - assuming your FC supports it. I know it's at odds with what I said about brushless and ccd cameras but this will be going on my Eyas X2 rebuild going for the lightest 2" possible - targetng 35g with props. Here is my original X2 eyas build on rotorbuilds if your curious. For a brushless quad 2s and up just get the micro swift or equivalent and the TX200 VTX. The video quality is just so superior in all but the best lighting conditions. VTX can be a little tricky with band / channel display but transmission quality is excellent and you have the ability to bump the transmission power up to 200mW.
 The Beebee 66 is a micro 1s brushless powered quadcopter which is essentially a brushless Tiny Whoop. It is made by Full Speed RC, the same company that produced the highly successful Leader 120. (review here). Gearbest kindly supplied me a BNF Beebee 66 to review. I was desperately hoping for this to be the brushless answer to the tiny whoop but I'm really bummed out that it just isn't. Read on to find out why. Adding a receiver Since this was supplied as a BNF model, it came without a receiver. I opted to use the lightest FRSKY receiver I had on hand - an XM that I'd finally figured out how to fash with the RSSI channel 16 firmware. In most models this is a matter of soldering wires to the exposed pads on the top of the flight controller. However,since the FC and ESC are part of the structure of this quad AND the FC is flipped upside down to sit the ESC connector in a manageable location, the prop gaurd, 4 nylon nuts and the flight controller itself had to be removed before I could access the receiver solder pads. Then I needed the help of a multimeter to figure out ground, +5v and signal wires. Once soldered up with a short length of silicon wire to the receiver it was easy enough to re-assemble and tuck the XM reciever underneath the canopy behind the AIO camera/VTX. Pics below of course can explain this better:
It's not the end of the world wiring in a reciever here but can be fiddly with particularly small hardware. I'd recommend if you did buy this model that you purchase with the receiver of your choice pre-fitted. Betaflight Setup Kept it pretty simple here. Because this is quite a different steup than I am used to I retained the stock settings on Betaflight 3.1.7 that it arrived with. All I did was set an arm switch and a mode switch for angle-horizon-air. Below are the default settings from Betaflight 3.1.7. Oh yeah, receiver had to be set up too. Like most f3 boards receiver is on UART 3. Quad Prep The only other preparation was pretty straighforward. The included GNB High Voltage 1s 260mah Lipo battery was easily charged using the included USB adaptor and a micro usb cable I had on hand. Only 1 set of props was included that are press-fitted on the tiny 0705 fullspeed branded (Sunny Sky made) 0705 brushless motors. I left the VTX on the default channel for the initial flight that my Aomway Commanders (review here) picked up as 5905MHz. First flight Please look away if you love your Beebee 66 because it starts to get a bit ugly here. After fully charging the LiHV batteryand confirming everything was working ok I armed and found the props were fouling on the TPU canopy. Minor annoyance down to the tight tolerance in the slightly flexible TPU canopy. Easy enough to bend out of the way and I was back in action. The first thing I noticed how loud the motors are - not in idle where they are practically silent but under any sort of load. Next as part of test with line of sight attempting a 'punchout' I could clearly see the quad dipping (pitch/roll) and twisting (yaw) under load. I'll attempt to tune this out later on and will post another review if successful. Moving on to line of sight I found the flight performance dull and uninspiring. What's worse was that after just one and a half minutes flight my battery was sagging down below 2.7v - the motors were clearly very demanding for their relatively mild output. I really wanted this quad to be a success and in fairness there is a chance I could have a less than perfect unit but my experience is my experience and I was disappointed. I do have some thoughts on how to improve though and I'll cover this in my Next Steps section below. Comparison to a brushed micro Please understand that these comments aren't made from isolation - I've had some experience with tiny whoops based on 7mm motors (like the JJRC H67 or Eachine E011) and although these are cheap brushed toy grade quads, they offered equivalent or better power and a flight time of 4 minutes plus on the same size battery with much smoother flight performance. A quick note that I actually tried the stock battery from the JJRC H67 (260mah non-HV) and got only 1 minute flight before it sagged below 2.7v under load. After recovery it bounced back to 3.65V but this same battery give my 4 minutes plus in my E011 FPV or santa whoop. Recommendations At this point I can't recommend this quad. The performance I experienced was poor and the flight time was unacceptable. My guess it that the brushless motors do not scale down well to 7mm, at this size the brushed motors seem to be more approprate. I'd recommend going in one of two directions:
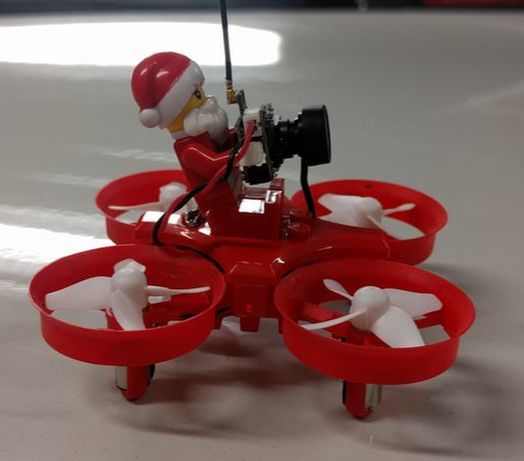
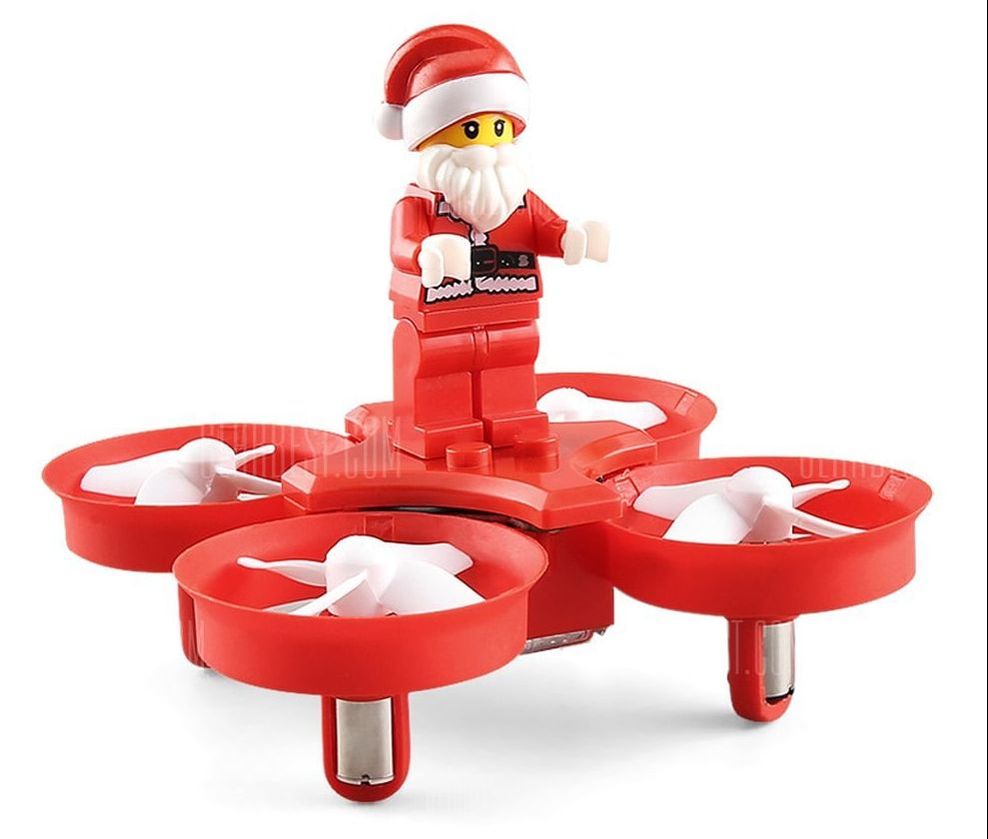
Next Steps I'm not content to leave things be with the Beebee 66 and the latest version of this model (Beebee 66 lite) has shown the direction I want to go in - removing weight. I'm skeptical of getting to the level of improvement I want but with some of the parts below I think I can replace the canopy with a simple camera holder. remove the propgaurd and TPU supports and save up to about 4g. Will this make enough difference? Not sure but will report back when I'm done. Make sure you bug me about the follow up in the comments if I'm too slow! Below are some of the weights of the components I'm interested in: 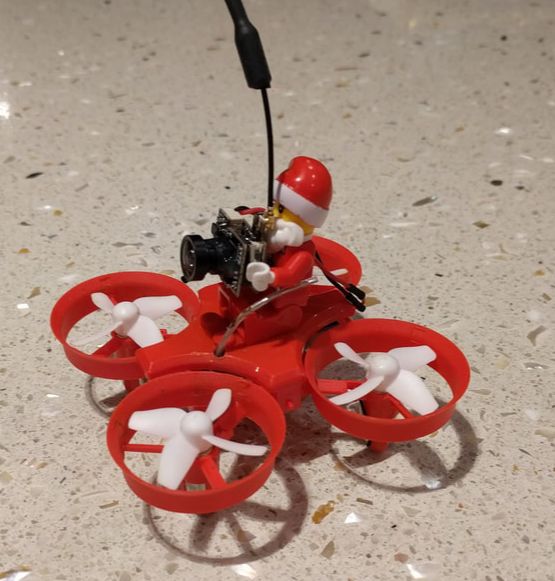 Time for a cheap, high performing tiny whoop build with a twist - Christmas style. I know it is a novelty but the JJRC H67 Flying Santa Claus RC Quadcopter is actually the Eachine E011 in disguise. The E011 in my mind is the absolute best starting poing for a tiny whoop with the larger 716 motors that have absolutely no problem lifting an All In One (AIO) camera. So what make this build so special? Freakin' Santa Claus does! 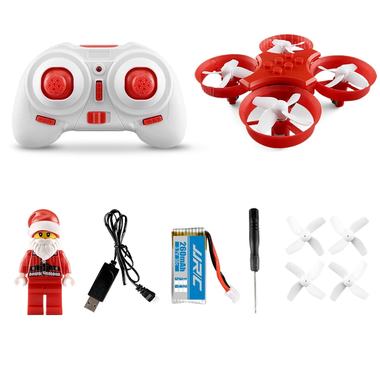 The JJRC drone is in Christmas themed colours and comes with a Santa minifig. The best (and most annoying part as a parent) is the noisy sound module on board that plays a Christmas tune. As a stand alone unit this is a micro brushed quad that flies very well albeit with a small but proportional remote. Of particular note, the motors and battery are very good and will give you a genuine 5 minutes of throttle-heavy flight time. Included in this pack is:
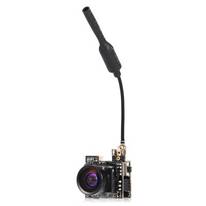 This quad is a lot of fun but it needs more FPV! I used the LST - S2 5.8G 800TVL HD Micro CMOS FPV Camera which is tiny and weighs only 3.5g. I've built an E011 whoop before with a 5g AIO Eachine TX01 camera and it had no problem lifting that. This new LST camera will offer much better performance even the seemingly small 1.5g weight difference has a very big performance impact on these brushed whoops. See below for pictorial instructions for mounting the camera in the spirit of Christmas. The minifig is very heavy at 4g but I couldn't leave santa out of this garish whoop so will take him off when we start taking the Christmas decorations down, weight savings will have to wait for now. Here is a handy tip given the crappy stock reciever range. Drill a 2mm hole on the canopy as shown above and poke the antenna through it. You get over 100% more range which is absolutely necessary as this does not have a failsafe and will fly away from you if you lose signal! In conclusion this is an absolute bargain for a basic little FPV rig. To date all of cheaper fpv ready whoops have the smaller and less powerful 6mm motors and I'm suprised that a 7mm motors FPV ready unit hasn't been released. No problem though, as you can see above building this is not difficult or expensive and much more rewarding. The set up as above flies well enough but needs quite a bit of throttle. When you decide to take the minifig, canopy and speaker out you'll find performance will increase dramatically but that can wait till after the novelty has worn off :) If you want to use your own hobby-grade transmitter and have the full control of betaflight with acro/air mode, check out part 2: Adding the Furibee F3 Flight Controller. I'll have a link live here by 4 November. Parts in this build: See this page for current bargains on Gearbest for play and racing
|


Thanks for visiting QuadifyRC.com Follow us on facebook below to get all the latest updates