 A quick announcement - user sbstnp from the RCGroups Betaflight Thread has kindly recompiled the betaflight Omnibus F3 target to allow the good stuff - RC smooting, absolute control, Iterm relax and even LED Strip. For those of you familar with the 3.4.0 'performance' version this is much the same but for 3.5 If you are not familiar this file will allow you to run all of the great new features of betaflight 3.5.0 that make it more suitable for micros (esp new dynamic filter and feedforward) and the massive improvements from 3.4.0 as above. I strongly recommend this for your leader 120 or any other micro brushless as all tend to run the OMNIBUS (F3) target. Will follow up with install guide in a few days. Full credit goes to sbstnp for this recompile. Hex file can be found here:
For my list of recommended hardware changes please see my blog: My leader120 is a year old! What I've changed in that time
3 Comments
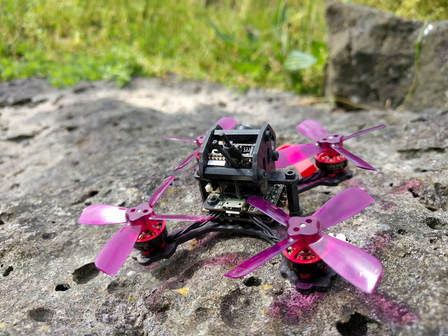
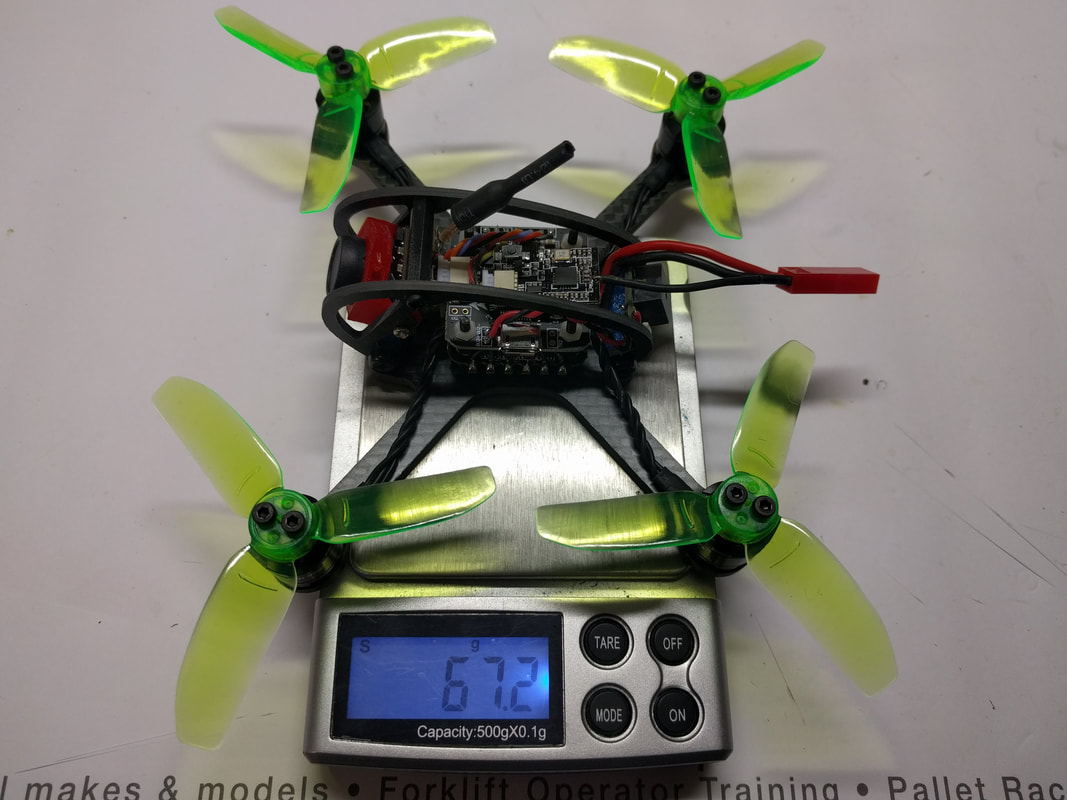
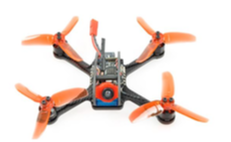
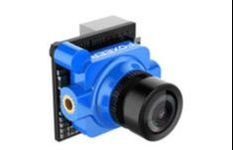
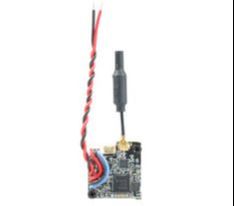
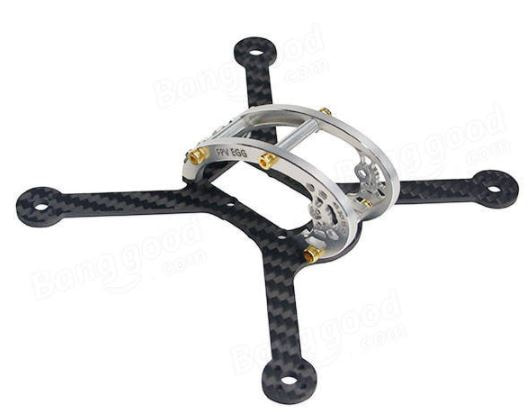
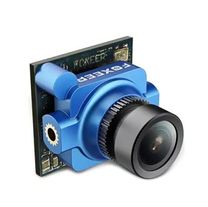
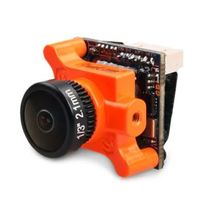
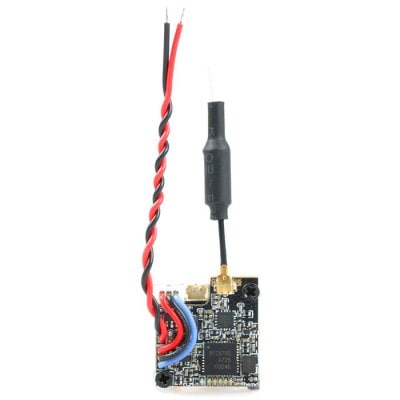
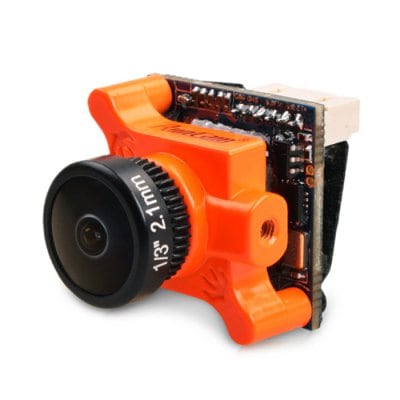
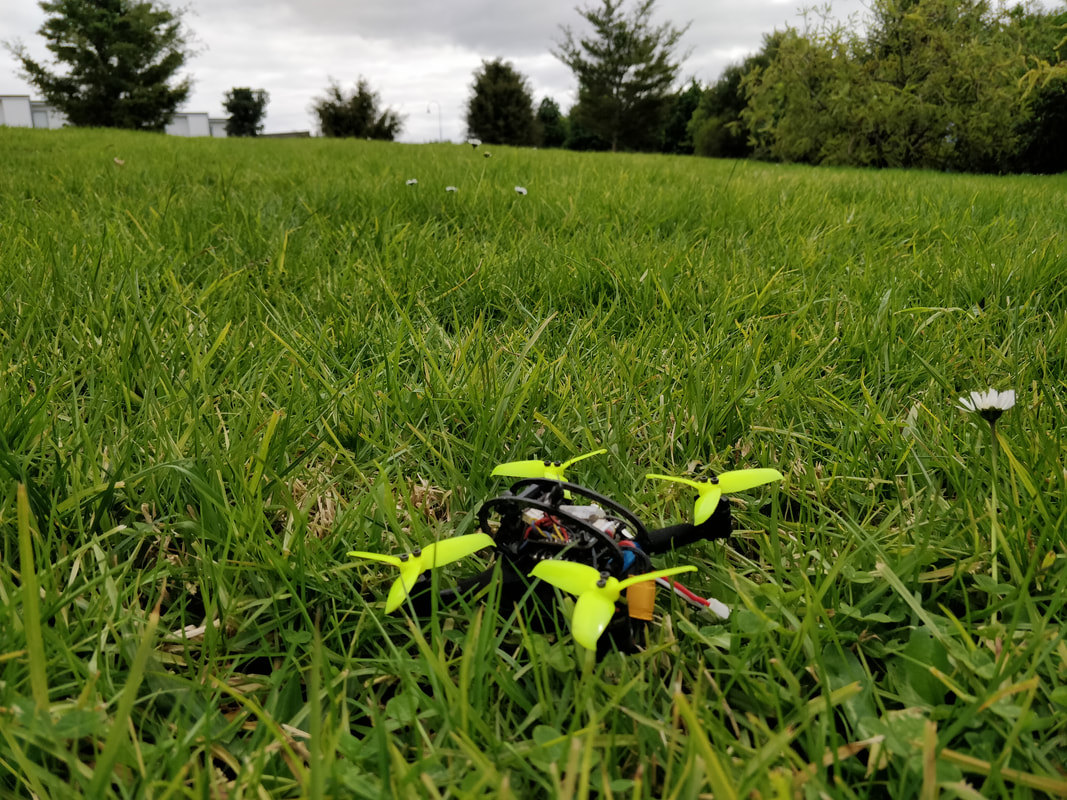 The ultimate park quad? The ultimate park quad? I've now had my FullSpeed RC Leader 120 for 1 year and have completed a bench review and flight review. After hundreds packs and many replacement props I thought it would be good to look back at what I've changed to keep this up to date and fun because at it's core, the Leader 120 is still an excellent quad and sits in a class of it's own as a ready to fly 2.5 inch quadcopter. The core of the quadcopter remains the same - original ESC, original flight controller, original 1104 7500kv motors. The bearings on the motors are a little noisy now but no detriment to flight. especially with the modern filtering available on beta and butterflight. My original review quad was kindly provided by Gearbest but is also available now from Full Speed RC's own website. Full Speed is a little more expensive but offers an excellent customisation service. Speaking of Full Speed the proprieters are pilots and test their products a lot before release - it's no accident they have good products. The Leader 120 is available at Gearbest here and FullSpeed RC here. It sells for anywhere between $100 and $130 depending on sales, discounts. So what have I changed in the last year? FPV system The Leader 120 ships with a VM2751 CMOS AIO cam and while ok for a whoop I don't think it does the Leader 120 justice given the speeds you can move at. I cannot emphasise enough how much an improvement the FPV system makes. Choose any camera you like, mine happens to have an HGLRC elf as that is what I had available at the time. Now there are many options, my personaly favourite is the Arrow Micro Pro - a 4:3 CCD cam which has an excellend image and can often be had for $20. For the VTX I personally use the Fullspeed FSD-TX200. This has proven to be an excellent long term reliable vtx that mounts easily to the back of the camera. There is no smart audio but then again you can get it for only $11. If smart audio is a must for you I'd recommend FullSpeed's new FSD-TX600 or the AKK FX3 ultimate. I've made a full article on the install here but with one recent change that has made this much more robust (see picture below).
Receiver You may have a receiver already but if not I'd recommend the Fullspeed model. They are less than $10 each and are available in DSM or FRSKY. More importantly they weigh less than 1g so help preserve the lightweight aspect of the Leader. Another thing I really like about the Fullspeed nano v2 receiver compared to the FRSKY XM is the fact that RSSI (control link strength) is enabled on aux 5 by default for immediate use in betaflight OSD. Frsky XM and XM+ receivers need to be flashed for this functionality. The Fullspeed FRSKY Nano V2 is available from Fullspeed RC, Banggood or Gearbest.
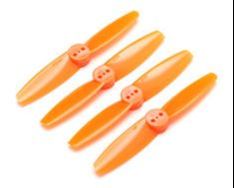
Propellers This is a personal choice. The stock 2.8" Kingkong 2840 props are fine but power hungry due to weight and pitch on 2s and almost unusable on 3s. Probably the best alround props is the Gemfan 2540 (@Bangood, @Gearbest) which offers the benefit of grip as in the stock props but at a much better efficiency with marginally more noise as reviewed here. Another option is the Gemfan 3025 twin blade (@Bangood) trimmed down as detailed here. These offer better efficieny again with but with less top speed. I got 9 minutes of flight when using a new 950mah 2s on these props... full review here.
Software Now running betaflight 3.4.0 which is release candidate at time of writing. Best features for me? Improved filters and much wider PID tuning window. I especially like the throttle limit options that are tied to rates as I think all I get between 90-100% throttle on 3s is noise with more current draw and very little increase in power. I believe my leader originally came with 3.1.7 Low pass and dynamic filtering has improved dramatically since then. Conclusion 1 year on the Leader120 is surprisingly relevant with a few minor mods. Don't forget that Fullspeed have made minor tweaks throughout the life of this quad - 20a esc upgraded to 28a, FC upgraded with better board layout, UART access and improved BEC. No one has really got a comparable lightweight 2.5" ready to fly that compares - the shift to 1105, 1106, 1107 and even 1108 motors on 2.5" have changed flight characteristics and durability for the worse. Even the Skystars Bolt 120 which looked like Heir to the throne with 4s capbility felt like a porker to fly. Enjoy this quad if you have it and upgrade at you leisure or not at all. Plenty of options on this community favourite. Parts mentioned here:
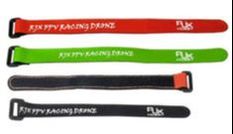
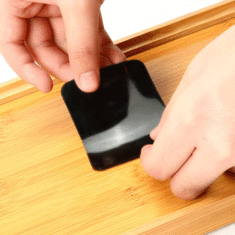
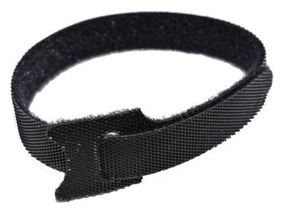
I'm yet to find a decent battery strap for a micro. So far I've been making do with the crappy velcro ones with come standard like in the picture below along with the nice silicon pads I've already reviewed. On tough crashes though I still get ejections which makes we worry about lifting a battery pad off the ESC.
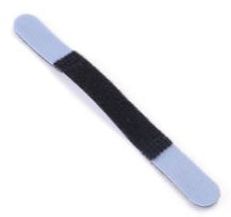
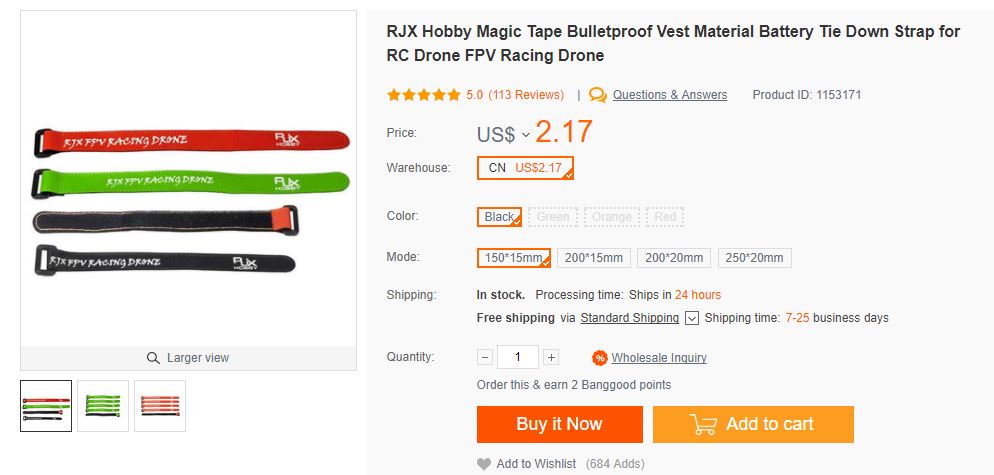
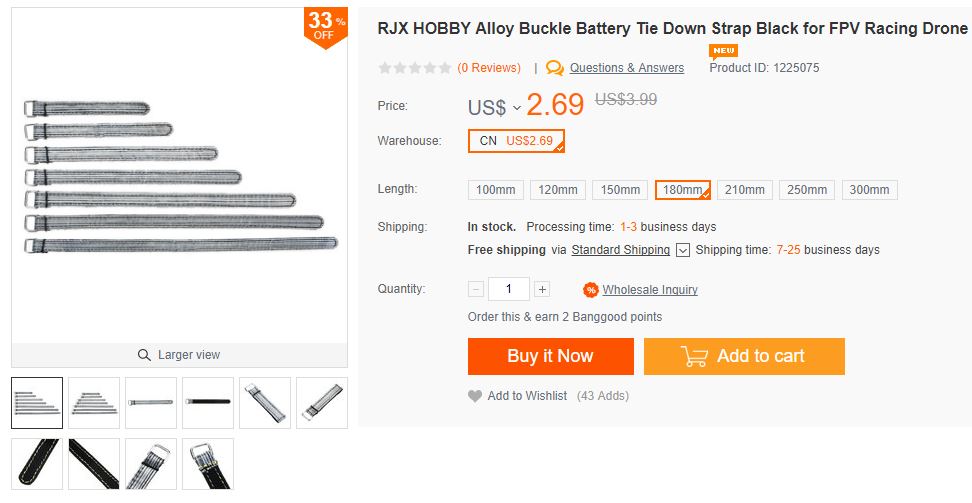
The problem with micros through is you need a skinny strap that will fit between the standoffs underneath a 20 x 20mm esc AND a plastic or metal return feed clip that really allow you to tighten the strap down. The stock one for the baby hawk works but only for very small batteries - 2s 300mah and smaller. The standard 20mm wide ones I use on my 5 inch quads and have heaps of are just too wide (and heavy). Another option is to use a rubber band like Albert Kim which is lighter but doesn't have the security of a good strap. Other than a few boutique options like the airblade UAV strap that Nick Burns has a bulk supply of, there is very little available, especially outside of the US. Thank goodness there are a range available now supplied by RJX hobby in varying material such as nylon, nylon with metal strap and Kevlar. Most importantly these are available in 15mm wide variants which is perfect for quads that are 3 inches and smaller. The best all round one I have found that is also the cheapest is the 15mm wide x 150mm long one here. This fits on both my leader 120 and Furibee X140 and will accept down to 2s 300mah and up to 4s 850mah. The nylon version is currently available for just $2.17 on Bangood. If you are one of the high-roller types you can also also get an alloy-buckled 12mm wide version for an eye-watering $2.69. There are a range of lengths available so order several or just measure first but make sure you get the 12mm or 15mm wide variants as listed here.
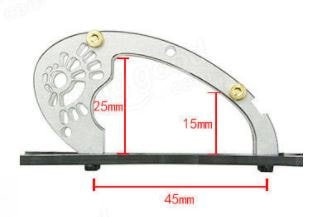
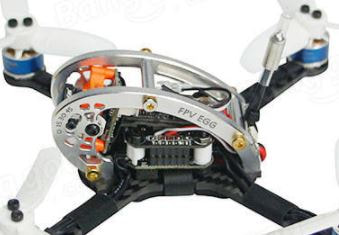
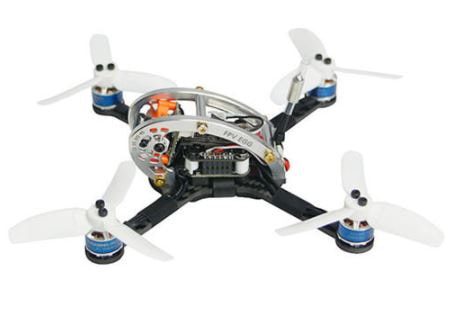
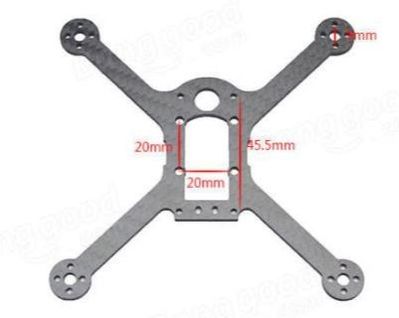
These straps won't make your quad faster or give you a better FPV feed but will give you greater peace of mind knowing that in a crash you are much less likely to eject your battery and potentially damage your sensitive electronics or even lose your battery. Get them here: 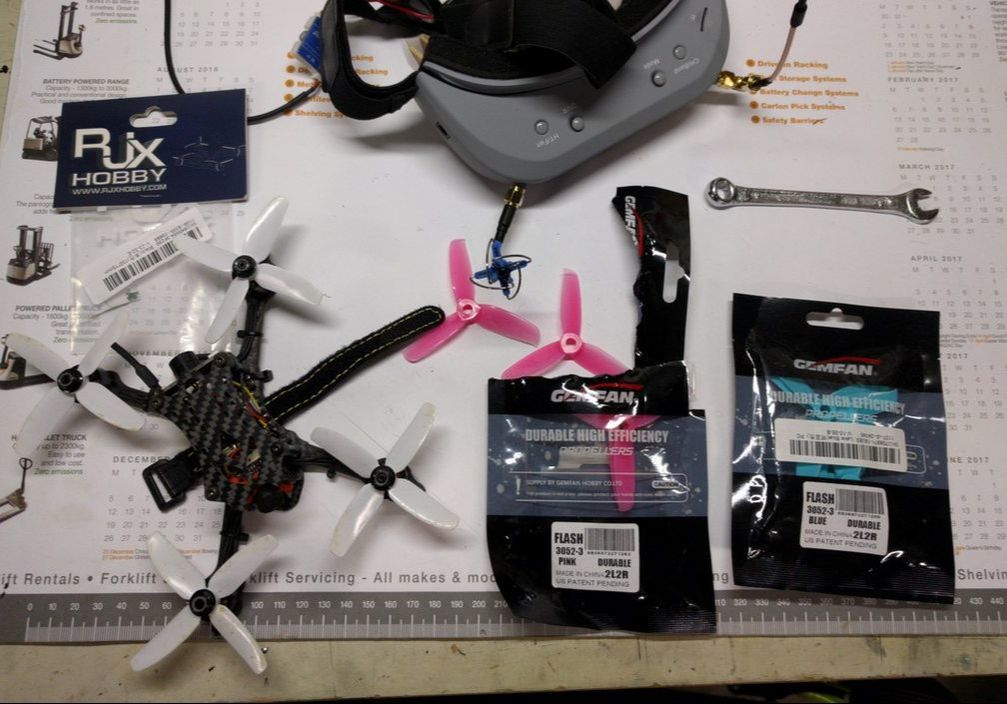 That strap tho! 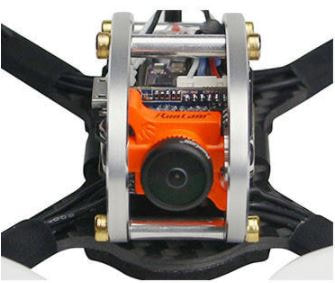 The Fly Egg 100 and 130 are 2 popular micro quads although like many other micros they have only have a cheap CMOS camera for FPV. The Swift and Arrow micros have been simply fantastic as an upgrade for micros like the leader 120 and I've covered that upgrade recently for that model. It's much harder with the fly egg series though because there is only 15mm between the sideplates of the frame where the camera sits which is too narrow for the width of 19mm micro cameras. Modding is near impossible because the frame cannot be drilled for a wider mount and it is too far for the side plates to stretch to accomodate. Now there is a new solution. King Kong have just released the FPV Egg 136 which is 4mm wider to allow for the micro swift. Although the complete frame is available for $23, I believe you can just get away with purchasing the new 136mm bottom plate only for $8.63 (less than $8 if you use the code "toysho"). This way you can recycle most of the parts from your fly egg 130 or 100. There are some caveats however.
Considering how compex the previous solutions were though, this will be a breeze or you could just take the path of getting the new frame with all the correct hardware. The good news is that since the fly egg comes with a good variable power VTX that is not piggy-backed to the CMOS, it will easy to re-use with the new camera. Also good is that the Micro Swift 2 and Foxeer Arrow 2 have a basic VBAT OSD and this will be a huge improvement to the OSD-less fly egg 100/130. I have a new 136mm bottom plate on order and will update here when I've mounted the micro swift 2. Here are the parts I've discussed in the article, click on the image to take you to the product:
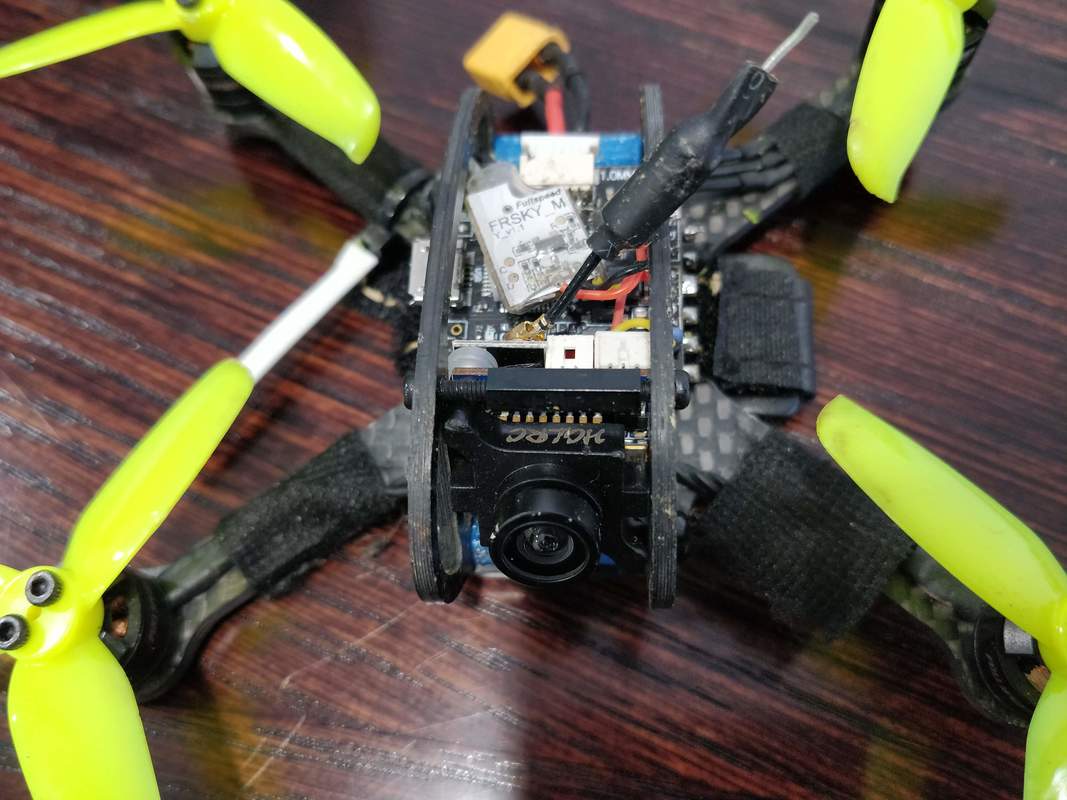
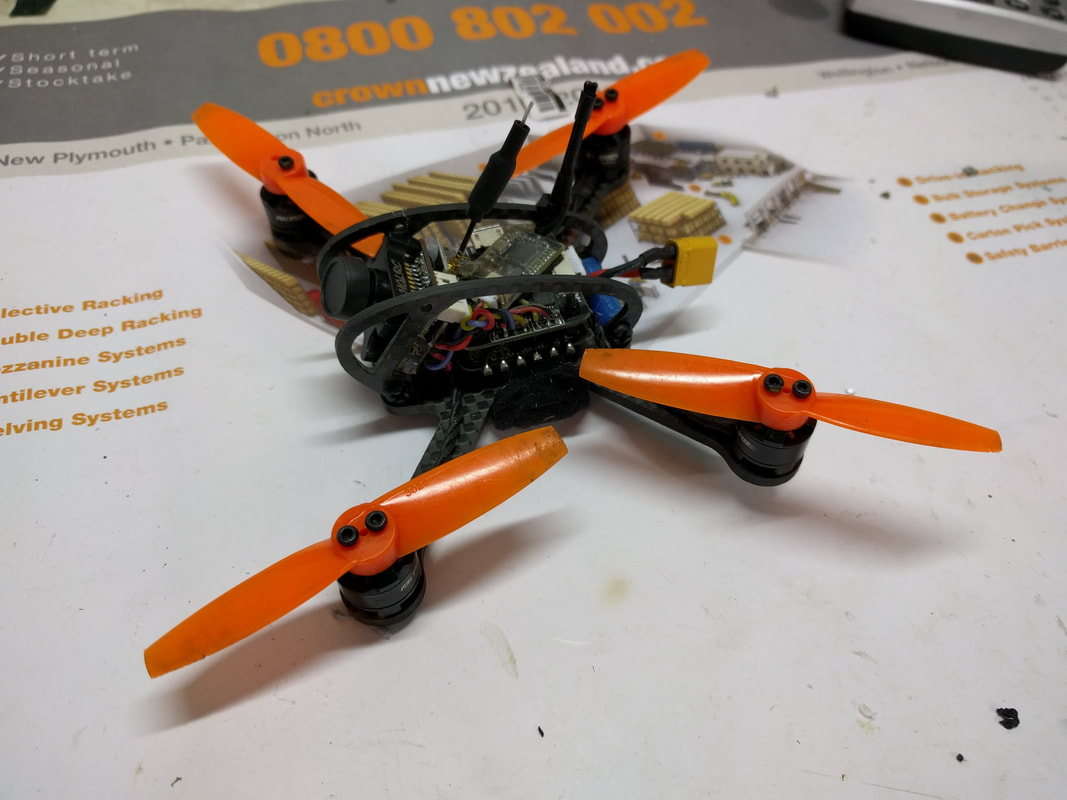
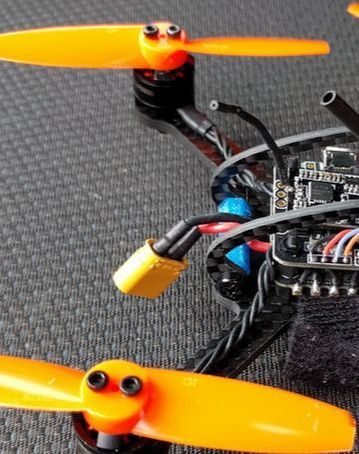
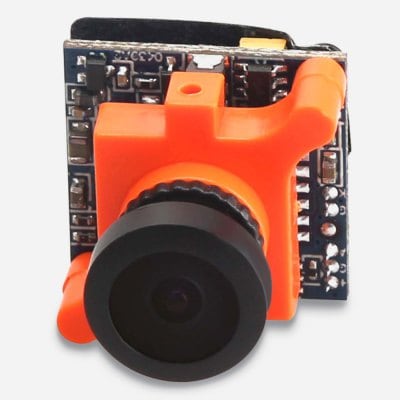
 The Leader 120 is my favourite micro quad but manufacturing to a price point has meant that although not uncommon, the camera and VTX leaves something to be desired. I found that although it handles light well for an AIO camera, it is poor compared to a CCD camera meaning flying in an out of dark areas can be challenging. Additionally the VTX is limited to 25mW so total distance before video breakup is not fantastic, especially around trees or other obstacles. I used a micro CCD camera (in this case the camera from the HGLRC XJB F428 Elf) and the new Full Speed TX200 VTX as a way to replace the AIO camera/VTX supplied as standard. A full review of this setup is here so that I can use this blog to give details of the install specific to the Leader 120. Update: Gearbest sell a clone of the micro swift which is identical to the HGLRC Elf - the Furibee 1672. This performs just the same as the other micro CCD cameras - micro swift, arrow, HGLRC elf. Update 2018: The foxeer micro arrow pro is now the best value and performance micro CCD camera at around $20 For my first attempt at the install please see the captioned pictures below: Unfortunately with this setup I had digonal lines in the video feed that were made worse when the quad was armed with increasing breakup when throttle was increased. Since this VTX will happily accept 5-17v I supplied power from VBAT rather than using the 5v BEC circuit on the flight controller. This immediately fixed the issue for the minor inconviniece of having to solder additional wires to the VBAT pads. This did however offer the advantage of less stress on the BEC circuit and less risk of brownouts as a result, especially when running on 200mW transmitting power. You can read my conclusion in the review but to summarise a micro CCD is a must have on the Leader 120. Having to use Vbat due to noise on the flight controller 5v circuit is a minor inconvience but the improvement on signal compared to the AIO camera, even on 25mW is really impressive and running on 200mW opens a whole lot more flying opportunites with much better penetration though trees for example. The additional depth the VTX adds to the camera (meaning the top standoff cannot be fitted) is mildly annoying for the leader 120 but realistic. I thought it would be hard to top the Eachine VTX03 but the tidyness in piggybacking to the camera and ability to do it's own 5v regulation wins it for the TX200. Parts mentioned: Update 2018: I forgot to mention this does rely on being held in by wedging the camera between the sideplates but since then I've found a better free solution below:  I trimmed a standoff by approximately 5mm and used longer screws to torque the frame together. This is much stronger and more secure than my previous install. Note: the caddx cameras are a different shape and you may be able to install without trimming that standoff
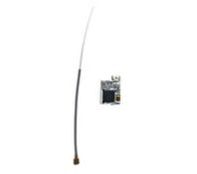
 On my lightweight x2 EYAS (updated build link here) build I use an Eachine TX01 All In One (AIO) Camera/VTX. Stock, these come with a basic Circular Polarised (CP) antenna that works well but is heavy and more importantly: not very durable. This is because the antennas are left fairly exposed on micro quads. More often now, AIO camera/VTX modules have linnear whip antennas that are much more durable, lighter and still get you about 90% of the performance of the CP antenna - much more practical in the real world for micro. Linnear whip antennas are actually a sleeved dipole where the outside sheild of the co-axial cable is grounded. The exposed centre transmitting signal is then exposed for a VERY specific length that should be tuned to 5.8GHz which in most cases is 12.9mm for a 1/4 wavelength of 5.8GHz. Albert Kim did an excellent video here and found that most whip antennas have the wrong length. Great! Easy to cut if they are too long, hard to fix if they were too short. Well the 10 spares I had were too short!! To fix this I tried the trick that my flysky FS82 and RX2a pro receivers use - a basic monopole antenna. This is a simple 28AWG wire (or any other small gauge wire) soldered directly to the signal line of the VTX with nothing on the ground pad. The wire is then cut to precisely 12.9mm, then heat shrunk over the top to relieve stress from the joint. Result:
What I see now is that the main reason for a dipole whip is to elevate the signal out of the frame where the AIO camera/vtx is enclosed. However, when the camera is mounted high like on my EYAS X2, it does not give any benefit and so the ghetto monopole antenna works just as well. Relevant parts:
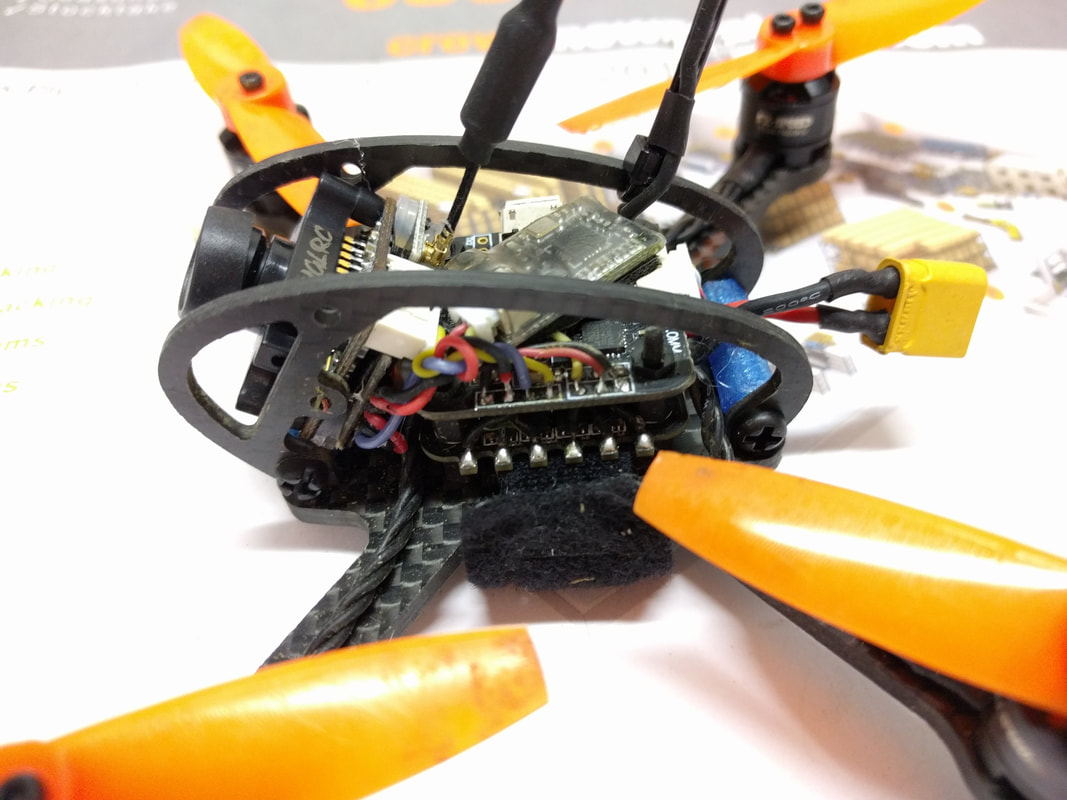
Quick follow up 10 months later and this continues to work well. I've now done the conversion to 4 AIO cameras with no ill effects. I've even done this on a FullSpeed tx200 piggyback vtx (review here) that is attached to the back of a runcam swift and no longer snag and lose the dipole. A really useful mod that has stood the test of time 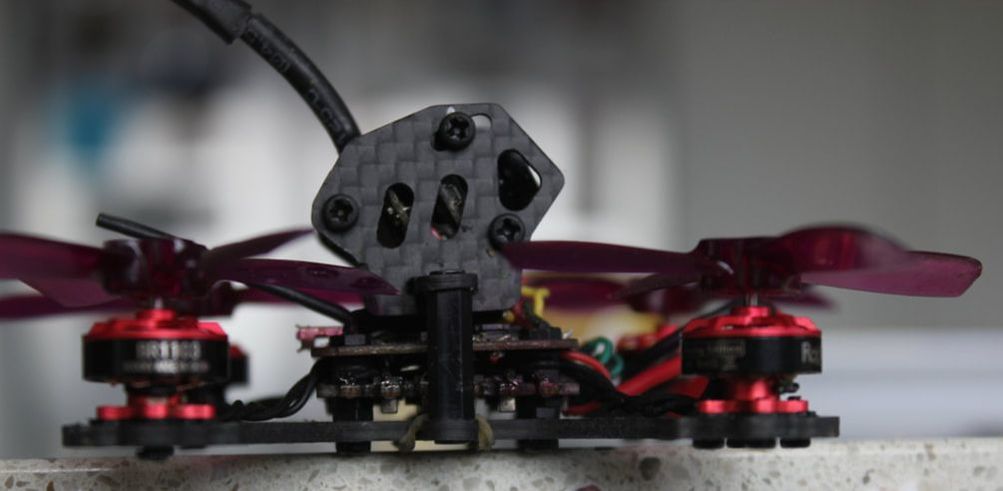 Problem: a standard FC/ESC stack is too tall and heavy.
A 20 mm x 20mm 4 in 1 ESC and flight controller is the backbone of most micro quadcopter builds. They are usually joined together by m2 nylon standoffs in the middle and bottom that are about 6mm tall each. This can be too high for some builds but there is an easy fix that can even include some basic softmounts. Here are the parts you'll need. They are not expensive and can be used for several builds:
To make the low profile soft mounted stack:
Voila! now you have a low profile stack that is lighter and soft-mounted. After a big crash recently I find it is much stronger too as it relies on the tension of nylon rather than shear. |
Archives
November 2020
Categories
All
 |
|||||||||||||||||||||||||||||||||||||||||||||


 RSS Feed
Thanks for visiting QuadifyRC.com Follow us on facebook below to get all the latest updates