 Introduction In order to run 2s, the Mobula 7 comes standard with 2 x PH2.0 connectors that allow you to run 2 x 1s batteries in series. When running in series the strength of the connection is determined by the weakest link in that circuit. The strength of connection determines the maximum current that can pass and the voltage drop that results. Although it works this system has a very low current overhead from a design perspective - 2 x budget PH2.0 connectors with the dreaded 'folded' pin and very lightweight 26AWG wire. All this adds up to a lot of voltage drop when even reasonable current is pulled - something all will be familiar with on the mobula where you see voltage drop to scary levels (6v and below) during punches even when you have a full battery. Although it recovers almost immediately it does mean you don't get access to the battery's full voltage potential. This is the second article in my series of HappyModel Mobula7 upgrades, many of which can be used for the Trashcan too. Also to come are:
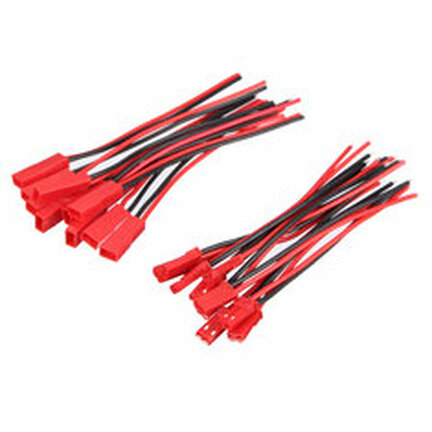
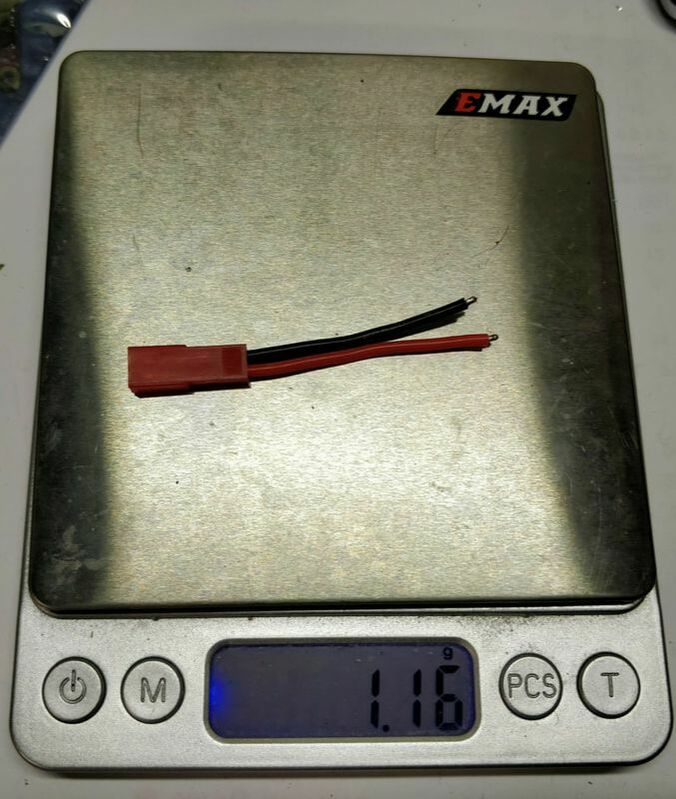
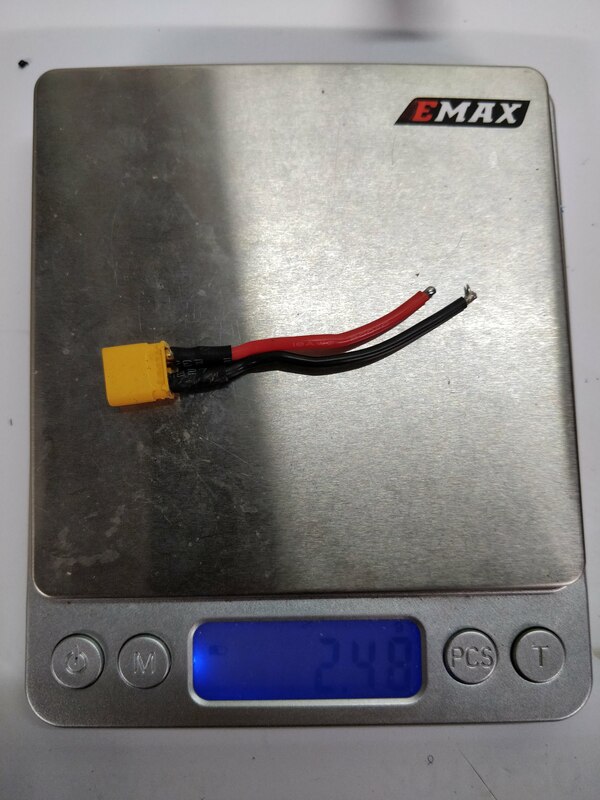
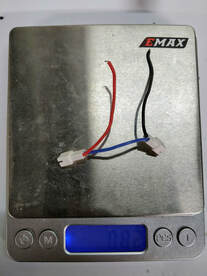
Why not XT30? I'll address the elephant in the room - short answer is weight. The JST connector is lighter than the XT30 and has plenty of overhead on this quad considering it only has a 4x5a ESC (20a max). I've also had history of using both on my larger 1.9" ultralight build before too and the JST was not left wanting. The only reason I would go to XT30 over the JST in the future was if I needed more durability. (photos to follow shortly comparing weight)
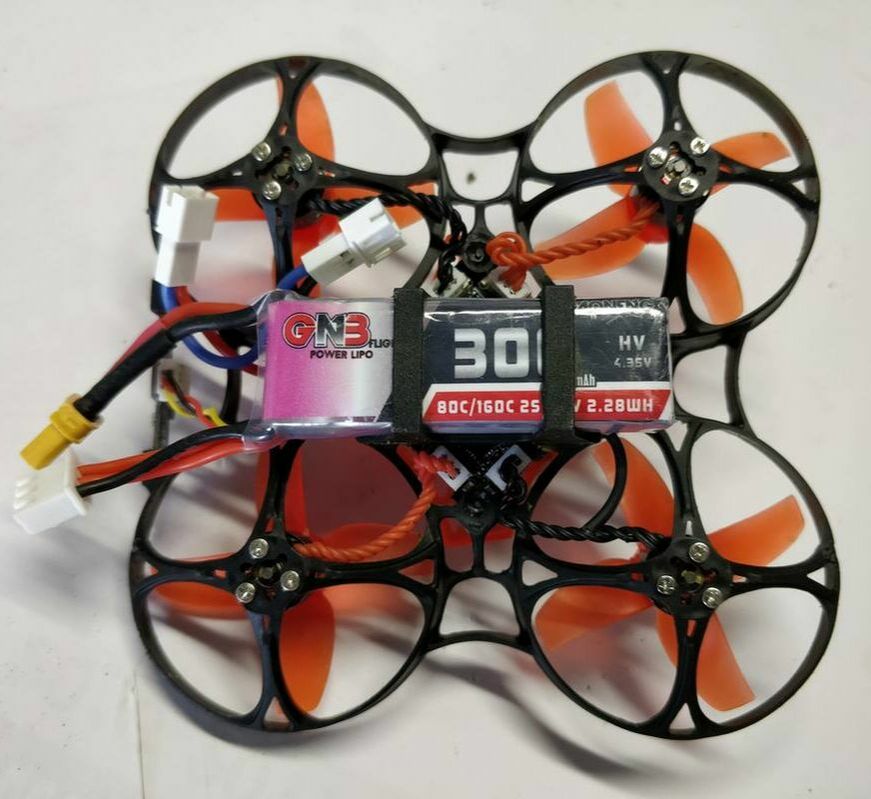
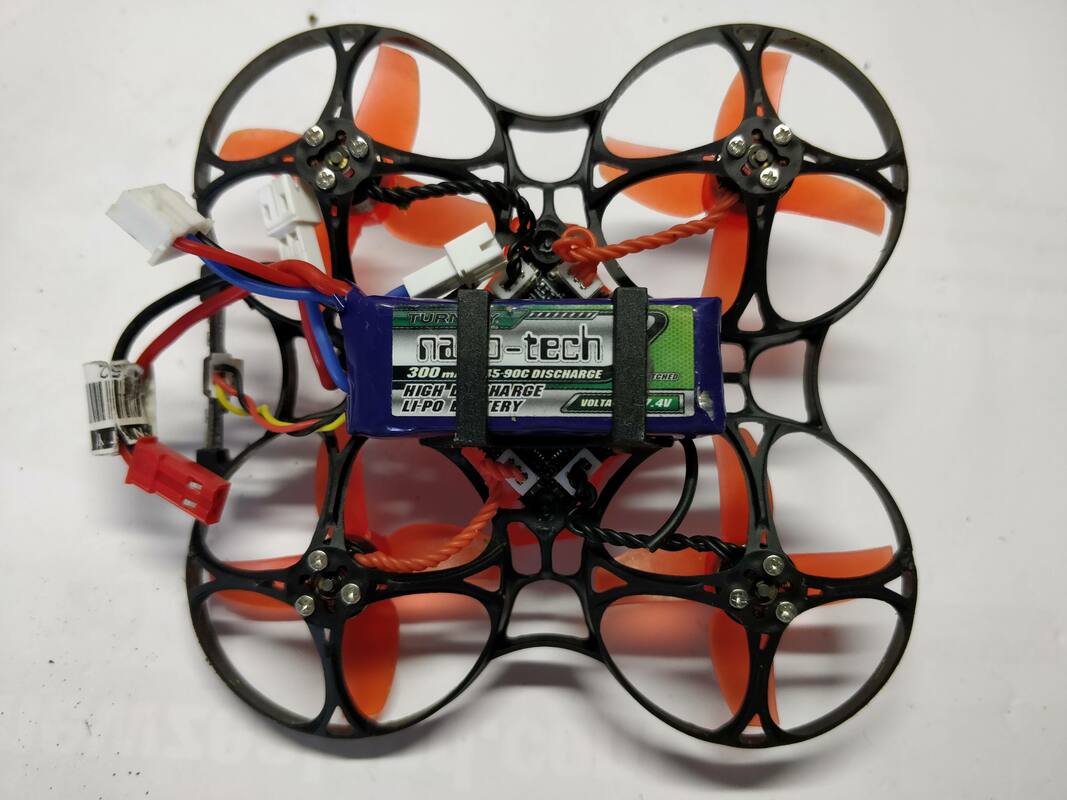
New batteries Going ahead with this mod means you'll no longer be able to use 2 x 1s batteries as before unless you make a harness of female JST to 2 x series PH2.0 I'd strongly recommend against this though as this adds weight and a lot of extra resistance. Assuming you have upgraded to the Eachine trashcan/mobula v3 frame as covered here (which is honestly the very first mod you should do) then there are 2 batteries I can strongly recommend:
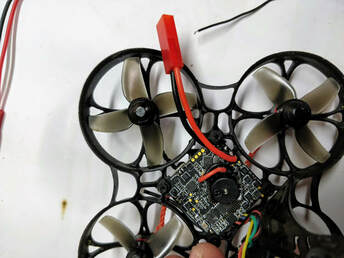
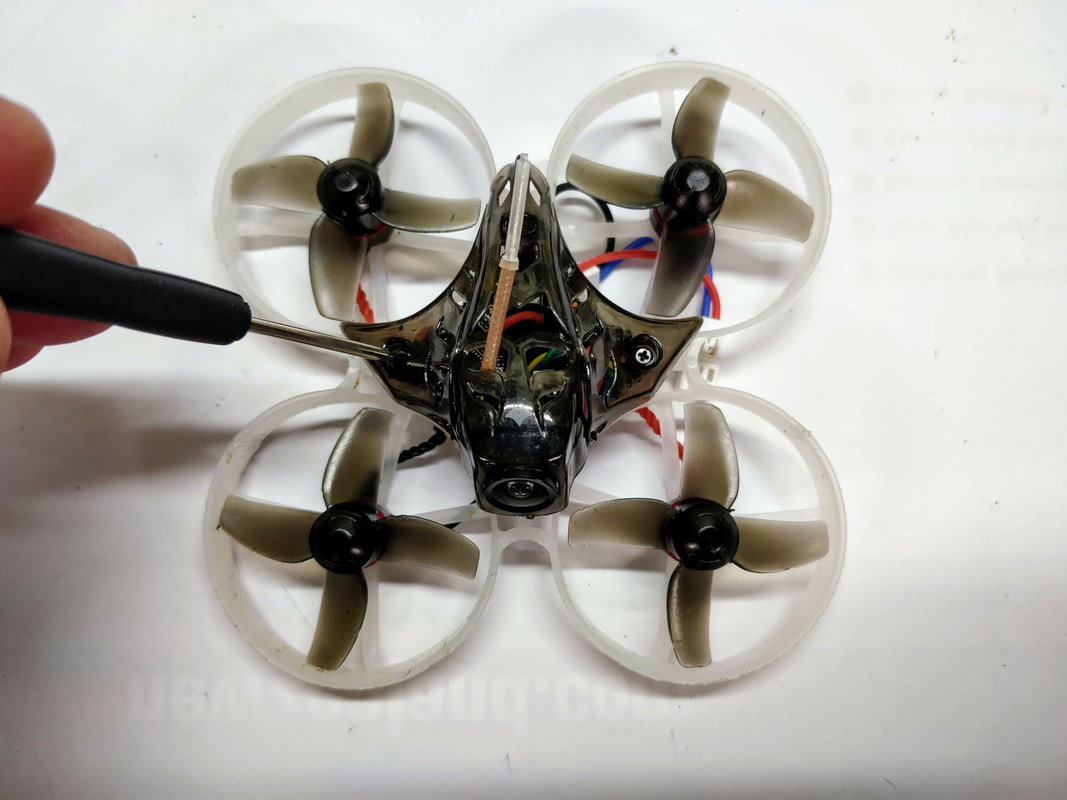
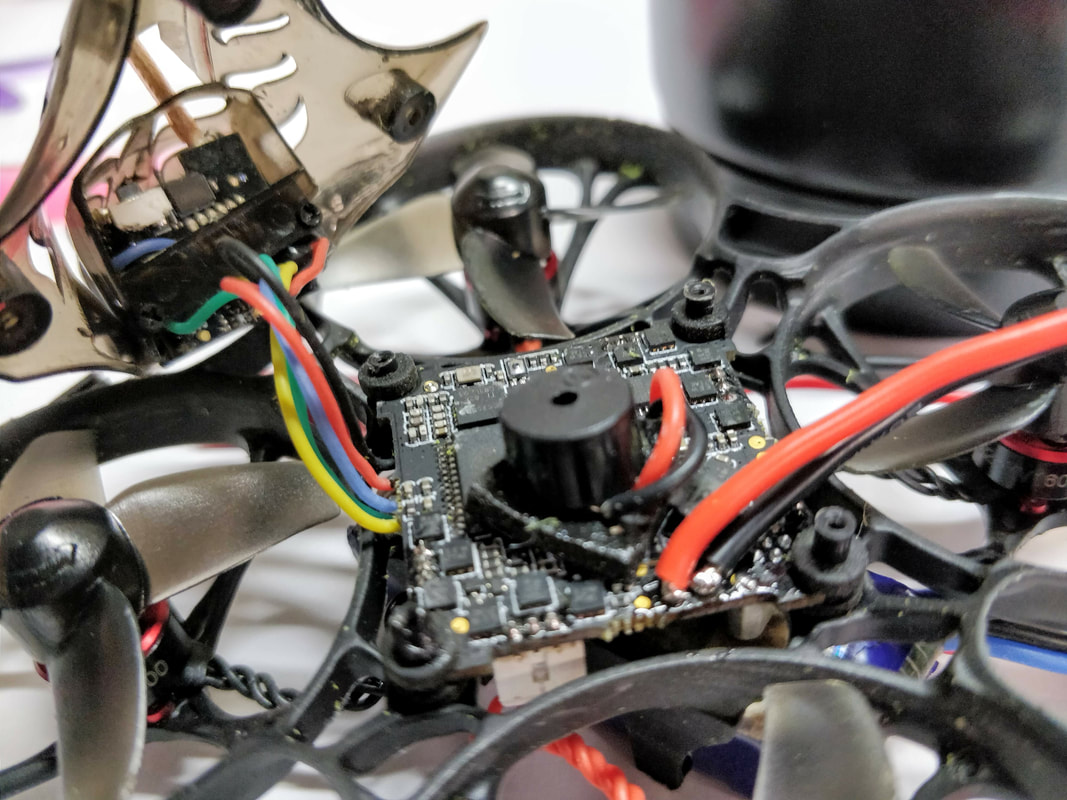
If you do not have a balance charger, you will need one to charge these 2s batteries or ay other multicelled lipo battery. I use the hobbymate pro 2 duo (reviewed here) - a little more expensive but so versatile. What to do with you 1s batteries you have left? I have an article coming to show you how to convert these to proper 2s batteries you can use with this new connector alongside the GNB or nanotech batteries. How to install Before I launch in with pics and steps I'll say although quick this is a fiddly install only because the solder pads are small in relation to the wires you will connect to them. I do have a method to confirm everything is safe but you have been warned!
Conclusions I probably spoiled the suprise earlier but this mod is well worthwhile. I skeptical but really pleased to find the standard battery sag issue was instantly improved meaning I didn't have to guess at how much battery I had left as before finishing my flight. In addition I seem to have access to more power more quickly meaning response feels snappier. Also on long punches thrust seems to remain more consistent. If you have a good soldering iron and are a confident solderer I'd definitely recommend this one, particularly if you are running the v3/trashcan frame. On my year old 2s 300mah turnigy nanotech batteries I got just over 3 minutes of hard flying in a large area. During that time voltage did not dip below 6.8v and then only toward the end. Compare this to dips below 6.0v with the original setup in the first minute of light. This large voltage drop is less to do with the battery and more to do with the poor connection on the original setup hence the improvement to power. As a side bonus this should mean power will be more consistent to the VTX and receiver as well for more consistent performance. All in all I can recommend this mod but stick with the 22AWG wire and bear in mind the change in battery requirements. Up next - easiest way to reverse motors (props out) without using BL_Heli Suite If you found this article useful please feel free to like or share, the facebook links below directly link/like this article. Links are affiliated and help me buy the bits I need to produce this type of content. 
21 Comments
JP
22/3/2019 09:14:10 am
Great mod... What voltage are you displaying on your OSD in the video ?
Quadifyrc
23/3/2019 11:19:16 am
Thanks! I use average voltage that divides total battery voltage by the number of cells. Gives me an indication battery level regardless of how many cells I run. Makes it easier when switching between 1s, 2s, 3s, 4s and 6s
Dex
25/3/2019 04:48:06 pm
I've seen people getting the 5v regulator burnout with the xt30 mod on the trashcan. Do you think the HV batteries also contribute to this. I'm gonna go jst I think
QuadifyRC
28/3/2019 12:12:46 pm
HV batteries shouldn't affect it. Cheap regs burn out when they have too much demand on them (like an external receiver or higher VTX output) but also go on their own too. XT30 connection is probably just an unhappy concidence when you start asking more of the system. IMO JST is plenty for the mob7 or traschan. XT30 is better but I don't like the weight penalty
JP
22/4/2019 09:28:13 pm
I did this mod with 22awg and a jst connector. I used a headband loupe as the soldering here is tiny! The difference is amazing. The voltage drop from 4.2 down to 3.2 feels very linear and the overall feel of this whoop is now great. Also made a harness out of the left over stock connector but the performance is not great. Think I'll be binning the harness and 1s batteries. I bought the turnigy batteries and I'm getting about 4 mins with moderate flight and just over 3 when I push it!!
Quadifyrc
25/4/2019 03:37:39 am
Nice one JP. Those nanotechs are great for the $ and available pretty much worldwide. Don't throw the 1s Batts out yet, I'll be writing up how to convert to 2s soon
Jasson
23/4/2019 11:22:44 am
very nice mod, I just change to xt30 connector it flies great, I am interested in the convert the 1S to 2s pack lipos for the mobula.
Quadifyrc
25/4/2019 03:38:42 am
Balance connectors arrived today so hope to be doing this tutorial this weekend 😁
Funs
25/4/2019 08:43:31 pm
Thanks for the great info. Would modifing the ph2 connecter with thicker wire also give the same results? Or perhapse to connecter terminal and battery wire will be the bottleneck. Not sure if it is even possible. Looking forward to modifing 1s to 2s tutorial, since I bought 20 1s batteries for my mobula.
Quadify RC
13/6/2019 10:22:08 pm
Sorry for the late response. If you had the right PH2 (solid pin) it is possible but they are rated for lower current than the JST. I think JST is the minimum you'd probably want to use. If you haven't see it already the battery tutorial is live :)
Josh
12/6/2019 11:33:35 am
What charging board do recommend to charge the JST connector batteries?
Quadify RC
13/6/2019 10:24:59 pm
Hey Josh I use a parallel board like this: http://bit.ly/2X6XVI3
Brent Van Blerk
7/9/2019 09:21:49 am
Great work !! What about using the Emax TinyhawkS Spare Part 2S 7.4V 300mAh 35C Lipo Battery - it as a PH2.0 connector? No need to do any changes :)
Quadify RC
9/9/2019 12:48:41 pm
Thanks Brent! It certainly is a clean option but still doesn't address the fact that a PH2.0 connector is pushing it's ability to supply enough current at full throttle.
Mister G
27/9/2019 04:20:15 am
Finally I got all the bits and pieces toghether for doing the mod. One question though about connecting to the board. In step 4 you mentioned that it is easy to bridge and you should verify with a multimeter. Shouldn't it read 0 IF you have done bad and bridged the connectors, because there is a continuity flow? So if you did everything right it should read 1, right?
Quadify RC
3/12/2019 09:54:21 pm
Yes, I think they are a better option than the JST now for the Mobula7 or similar. Hopefully 3rd party manufacturers pick these up and offer at a better price than what Beta are currently selling for.
steven mazza
28/9/2022 06:57:20 am
Thanks for the article! I have a Mobula 7 1s. It did not come with the PH2.0 nor did it come with two connectors. Am I looking into this for the wrong model? My quadcopter batteries die out on punch then recovery like you mentioned. That and the flight time stinks....
QuadifyRC
29/9/2022 11:22:03 am
Hi Steven
Nick
17/10/2022 11:49:13 am
I’m not sure I’ve done the correct thing for my Mobula 7 HD!
QuadifyRC
21/10/2022 10:35:39 pm
If you want to be safe, stick with 2s on this board Leave a Reply. |
Archives
November 2020
Categories
All
 |


 RSS Feed
Thanks for visiting QuadifyRC.com Follow us on facebook below to get all the latest updates