|
Part 3 of from our good friend Geoffrey Chan's 124018 build following on from the visual ans suspension improvements he made to his 124018 in this Stage 0 guide and Stage 1 guide. If you're on Facebook, pop over to the QuadifyRC group to discuss here with Geoffrey and myself A quick Recap: Geoffrey is building a special build from a WL Toys 124018, taking time to build the car that he wants. This is a very methodical build going deeper into each component and looking at many options. There’s a reason why this project car is called the WLC Racing 124018: several of the upgrade choices are sourced from the LC Racing catalogue and are a direct replacement. This goes to show how heavily “inspired” WLToys was with their 1/12 scale models. The parts mentioned in this article are also compatible with the 144001 and 124019.  Keeping in mind, my intention for Project WLC Racing 124018 has always been to build a reliable and fun bashing rig. I wanted it to be fast enough off road, but not have to worry about overheating or premature wear. A brushless upgrade was always in the plan for this car as this is the most significant upgrade to make on this platform that will most noticeably transform its performance QuadifyRC has written several brushless articles already and how-to articles. The steps I’m following to convert Project WLC Racing 124018 to brushless are pretty much the same as the Drop-In Brushless Upgrade guide, except with a slightly difference choice of parts. With the bigger 85mm diameter LC Racing EMB-MT tires I’m running, I wanted to have something more robust to handle the extra load. Using larger wheels has the similar effect as up-gearing to a 17t pinion. My intention was to run my setup exclusively on 2S. Running 3S in the 124018 didn’t seem like a good idea due to the space limited and airflow restricted body. Also, it is my opinion that running 3S on this platform is not ideal as it was never engineered to handle that much power and would result in premature wear and tear. See the article on 2s vs 3s in these cars if you want to read more on this. I prefer to spend more time out enjoying and driving my RC over wrenching and replacing parts all the time. The Brushless Motor 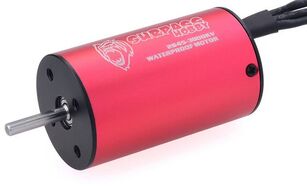 Surpass Hobby 2845 is available in many kV options Surpass Hobby 2845 is available in many kV options When looking for a motor choice I went to my first go-to resource for reference, directly to Mr. QuadifyRC himself. He graciously shipped the bigger Surpass Hobby 2845 motor in 3800KV and 4400KV to me directly as it would be up to task provide more torque to get the larger wheels moving quickly. Also, with the longer can size, the motor will have more surface area to dissipate heat. I opted for the Surpass Hobby KK 2845 4400KV for the below benefits:
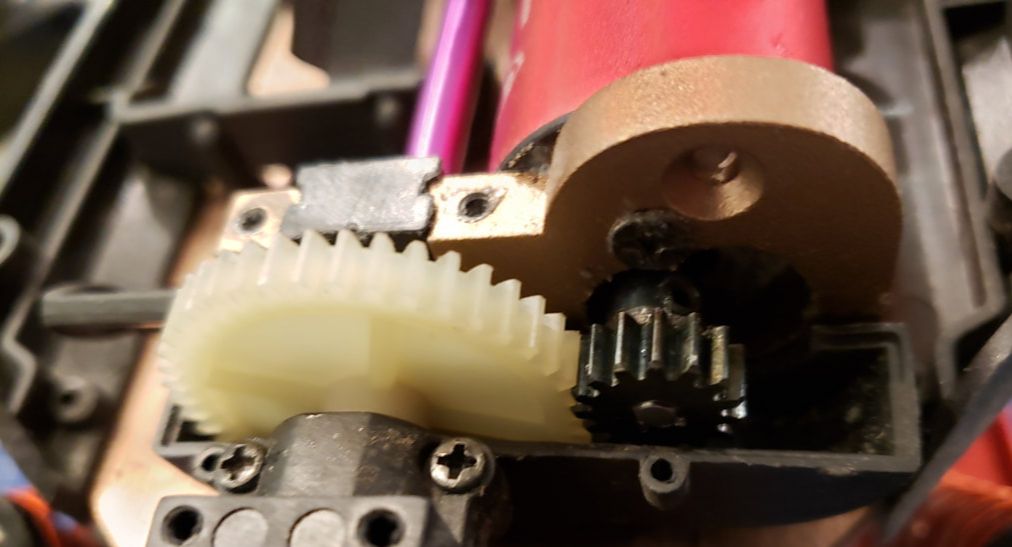
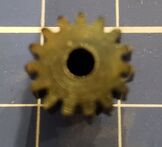 15t Pinion bored out to 3.2mm 15t Pinion bored out to 3.2mm I’ve opted to use the 15t pinion (available exclusively here: 15t M0.7 pinion gear) on my build for a few reasons. First, I wanted the build to be reliable and run cooler with the larger wheels, so the smaller pinion puts less load on the electronics. Second, I didn’t really want to slot the motor mount for this build because I preferred as much as possible to do a straightforward install. The shaft on the Surpass Hobby 2845 motor is a 3.175 diameter, so the only mod I needed to make in this case was to drill out the pinion from 2.3 to 3.175. Seeing comments from the community, I can understand why this is a daunting task for some people who don’t have the necessary tools or experience. This was my first attempt as well, but I took my time and it turned out perfect. I can offer the below advice on how to do this and get it right the first time (as much as possible)
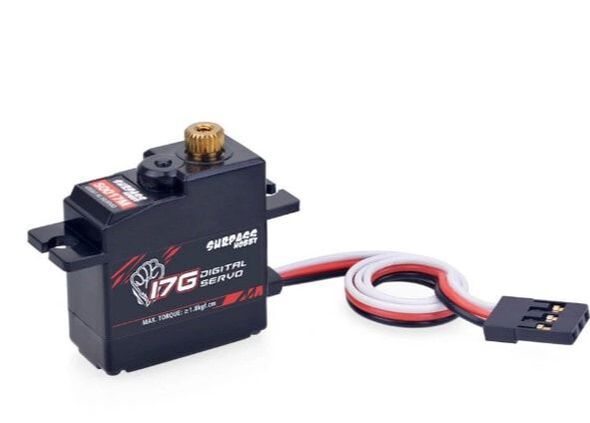
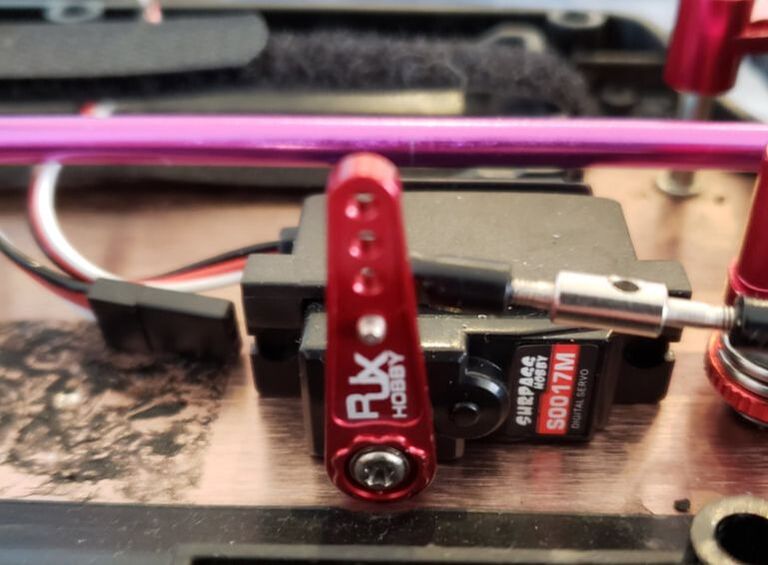
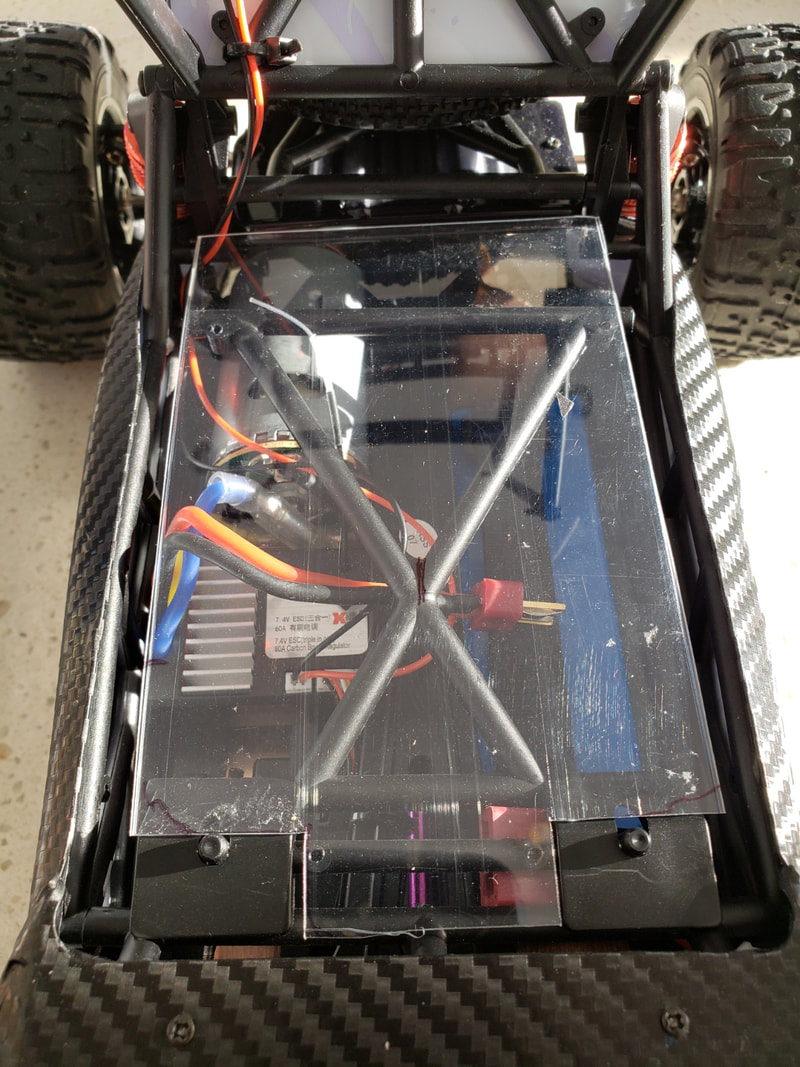
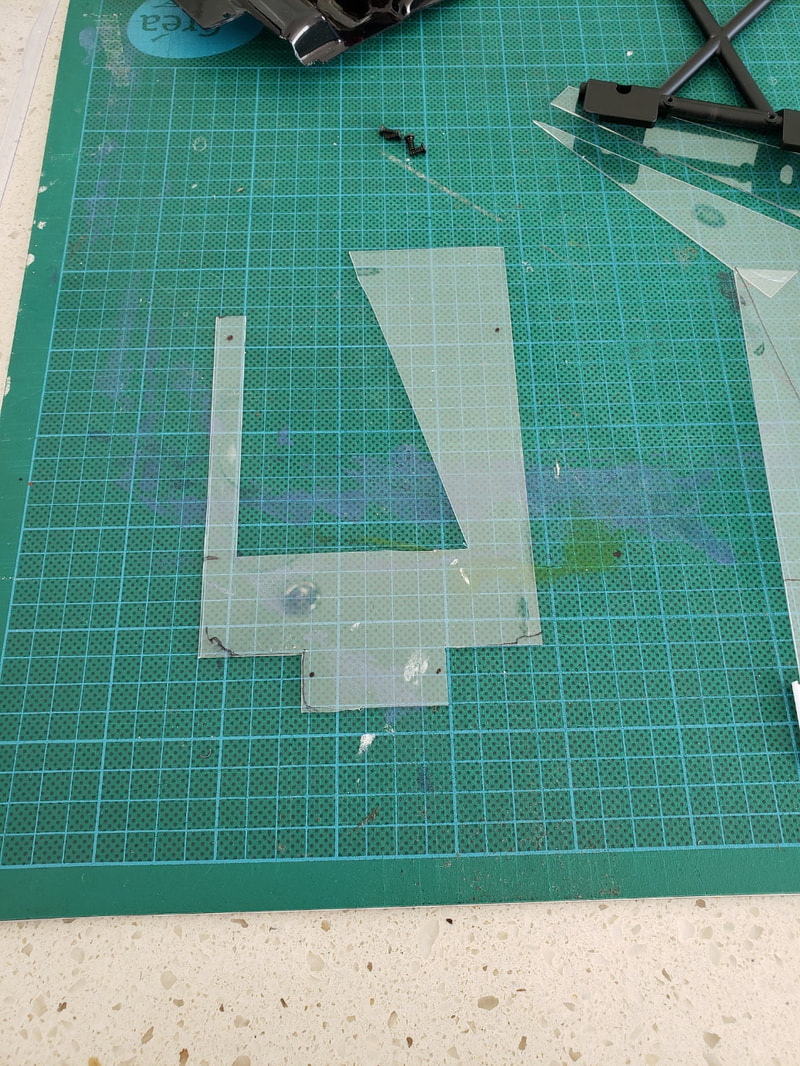
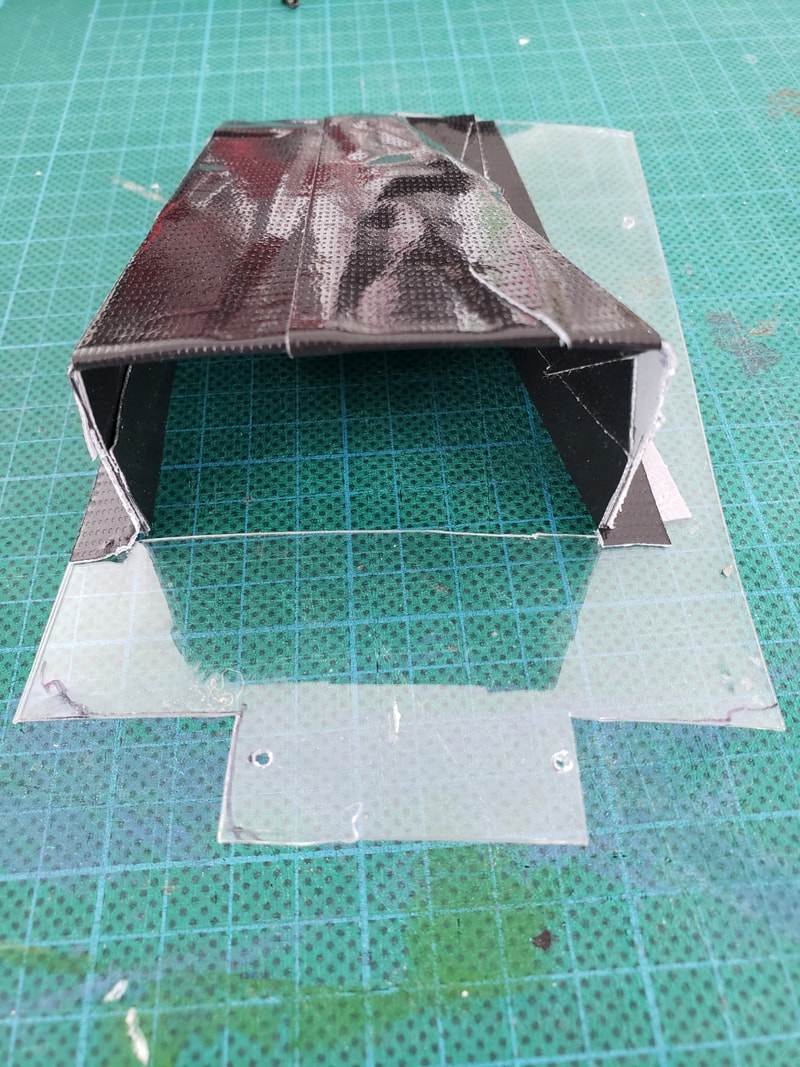
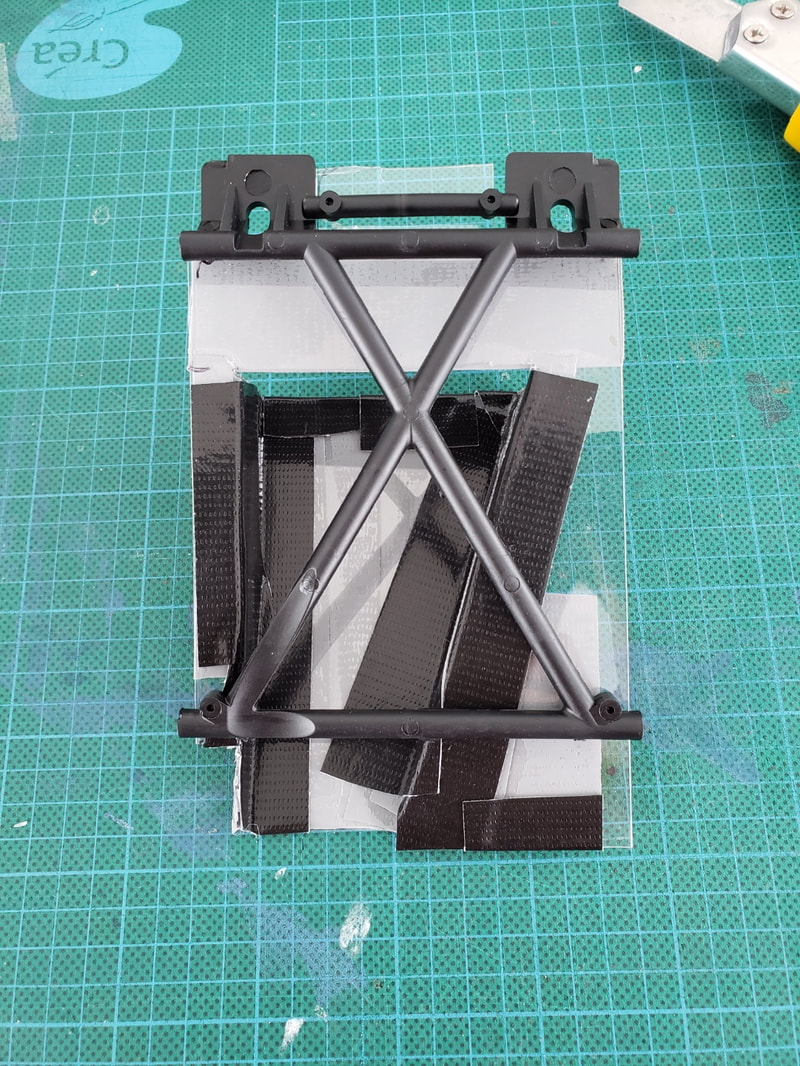
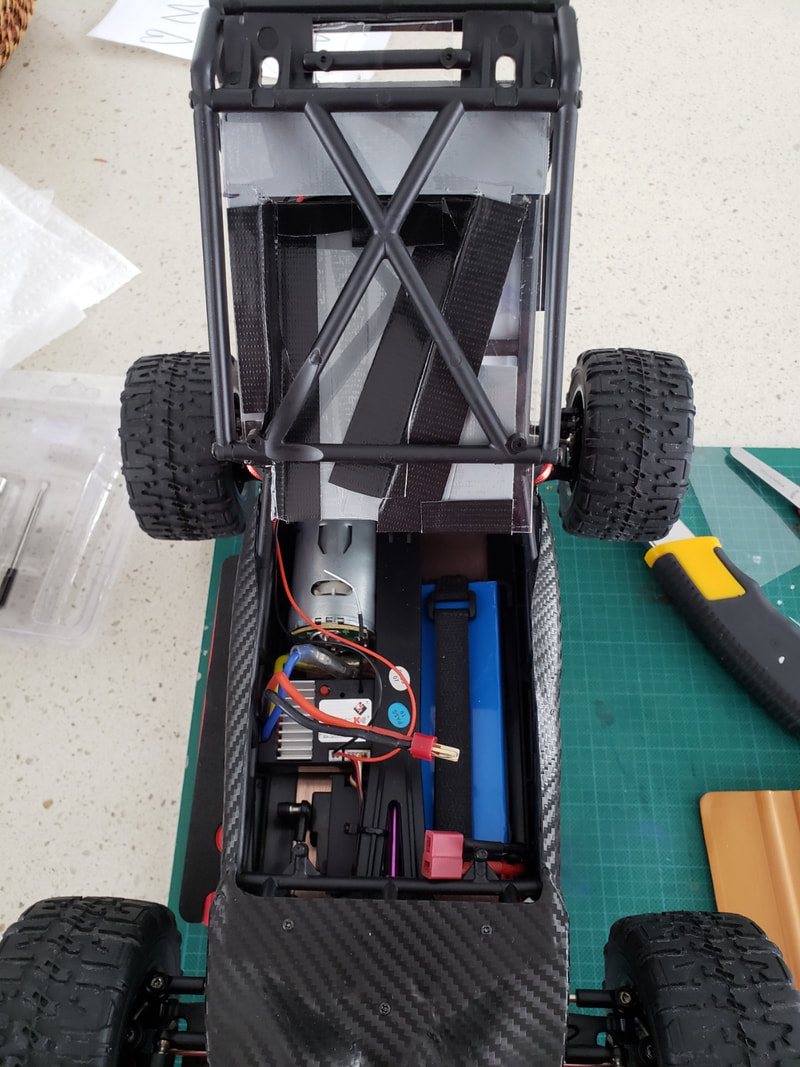
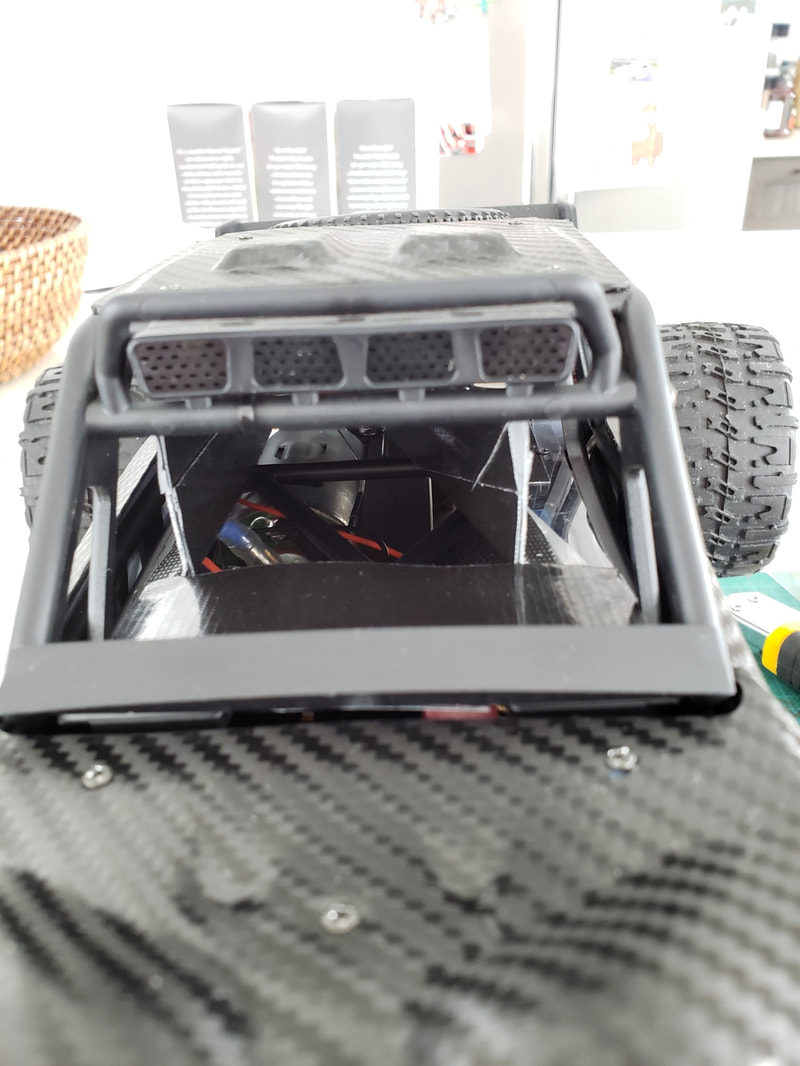
 The ESC Hobbywing ESC’s are one of the most trusted and popular ESC’s on the market for good reason. They are priced well and offers plenty of adjustability with or without a program card and have been quite reliable in my experience. LC Racing has been specifying them into their RTR cars for the last few years and I rarely ever hear of any issues unless it was mismatched with the motor spec. 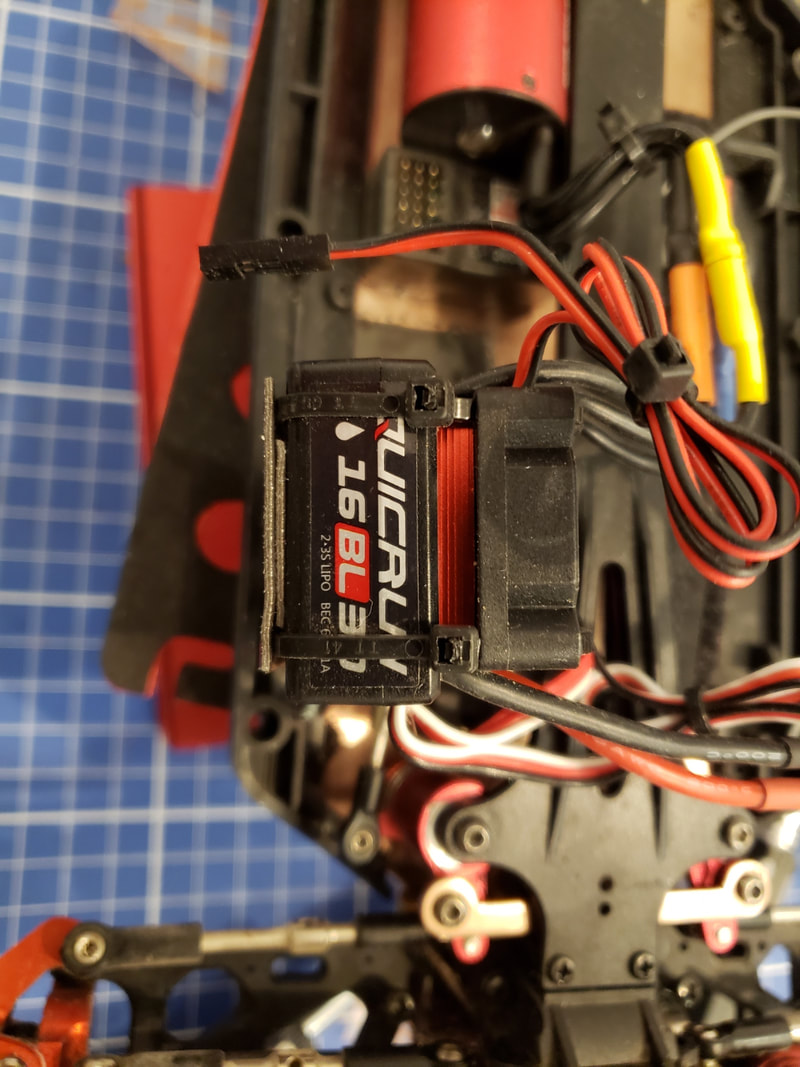 Working from the motor backwards, I decided to pick up an ESC that offered some overhead. According to the specifications, the 2845 4400KV motor has a maximum current draw of 80A. The motor isn’t going to be operating at 80A continuously, but this is still a spec to keep in mind when choosing an ESC. The idea of running the Quicrun 16BL30 crossed my mind since my LC Racing EMB-T uses basically the same ESC, but with a 2850 4500KV motor. Albeit, the LC Racing is geared lower compared the WLToys 124018 with the larger truggy wheels and tires, which are the same diameter as the LC Racing EMB-MT wheels I’m running. I had an extra Quicrun 30A ESC lying around, so I figured, why not try it out? I can tell you after a running a several packs through with a full throttle passes, that heatsink was hot but not quite enough to hit thermal cut-off. The 16BL30 is rated to operate at 30A continuously and handle a peak current of 180A. The motor was very likely drawing more than 30A on wide open throttle, but without a way for me to measure that, this is more of an estimate at best. But not wanting to just leave it as is, I opted to strap a fan onto the top of the ESC to provide a steady flow of air to cool things down. Two zip ties did the trick perfectly. The fan was meant to be a temporary solution until I received an ESC with more headroom. Surprisingly after a over dozen packs of bashing off-road (including grass), I have never hit thermal shut off at any point. I managed to completely drain a 2700mAh 2S lipo down to 3.2V accidently (I normally only go down to 3.8V) to hit low-voltage cut-off and still didn’t hit thermal shutdown at any point. I should say at this point that someone else’s experience with this setup may vary. It will depend heavily on driving style and the type of surface the RC is being driven. I am running my car on mainly loose gravel, asphalt, and short grass. When I do get to full throttle, it isn’t for longer than 2-3 seconds before I need to slow down to turn. This setup hasn’t created any issues for me so far, but it doesn’t necessarily mean it won’t hit thermal cut off for someone else. So please take this setup as not necessarily recommendation, but as a setup that has worked for me. I will continue to do testing to see how reliable this ESC is over time. The next logical step up would be to step up to the Quicrun 10BL60, which would likely be the most ideal solution. However, because the Quicrun 10BL120 was only $5 more at the time of my purchase, I would get the higher amp version because it has much more headroom to give some added flexibility to remove the fan and run it passively if I choose to do so. I would highly recommend using the 60A or 120A ESCs if a more robust setup is needed. 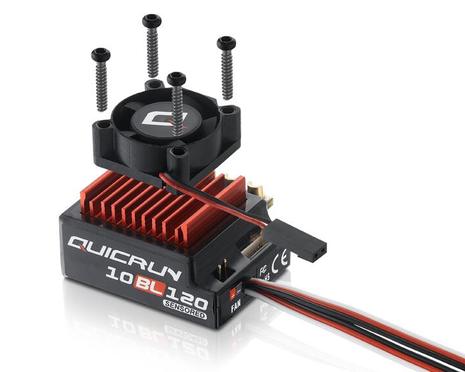 The Hobbywing Quicrun 10BL120 is a favourite her at QuadifyRC HQ Installing the bigger ESC will require moving a few things around. I will report back in a future feature if I decide to move to the bigger ESC. Also to note, the Quicrun 10BL120 requires soldering the leads directly to the ESC, so it is not as plug and play as the 30A option. Something to be aware of, but I do believe that learning to solder is a must if you decide to continue in the RC hobby. It just so happens QuadifyRC has created a Soldering Guide for Newbies for that reason. The Other Electronics The Surpass Hobby 17g micro servo is my current go-to choice for this platform. It is reasonably priced, metal geared and super quick compared to the other options (JX 1181 or EMAX ES3054). Being a 25t spline, I get to use an aftermarket RJXHOBBY 25T alloy servo horn from Banggood. This may not seem like a big deal but having the added stiffness with an alloy servo horn gives a much more direct feel in the steering over the flexy stock unit. It is a tight fit with everything in place with the Quicrun 16BL30. I will need to reference the Quadify soldering guide to tidy up the wiring in the chassis. Overall, quite happy with the setup and I was able to keep all the electronics on one side of the car and the battery on the other. One thing that is a bit annoying with this chassis is having to remove the body pins and getting your fingers into the compartment to place and remove the battery. But that’s the price you pay for a nice looking car I suppose.  For the transmitter and receiver, I went with the ever popular DumboRC X6 transmitter. I won’t go into too much detail as you can read through QuadifyRC’s extensive review. My choice was to use a budget unit that had great adjustability and good range, which this setup offered. This is the second DumboRC X6 transmitter I picked up and I can’t be happier with it for the price point. Although I am using the X6FG receiver with the gyro, I have thus far left it off. I prefer to drive without it as it forces me to learn to modulate my throttle control better. Just a personal preference, but good to have the option to use it is available if I ever need it. Some Additional Cooling Cooling is an issue with the 124018. Not wanting to chop up the beautiful stock body, I decided to craft up a ghetto ram air intake by replacing the drivers in the cockpit area of the car. Surprisingly, no one has yet to notice or comment in any of the photos so far for my build that the drivers aren’t present in the cockpit. I cut out from some plastic retail packaging and pieced everything together with some black Gorilla tape. I started with the original cockpit mould as a template and cut the plastic to size.
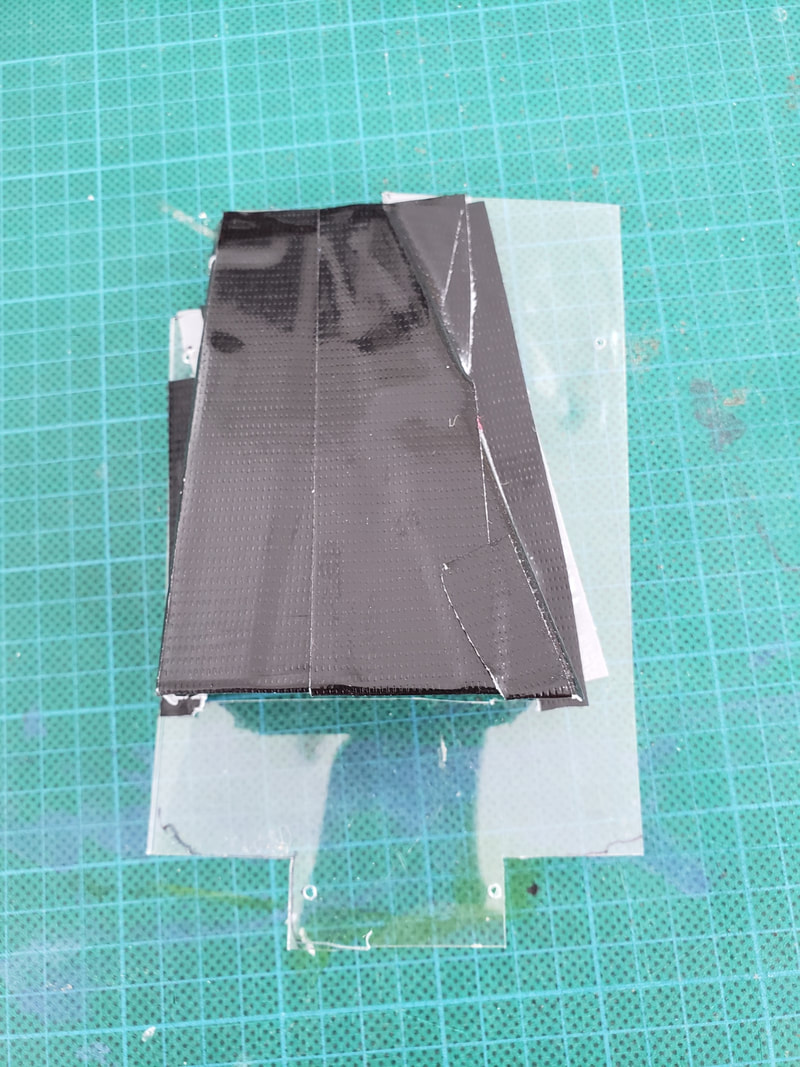
I then created an angled opening for the area above the ESC and motor and cut out some additional plastic pieces to create a simple trapezoidal scoop. Everything is help together with copious amounts of Gorilla tape because that was what I had on hand. The intent for the angled intake is to force air from a wider opening to a narrower point to help increase airflow over the target area.
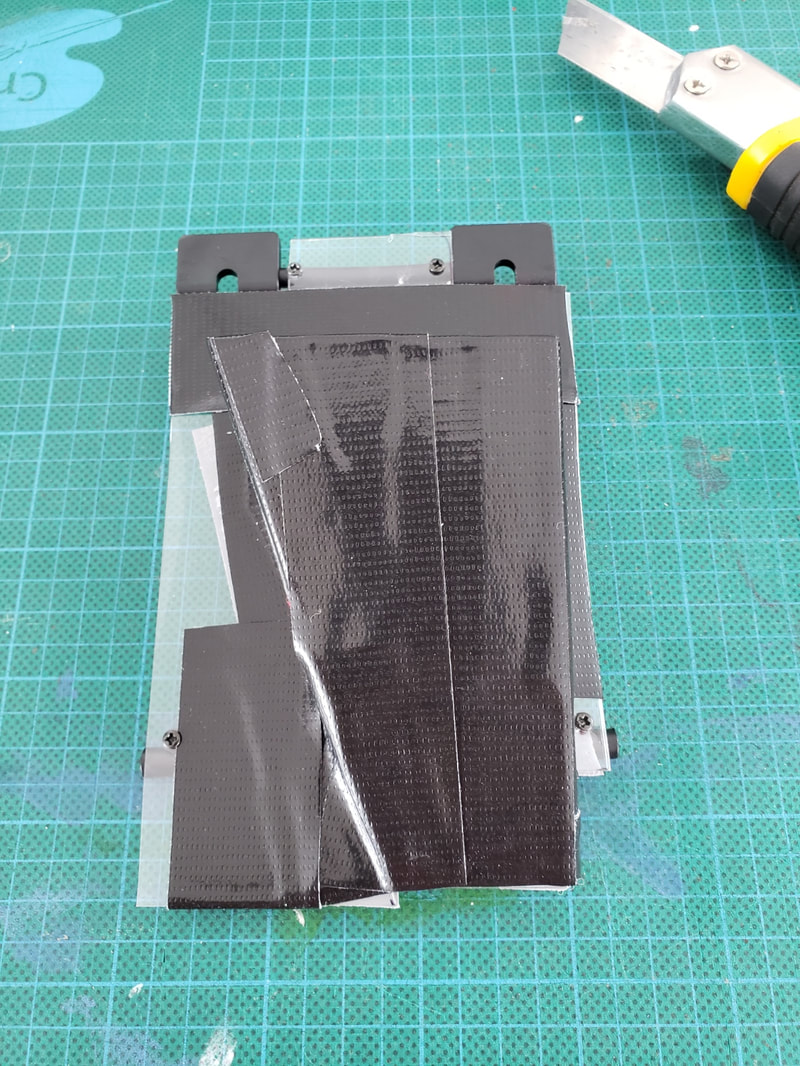
Everything screws back into place with the original hardware and replaces the driver area with a functional scoop. The black tape makes it much less noticeable and gives it a stealthy look. I may come up with a better and more aesthetic design, but for now this has proven to be very functional and has certainly helped in the overall cooling of the motor and ESC. I probably would have had more thermal soak in the ESC if this weren’t in place. For anyone looking for better cooling on the 124018, this solution is quite easy and can be done on the cheap
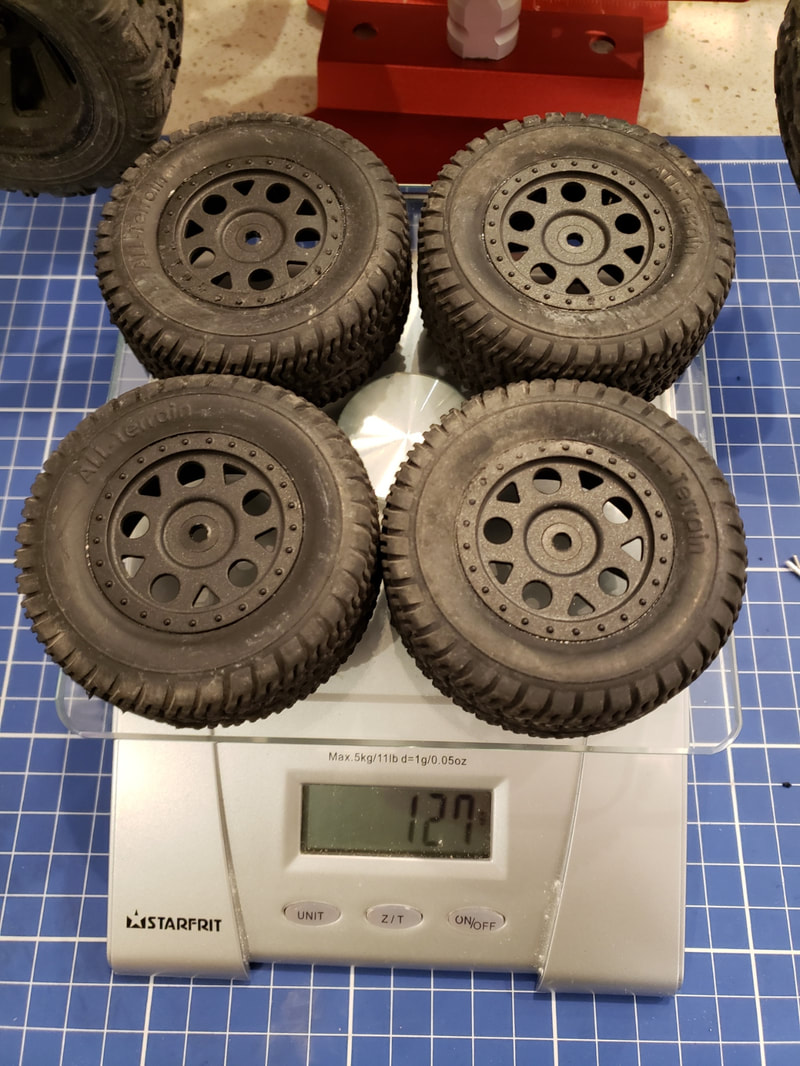
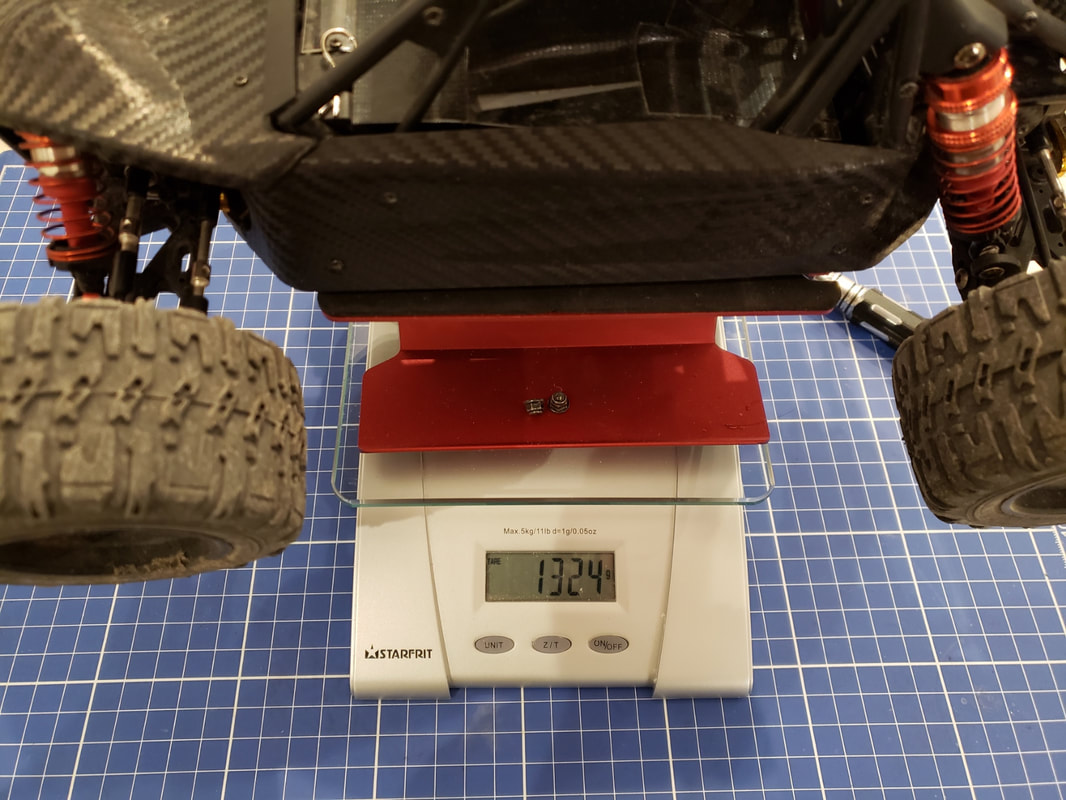
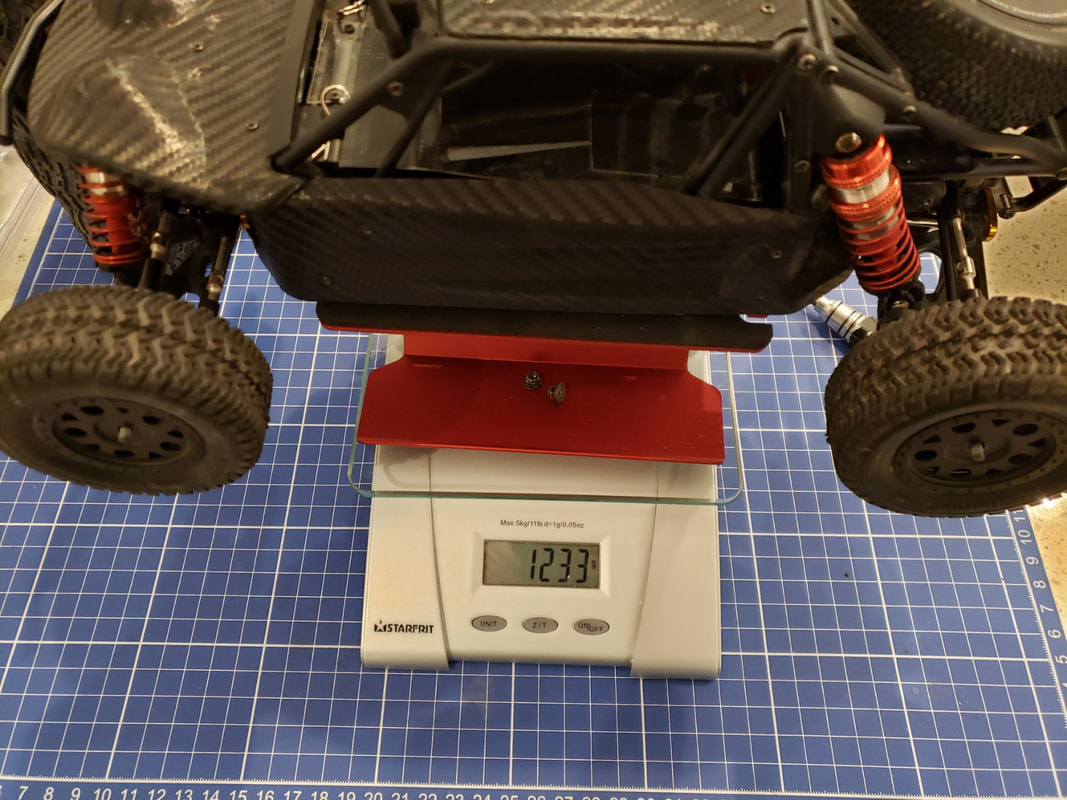
 Weigh-In and Overall Impressions 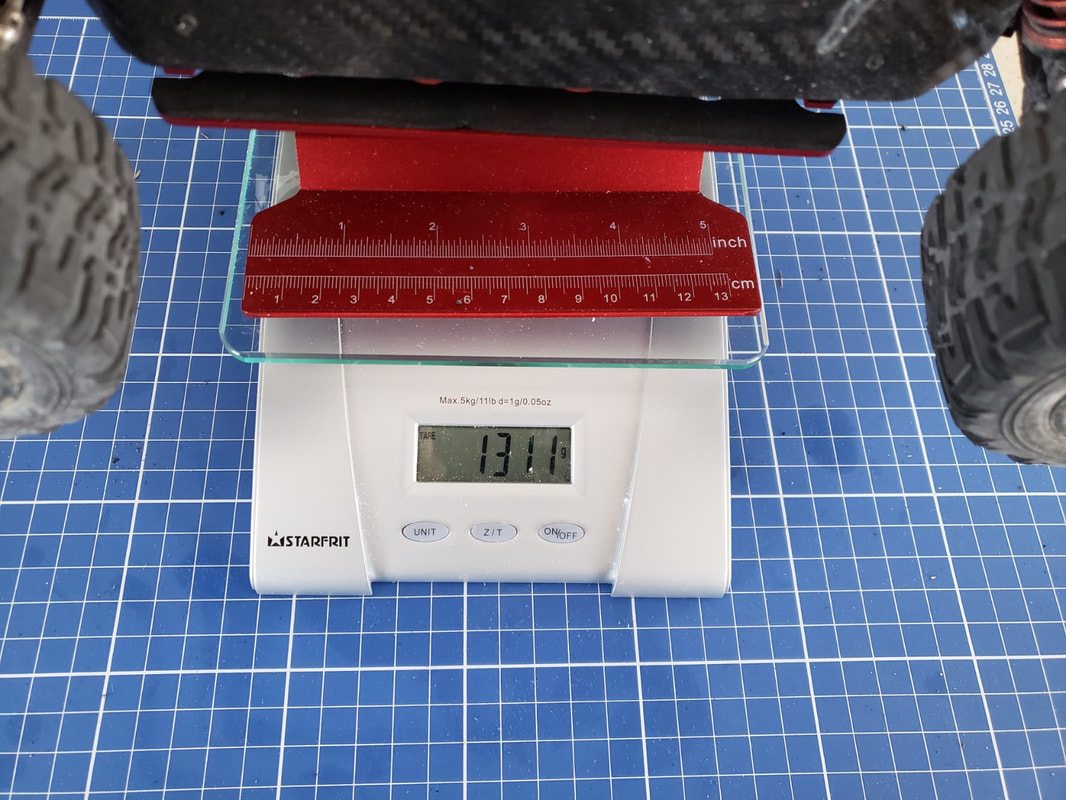 When I first embarked on this project build, my target was to get to a point where the WLToys 124018 performance and weight would be comparable to the original LC Racing EMB-DT. According to the LC Racing website, the EMB-DT with battery weights in at approximately 1200g. So where have we ended up on project WLC Racing 124018 with all the mods? 1324g, lol. So much for a diet. I can say the two areas where we have gained the most weight is also the areas where I feel improve the performance for my intended use. Firstly, the 2845 motor is bigger and heavier than the 2840 sized motor that the EMB-DT uses. According to the manual, 30g is the weight difference. Secondly, the beefier EMB-MT wheels weight quite a bit more compared to the stock EMB-DT wheels, 89g to be exact. With the EMB-DT wheels mounted, the car weight drops down to 1233g, which is very close to the intended target. Quite frankly, this would be more of an apples to apples comparison. To shave off more weight, removing the spare tire on the back of the car would get us down to 1200g. This really isn’t too shabby compared to the original weight of the stock car was 1264g. So I have saved weight, improved battery life and added a ton of performance with this setup.
How does it drive? This thing is an absolute hoot. It goes without saying that the acceleration is brisk and top speed is much faster than the stock brushed setup. My visual speedometer tells me it’s probably in the range of 65-70km/h now when using the 85mm diameter EMB-MT wheels, which is plenty for me. It is most likely faster than my LC Racing EMB-T with the stock pinion using the same MT tires. On road, the feeling is still a bit soft but the wider contact patch, the car is very stable at speed. The hardish rubber compound still allows me to initiate turn-in oversteer or on-power oversteer when needed. I find on loose, off-road terrain, this car is tons of fun. The bigger wheels help in absorbing bumps and rolls over uneven terrain with ease.
Switching over to the 75mm diameter EMB-DT wheels, the first thing I noticed is the lower top speed which is to be expected. The acceleration is quicker, and it was easier to toss around with the narrower width. However, I had to be more careful with bumps and couldn’t launch the car off of bumps and jumps as comfortably. Although this is the original wheel spec, I can’t help but feel it is undersized with the heavier bodyweight of the cage and body panels. This is a tire that is great for smoother on or off-road surfaces. There’s just enough bite in the tires that it provides some decent traction in moderately loose dirt and is still an improvement over the stock 124018 tires. I have decided to stick with the EMB-MT tires. Despite the added weight, I find the overall performance suits my intended use better. I find the driving experience with the bigger wheels and its ability to clear obstacles and the sensation of the higher speed makes it more enjoyable for me. So what is next for this project? I will continue to make tweaks and adjustments to my setup, but for now I will just enjoy the fruits of my labour. A future feature may come up with driveline mods that I’m currently testing out to. Until then, I’m going to give the car a thorough thrashing during our Canadian summer! 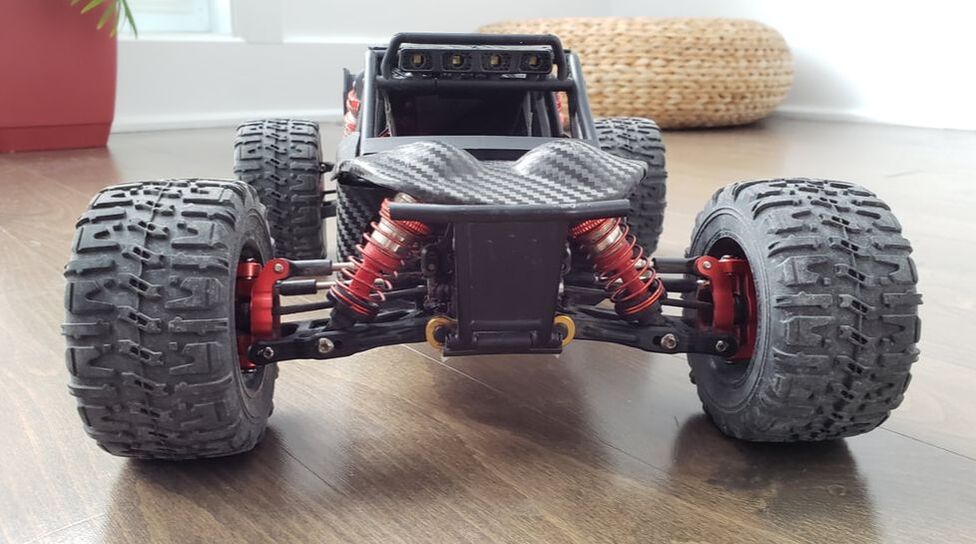 Thanks for reading, if you found this article useful please feel free to like or share, the facebook links below directly link/like this article. I don't believe in asking for money by patreon nor by paypal but if you do wish to help me, the affiliated links in these articles help me buy the bits and services I need to produce this type of content. If you are looking for RC cars, quads or parts check out my coupons and discounts page which I keep updated with only the RC cars, parts and quads I like at a proper discount
|
Categories
All
|


 RSS Feed
Thanks for visiting QuadifyRC.com Follow us on facebook below to get all the latest updates