|
Our regular contributor Geoffrey Chan is at it again, this time with a very detailed build guide for the LC Racing LC12B1. This is a fantastic 1/12 4WD buggy from LC racing that comes as a kit. These cars are well priced (for a race car) and are highly competitive in carpet racing. 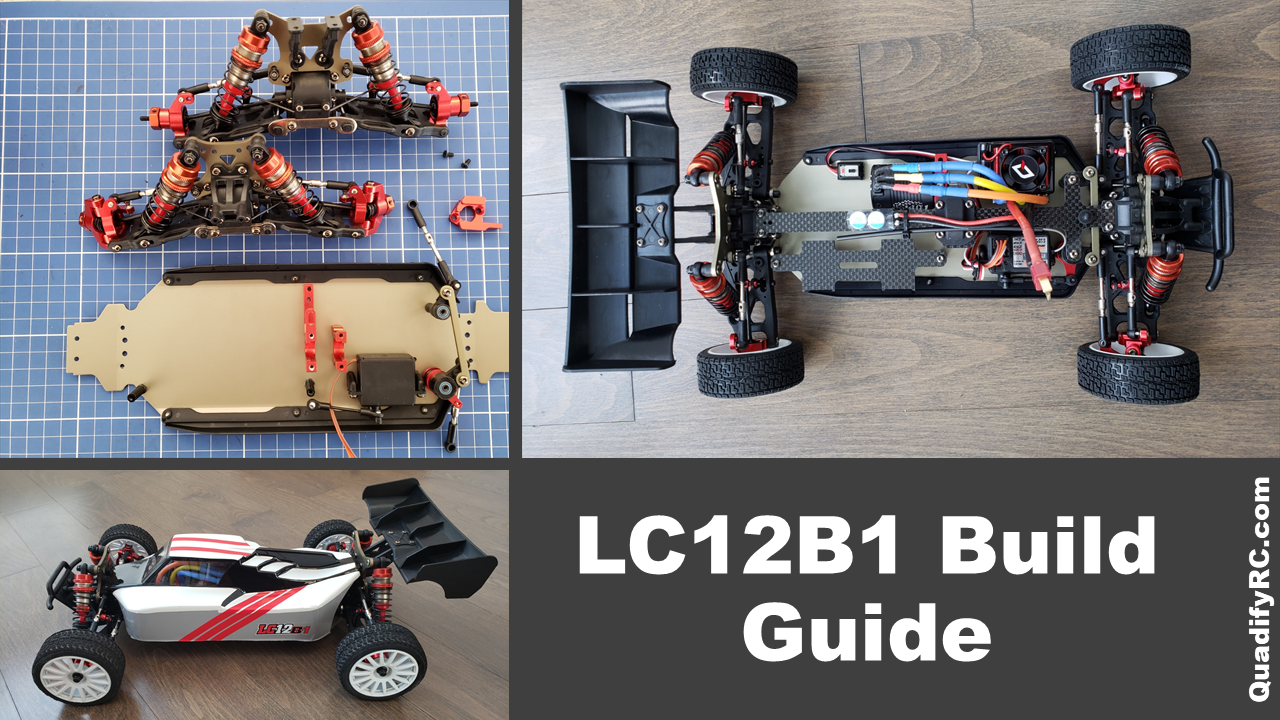 I will start by saying that I’m a big fan of LC Racing RCs. It was just a matter of time before I finally pulled the trigger and picked up what is essentially the King of 1/12 scale 4WD buggies. I’m quite confident that there isn’t a better engineered buggy in this scale on the market today. Make no mistake, this is not a budget RC. Although not as expensive as larger 1/10 scale buggies, it is still more than 2x the cost of a WLToys 124019. Even up to 3x the cost depending on what electronics you decide to put in. What you get for the extra dollars spent on an LC12B1 is better material quality, much tighter fit and finish and overall better tolerances. It should also be mentioned that this buggy’s dominance is not at speed runs, but at quick acceleration, jumping and cornering. If speed runs are more your thing, then modifying a 124019 will get you more bang for the buck. That hasn’t prevented others in the LC Racing community from building theirs into a speed runner, it just wasn’t the intended use or design and where this car truly performs and rules.
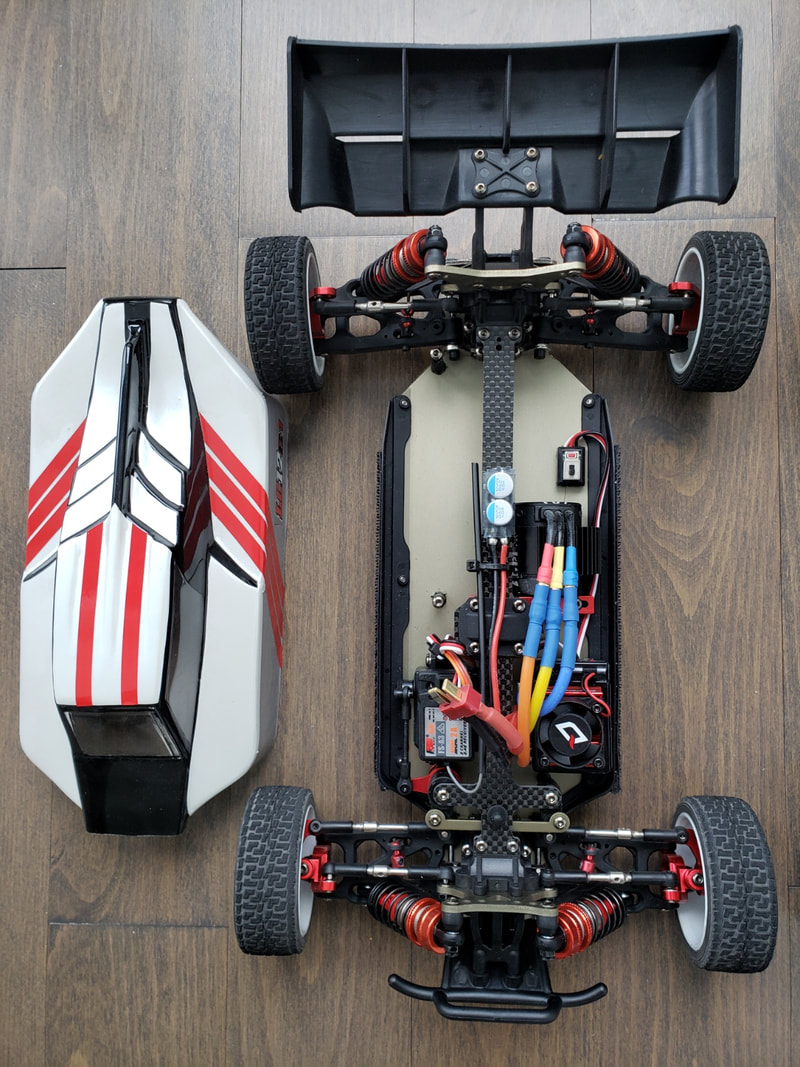
I want to point out that the chassis length between the LC12B1 and all models of the LC Racing EMB line with the exception of the EMB-1 and EMB-MT are all the same. Yes, it’s a bit confusing that the 1/14 cars are the same size as a 1/12, but that’s just how they’ve decided to differentiate the product line. The WLToys 124019 and 124017 are also same size and length as the LC12B1 and as a result, several of the suspension and body components are compatible between the models. 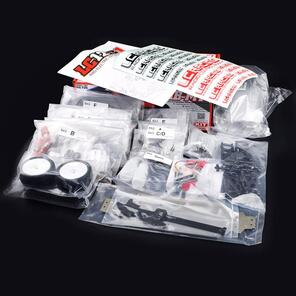 The LC12B1 is only available as a kit that requires full assembly down to the last screw and paint for the body shell. I opted for the kit that doesn’t include any electronics except the Batan digital servo as I wanted to spec out the motor, ESC, transmitter, and receiver. The major differentiator with the LC12B1 from the other LC Racing EMB 1/14 scale line-up and WLToys 12401x line-up is that it is a mid-motor architecture. This helps improve weight distribution towards the front of the car for better balance and handling in turns as well as when jumping in the air to better level out for landings. Pretty much all competitive racing 1/10 scale 4WD buggies are a mid-motor design. All the pieces come clearly labelled in individual backs to facilitate assembly. Throughout each section of the instructions, it will refer to the bag required to build out the car one section at a time.
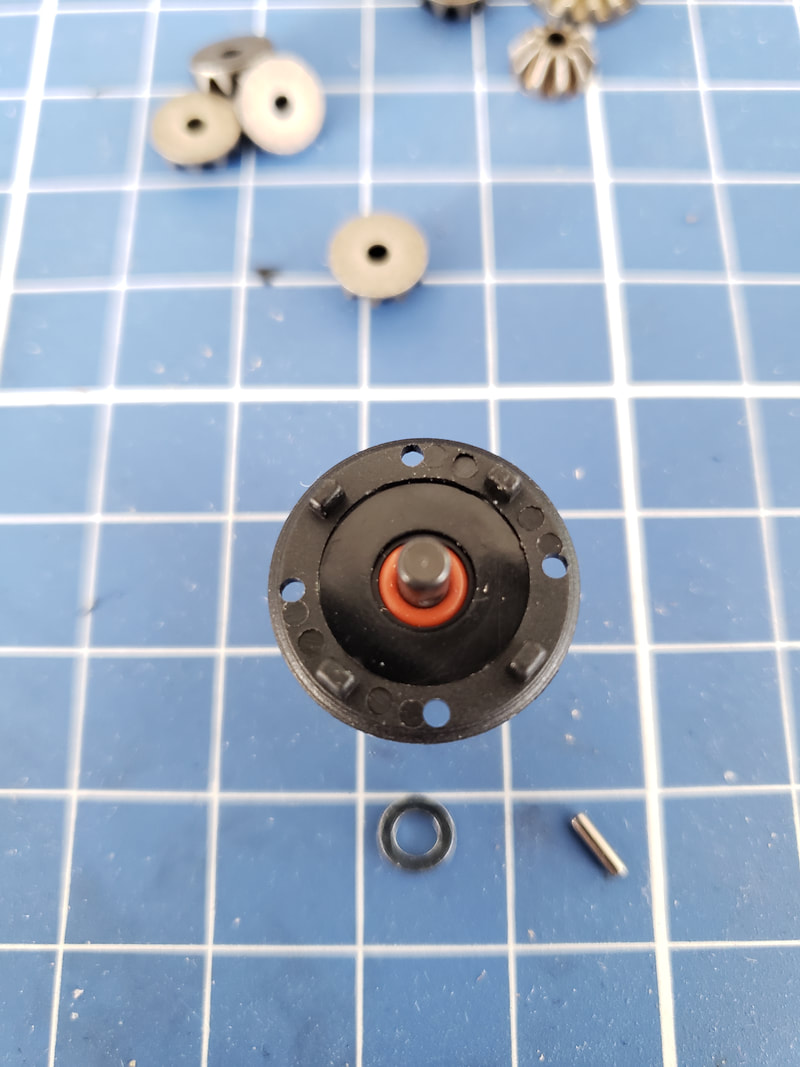
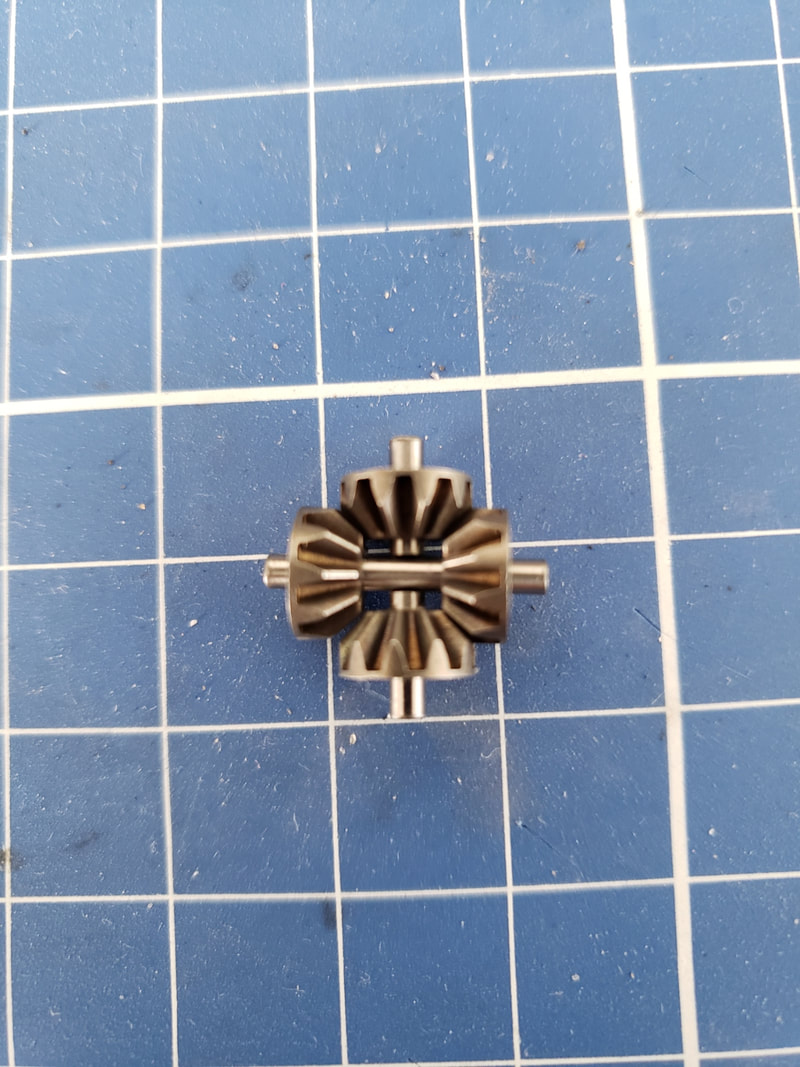
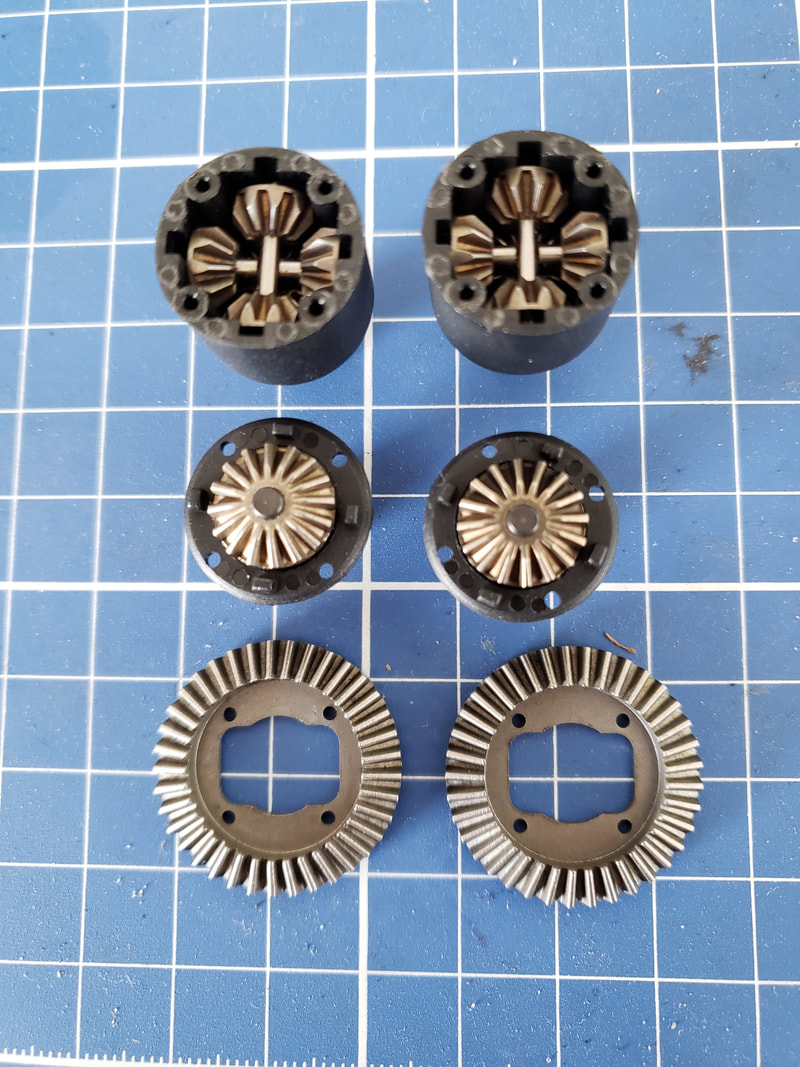
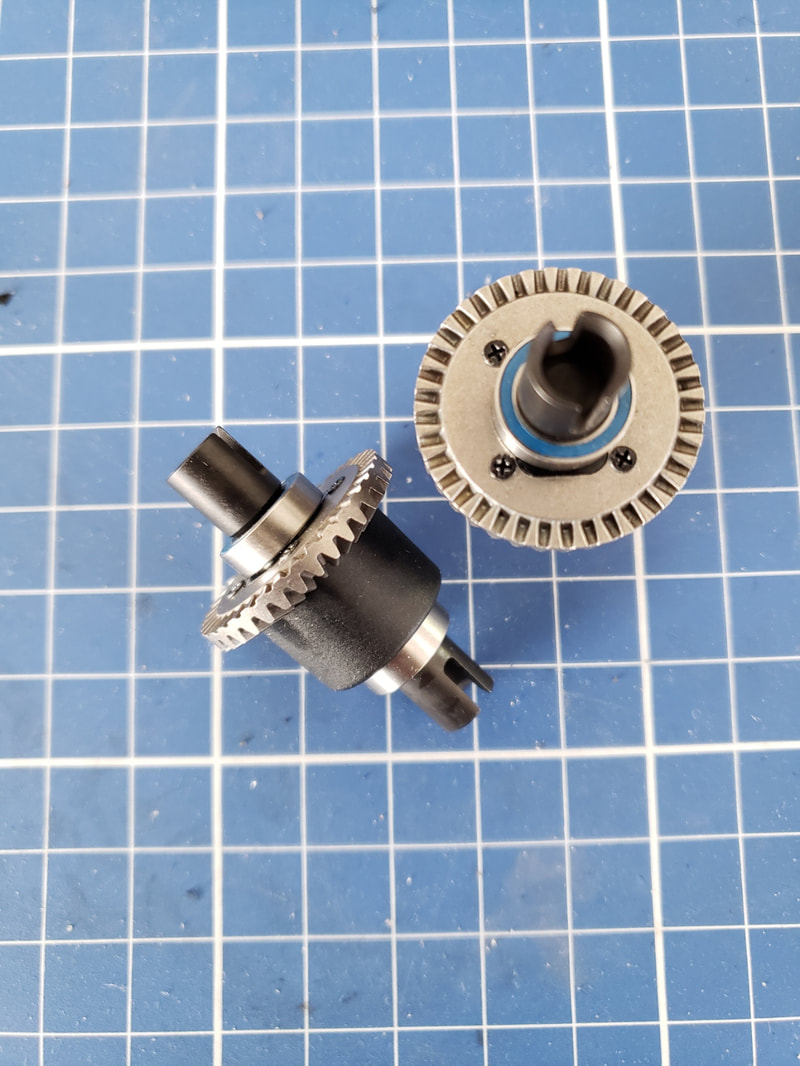
This is the first kit RC that I have ever built, but given my experience taking apart and reassembling my WLToys 144001 and 124018, the entire process is very familiar. If you haven’t ever built a kit before, this is really a good experience to get intimate knowledge of how your car functions mechanically, electronically as well as how all the pieces come together so when there is an issue, troubleshooting is much easier. I will take you through my build process as well as my parts selection and point out what are in my opinion the key areas that make this the King of the 1/12 scale 4WD buggies. I should also note that the LC12B1 is engineered to be a race car to turn fast laps at a smooth dirt track or an indoor carpet track. However, not having access to either of these facilities, I am building out mine to be more of a tarmac racer, which just highlights how versatile this buggy can be. Differentials Going through the first section of the build is the assembly of the differentials. Three things immediately stood out to me. First was the absence of any shims in the kit. However, because the tolerances for the parts are so tight, there was minimal play and were unnecessary. Second thing I noticed were the hardened metal gears that will help ensure the diffs were reliable and tough for hours of driving. Not all metal is created equal. Third thing was there are silicone seals in the diffs that require the use of specific silicone differential oil to be used. The great thing about being able to use silicone oil in the diffs is the added tunability with different weights that affect how the car handles in turns and on power. Without oil, power would simply push to the wheel with the least resistance and cause it to spin. Adding oil reduces this spin and greatly helps with traction. The seals are a feature that is lacking in the WLToys differentials, which is why sticky, thick grease is often recommended instead of oil as it tends to stay in the diffs better over time.
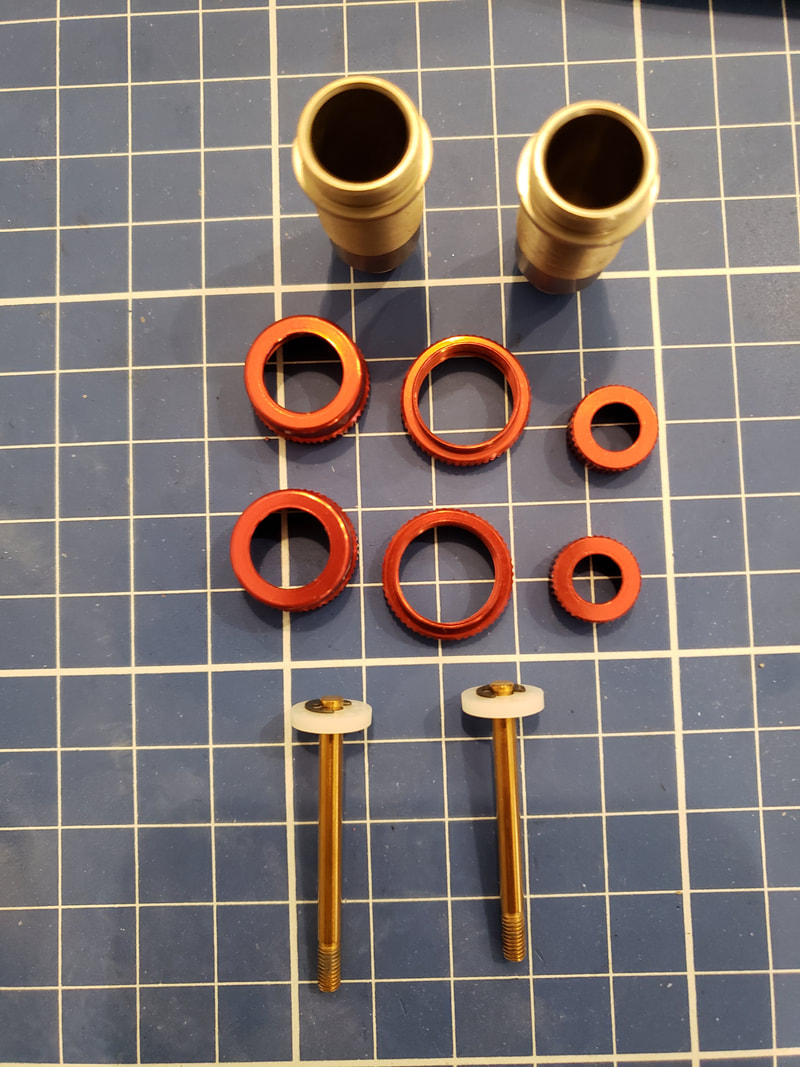
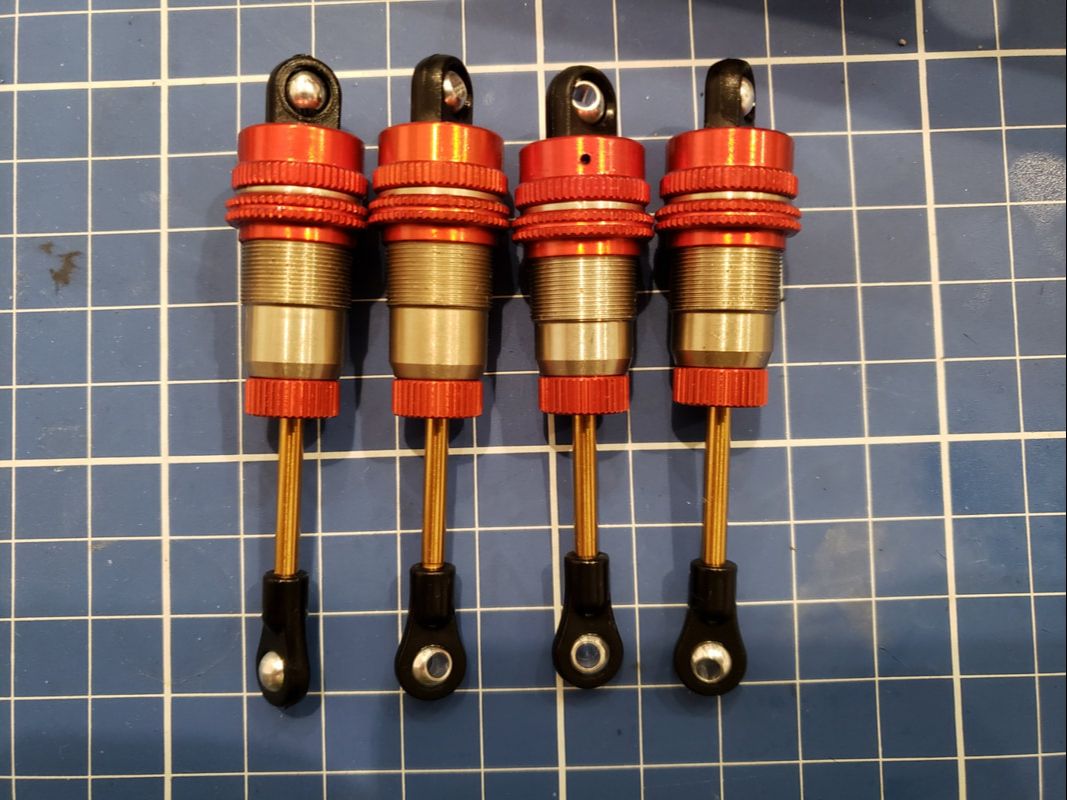
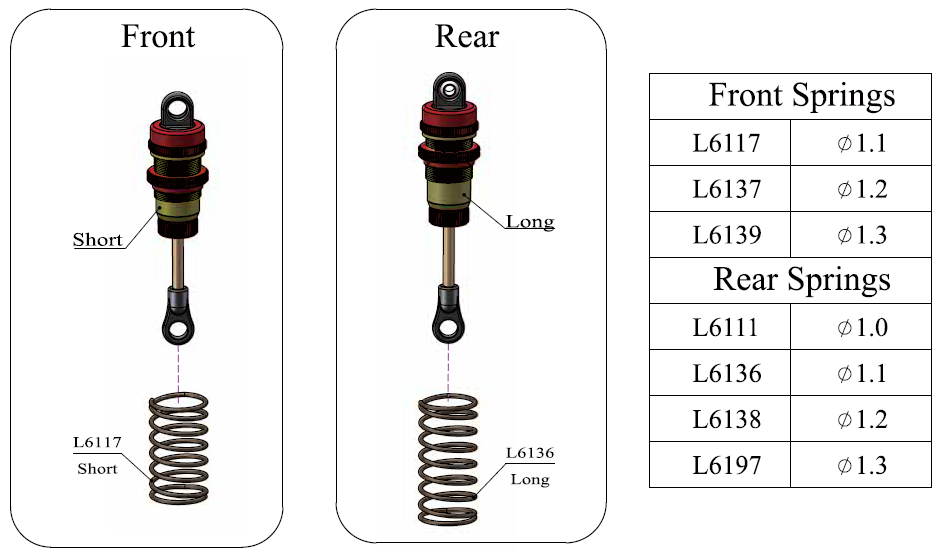
I opted for a 7000wt in the front and 3000wt in the rear. Using a thicker 7000wt oil will help through turns while on power while using a thinner oil in front will help with turns while off power. This may not be the perfect set up for me, but it’s a setup I’ve seen a lot of LC Racing owners have used, so I figured it would be a good baseline to start with and further tune from there. Shocks The next section of the instructions tackles the assembly of the shocks. First off, this kit includes the friction reducing Ti-Nitride coated shafts, which is often something you see on the high-end 1/10 scale or bigger race buggies to smoothen the suspension movement. This is included as a standard item in this kit, which is pretty sweet feature that adds a bling factor. Not sure it makes much difference as my EMB-T shocks don’t have the Ti-Nitride shafts are still very smooth. The shock assembly is a straightforward affair. LC uses a set of C-clips to hold the piston to the shafts, which is more solid than the single pin design on the WLToys shocks. Take note as well the shocks use a dual silicone seal to minimize any fluids from leaking out. I filled the shocks with 35wt in the rear and 30wt in the front as a starting point and will tune and adjust from there. The Stock RTR LC Racing cars normally come with approximately 25wt oil for comparison. Keep in mind if you are building this kit that the front shock body and shafts are slightly shorter than the rear. Don’t get these mixed up or you won’t get the proper stroke and height on the shock. Don’t ask me how I know… I also took this opportunity to slip on a few animal balloons on the lower shafts to keep dirt out of the seals to prolong the service life of the oil shocks.
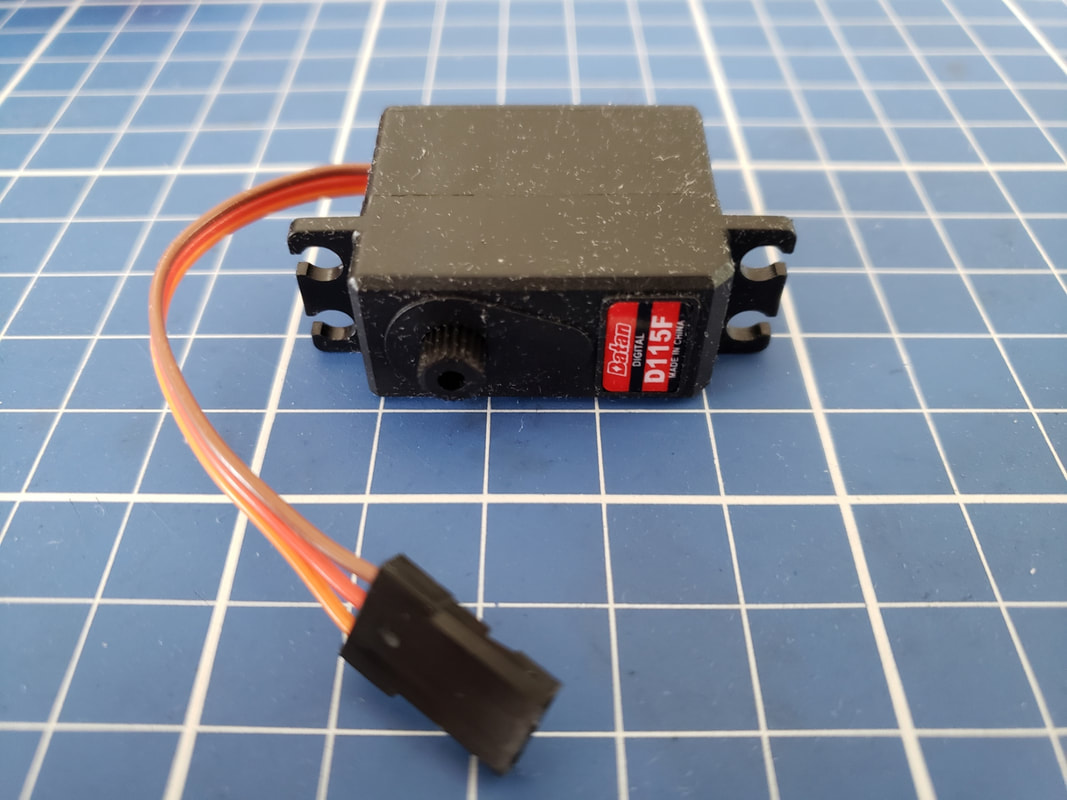
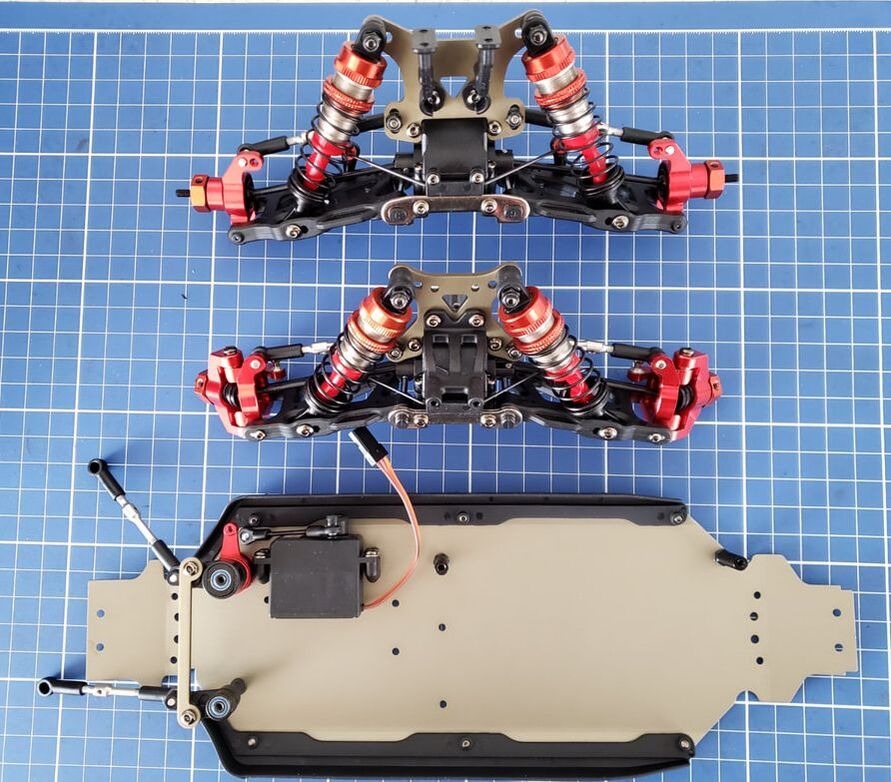
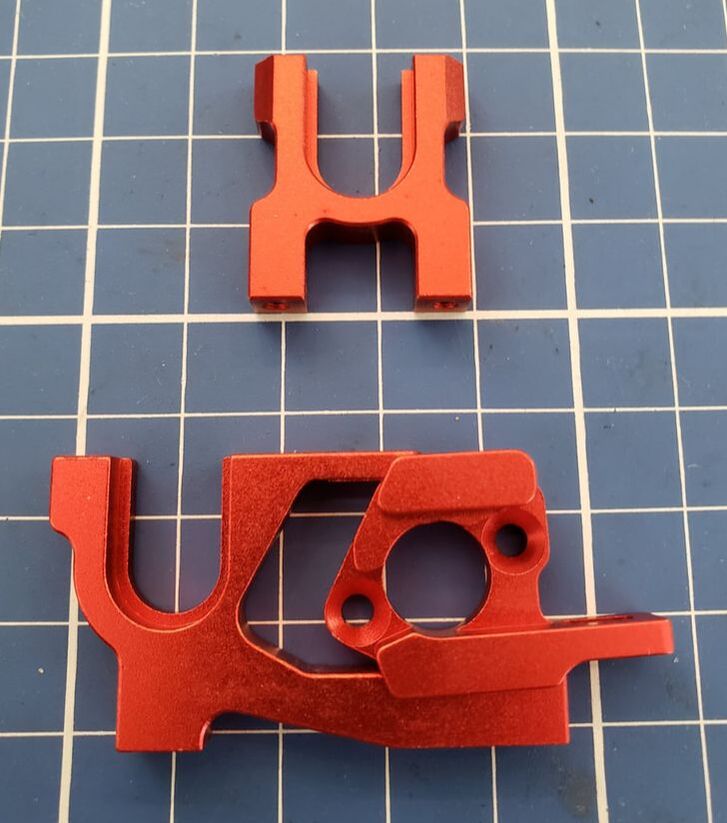
Suspension The assembly of the front suspension assembly starts with the hubs, hub carrier, CVD’s, lower diff housing, suspension arms and a completed diff. There are a few notable nice features that are included in the kit. The wheel hexes are the signature LC Racing alloy hexes that have a grub screw to hold them in place on the CVD’s to minimize any play and wheel wobble. The arms that are included are the thicker and stronger “hard arms” that are normally an upgrade item for the other LC Racing EMB 1/14 scale cars. Also take note of the hex screw hardware all around comes standard is of much stronger metal and is less likely to strip. I made the decision to upgrade the hubs and hub carrier to the LC Racing alloy units for durability. As I plan to be doing a lot of tarmac driving on the streets, the chances for a bump into a curb at speed is quite high. 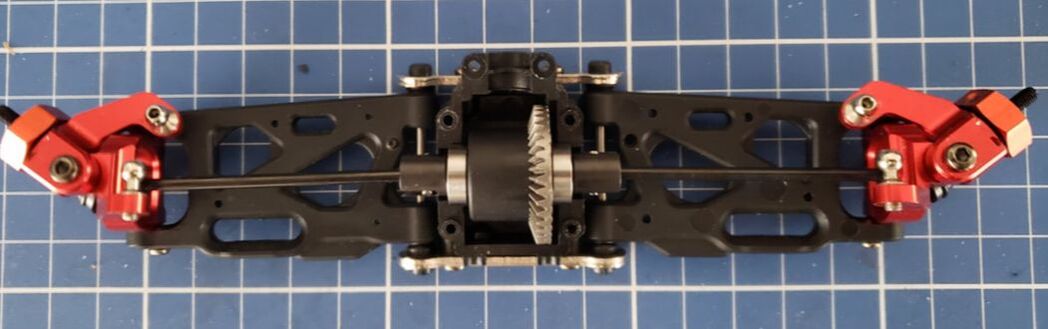 To finish assembly the entire front suspension, greasing the diff crown gear and screwing down the upper part of the diff housing makes the rest of the build easy. The following step is to attach the included sway bar set to the diff housing and the swing arms, which is an easy affair. It is typical to see a sway bar set with race pedigree buggies. I chose the medium setting for front and rear to test and will test from there for handling feel. QuadifyRC has documented a detailed how-to on the 144001 in his article and it is a worthy upgrade for the WLToys 4WD buggies. The last step is to mount the alloy shock towers, shocks and turn buckles to the assembly. One trick to note for the turn buckles is to put a small dab of grease on the threads to make turning them much easier when they are mounted on the car. The WLToys turnbuckles are notoriously tight and difficult to turn and doing this step will make fine turning toe and camber much easier. 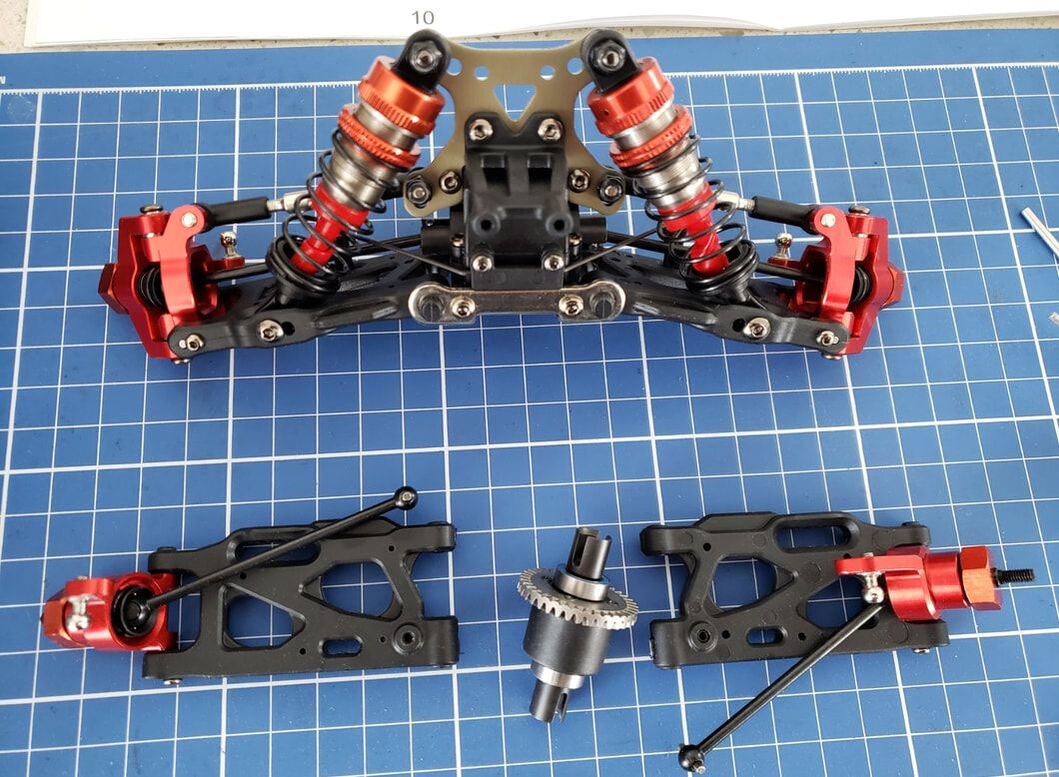 Assembling the rear suspension and differential is basically the same as the front. Also, a big plus with this kit is that is employs the same hardened CVDs for the rear as well as the front. What you will notice is that it is required to fully close the diff housing and attach the diff bevel gear and outdrives for the center driveshafts. This assembly approach is not possible on a WLToys due to the solid driveshaft design with the bevel gear attached. Because LC Racing uses a floating driveshaft design, it makes mounting and removing the entire assembly for servicing much easier in comparison. 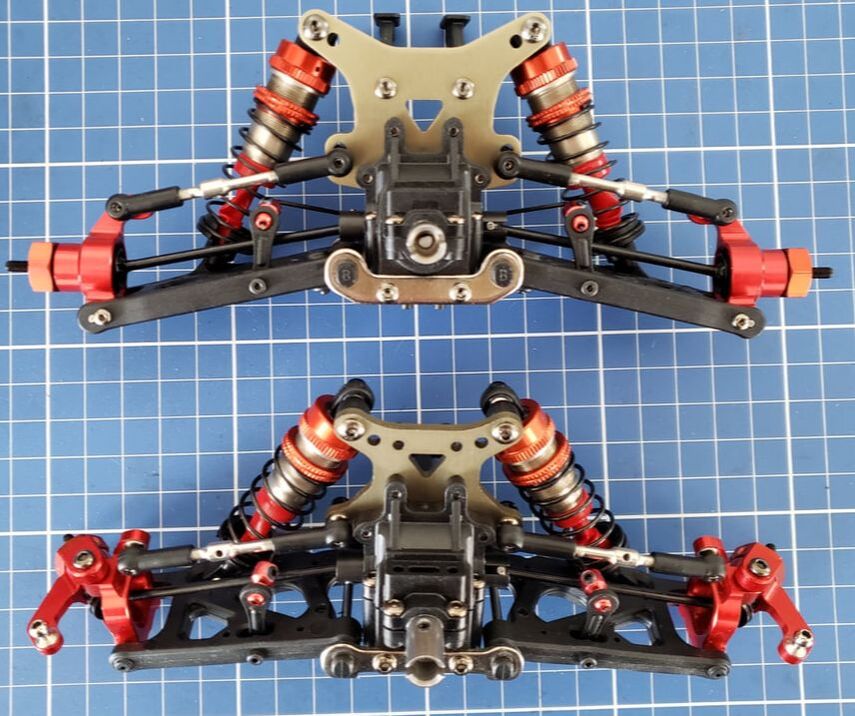 Servo and Steering From this point, it is time to start mounting the servo, servo saver and suspension posts to the chassis. The kit includes a Batan digital servo that has plastic gears. It is possible to upgrade to a metal geared version, but the included unit works well enough, but is not as quick as the Surpass Hobby S0017M. I am looking for a way to the quicker and inexpensive Surpass servo in place of the Batan, but because it uses a two-screw mounting tab, this makes it a bit tricky to find something in the same size that fits the stock mounts. Small detail is that the servo saver comes with an red alloy arm. Not sure why only that arm, but a nice upgrade over the EMB line-up’s plastic.
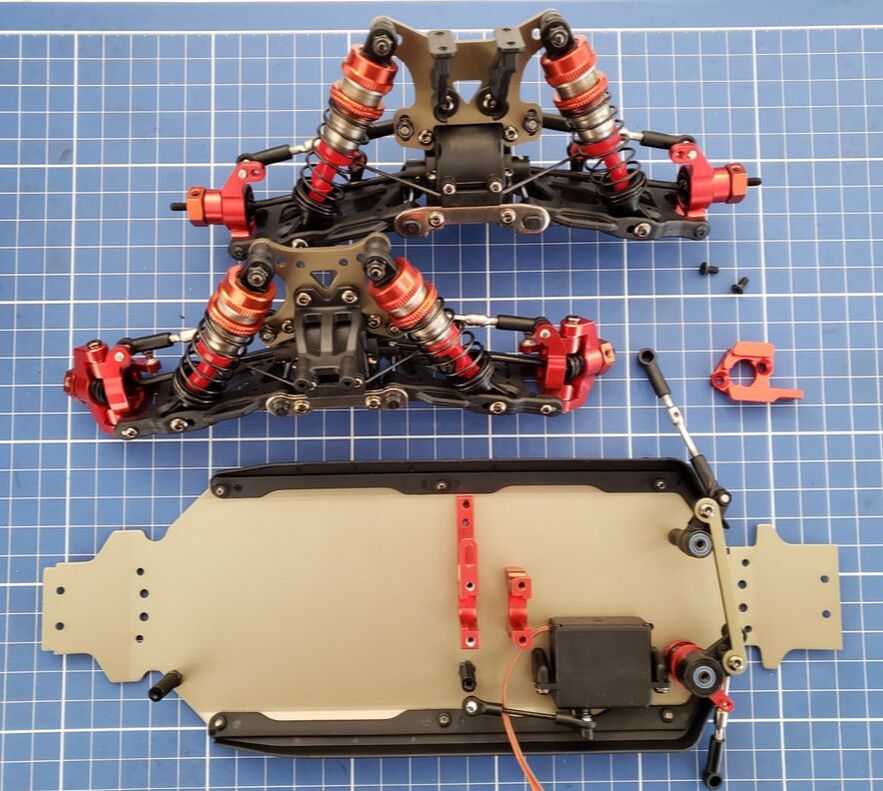
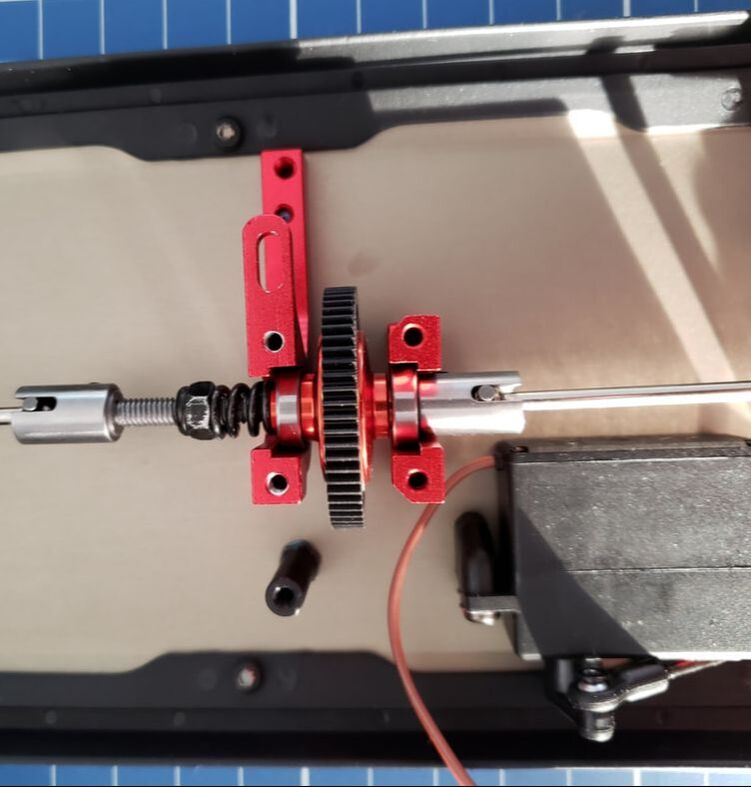
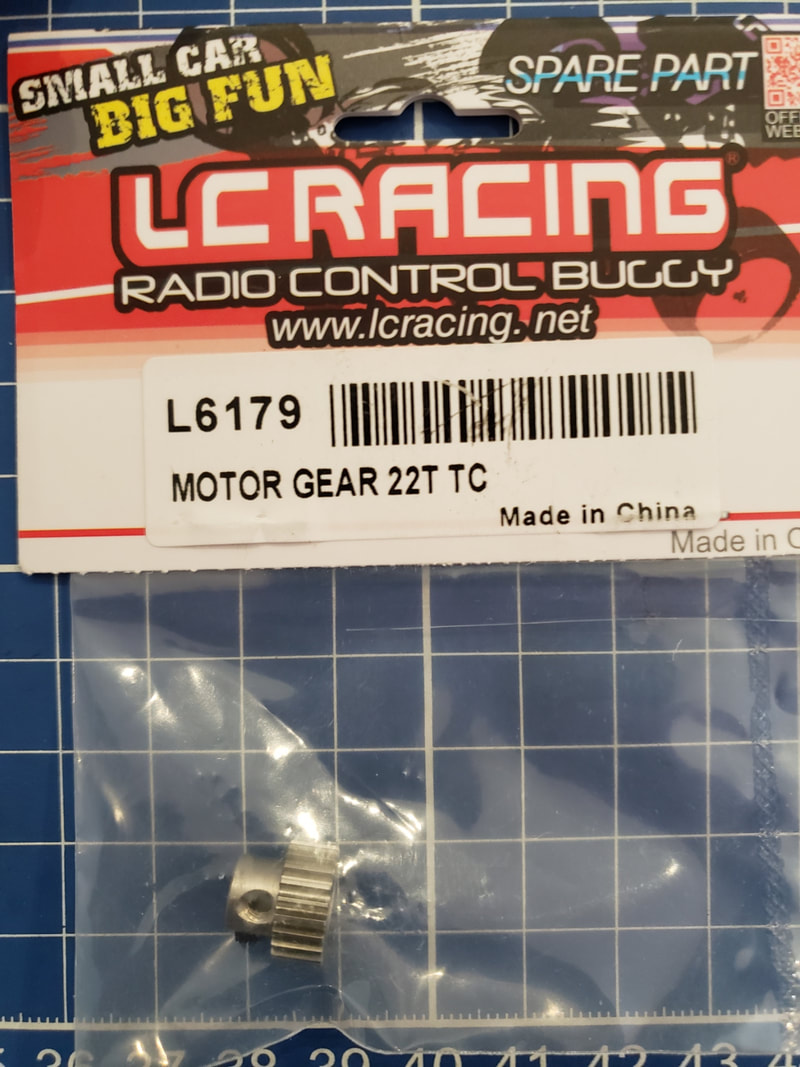
Motor Mount and Slipper Clutch The motor mount and slipper clutch support are next to be mounted. The alloy used is nicely anodized, but more importantly is stiff and quite solid. It is an adjustable design and can accommodate between 16t to 22t pinions with a 0.5M pitch.
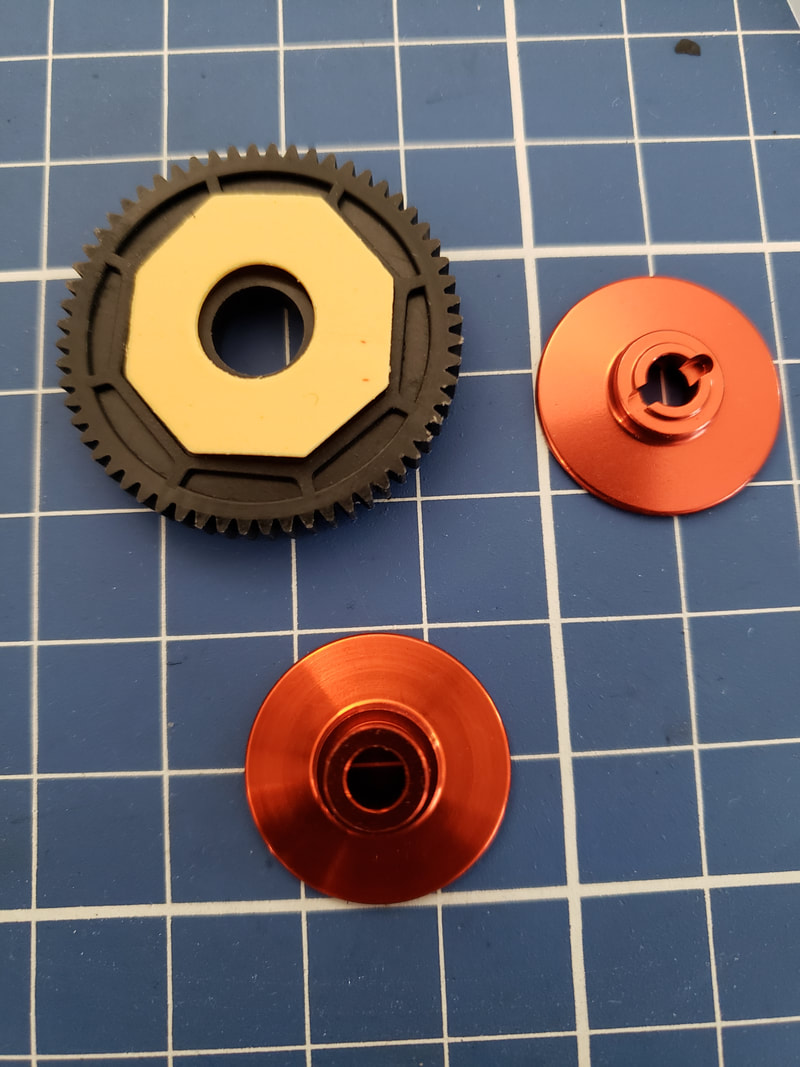
With motor mount and slipper support attached, assembling the slipper clutch and installing it is required next. A slipper clutch is a big advantage when sending power to the wheels to help absorb shocks to the differentials due to sudden throttle inputs. It is also there to protect the drivetrain when landing a jump or when a sudden reduction in speed of the wheels sends a stopping force through the drivetrain. It is essentially a spur gear with a friction pad material pressed in with a spring for tension. It is possible to adjust for tension based on your preference and level of traction control needed. This is an important traction and protective feature and is absent from any WLToys models. Another place where the added costs has gone into for the LC12B1. At this assembly step, it is necessary to install the center driveshafts which are effectively dog bones that connect the entire driveline together. Those with keen eyes may notice that the WLToys 104001 borrows quite heavily from this design, but upscaled to a larger 1/10 size and without the slipper clutch.
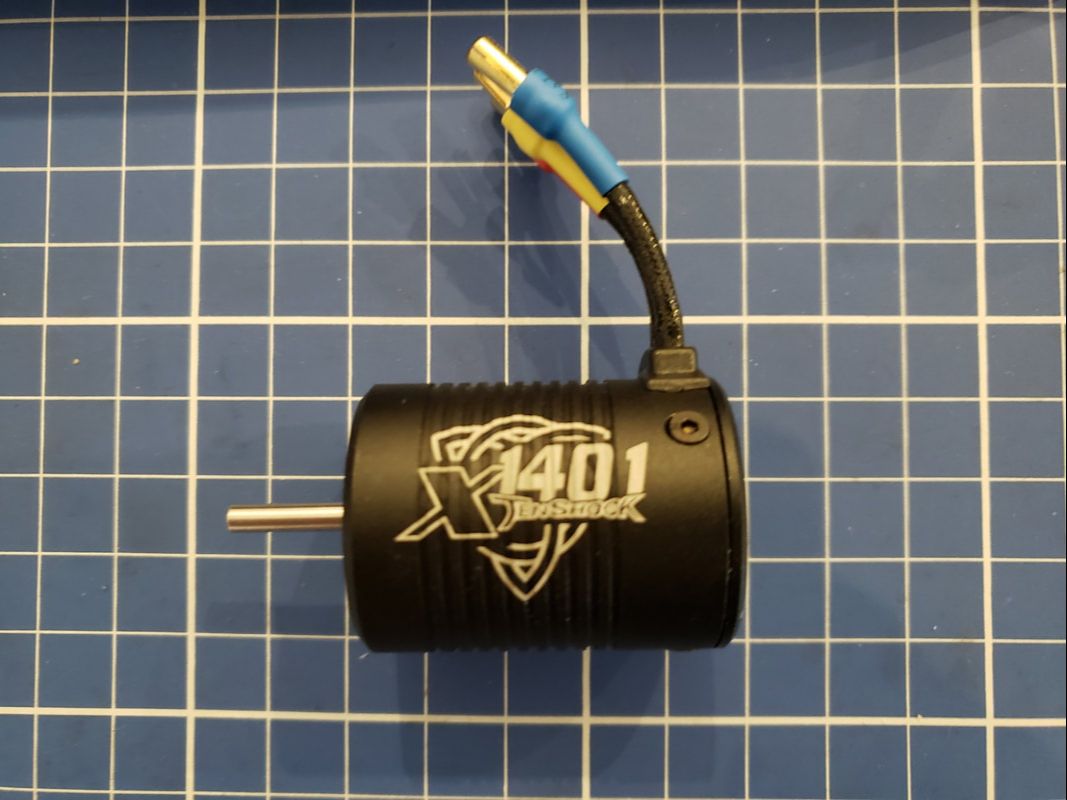
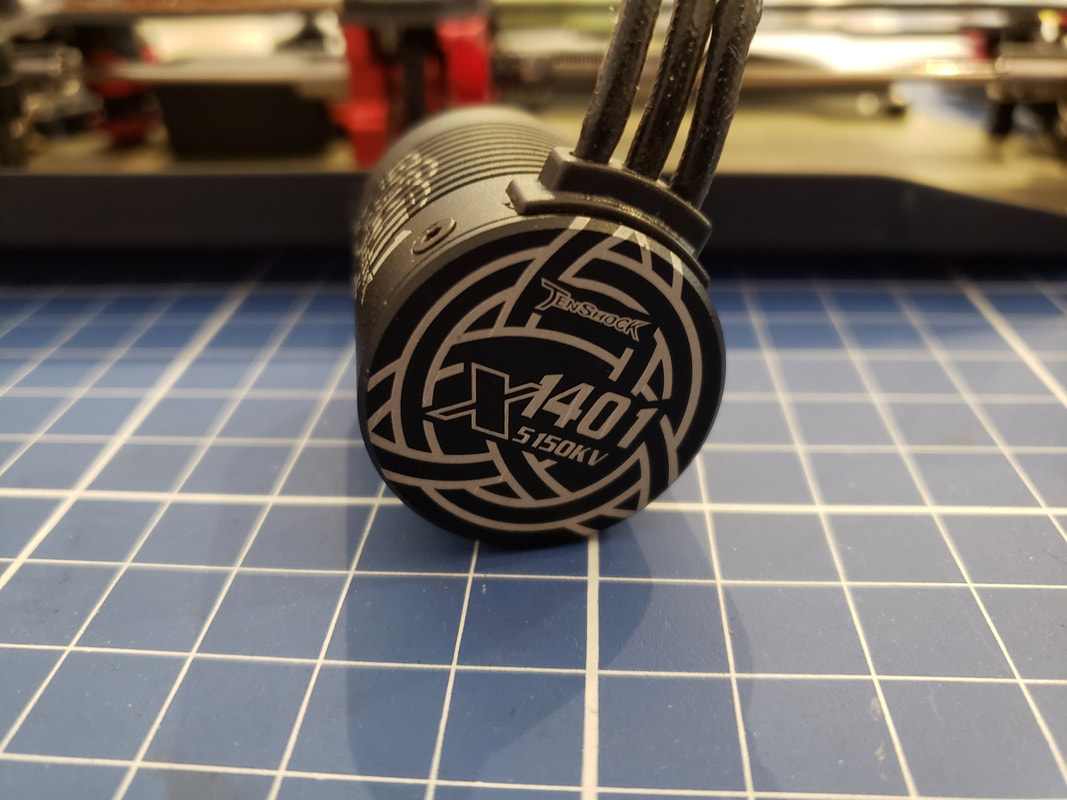
Electronics The next piece is the electronics. I opted for a motor that isn’t commonly used in the WLToys community, but it was David Wong’s track prepped 144001 that influenced my decision to try the sensorless, brushless Tenshock X1401 in a 5150KV spec. The 29mm x 37.5mm can size of this motor is different from several of the more commonly sized brushless motors, but don’t let the small size fool you because this motor is potent. It is every bit as comparable to the LC Racing 2850 sized motor. The magnets feel stronger than any of the other 28xx brushless motors that I have in my collection. The compact size is also saves space and reduces some weight. Although twice the cost of a Surpass Hobby 2845 motor, I really felt this car deserved a special power unit. I have also seen many LC community members rave about how smooth and powerful it is and had to try it for myself. A nice detail with the Tenshock motor is that it comes with 3.5mm bullet connectors for you to solder onto the ESC. This came in handy as the Hobbywing Quicrun 10BL120 only comes with leads 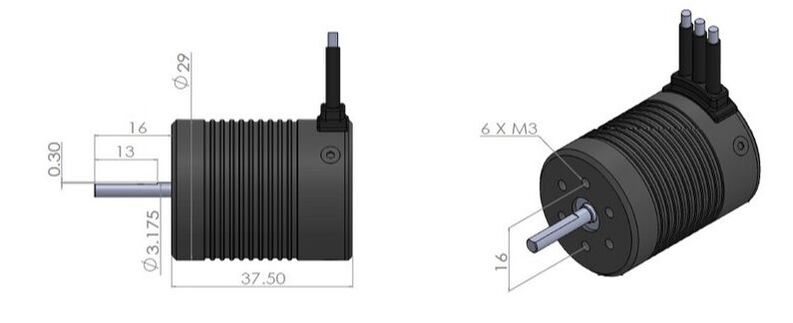
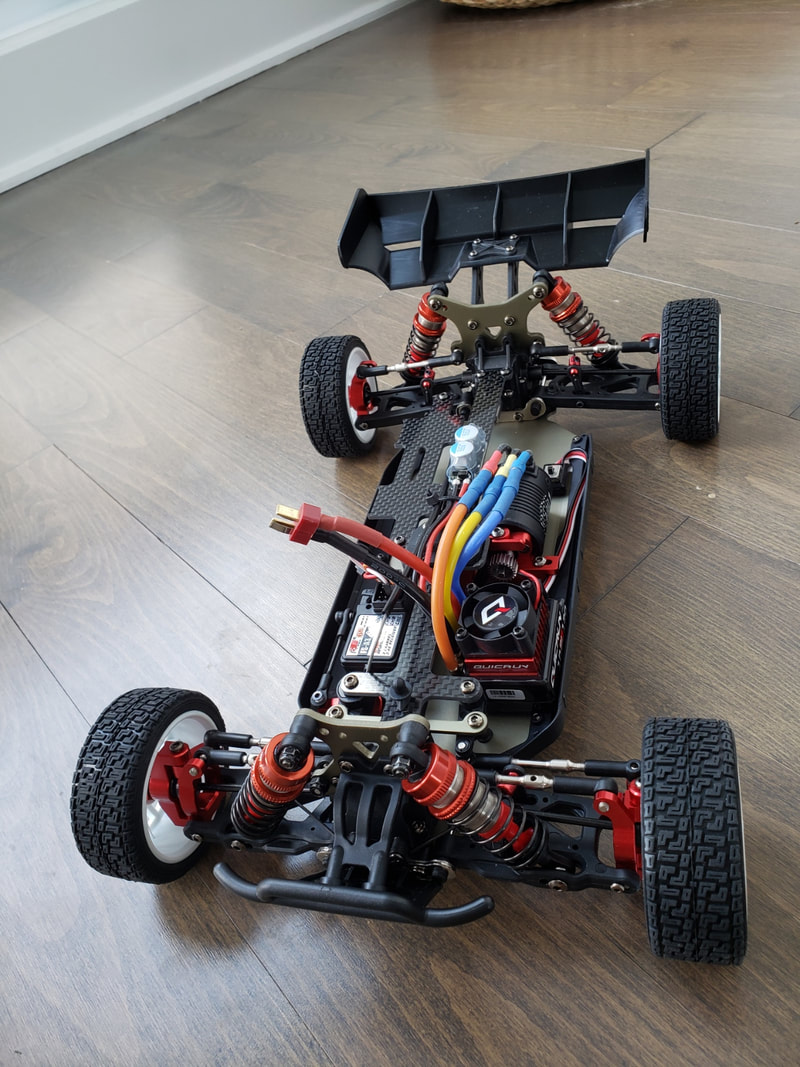
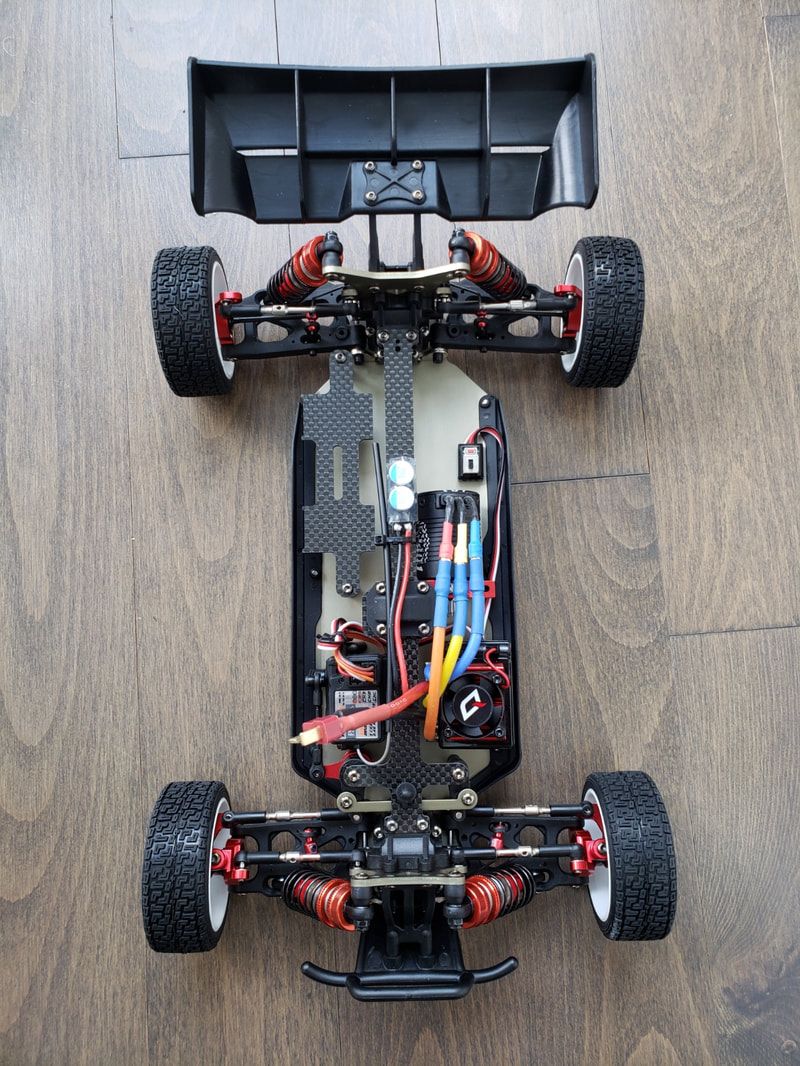
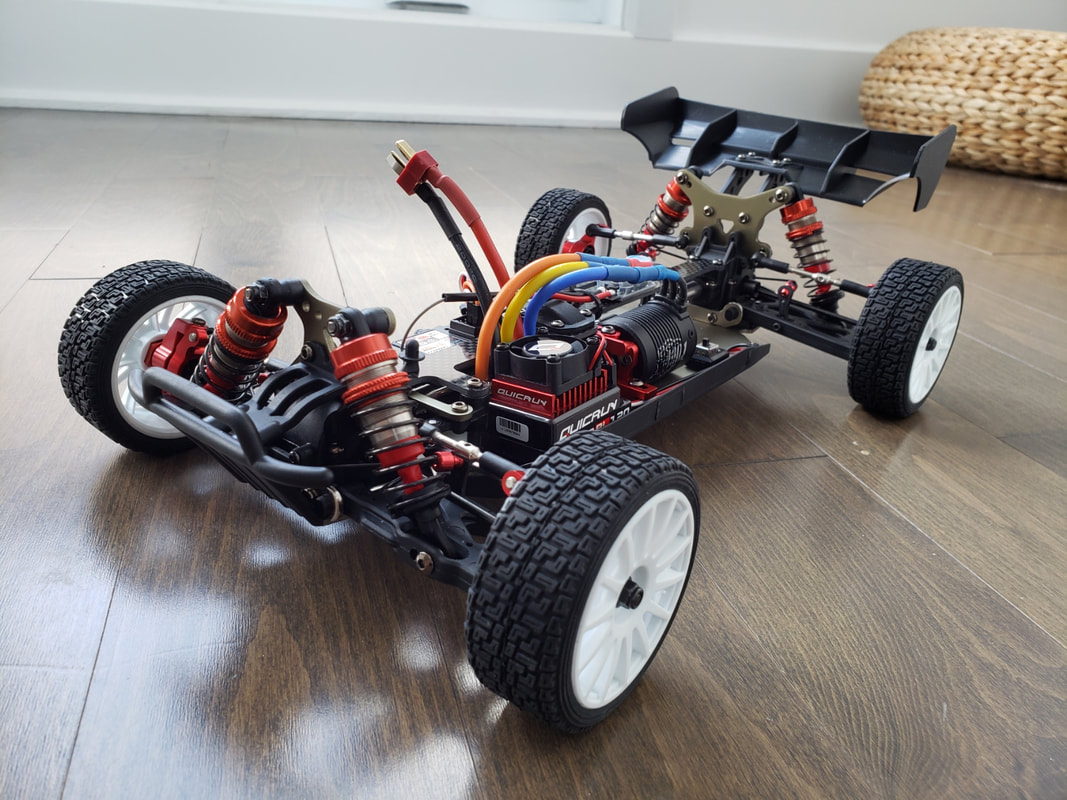
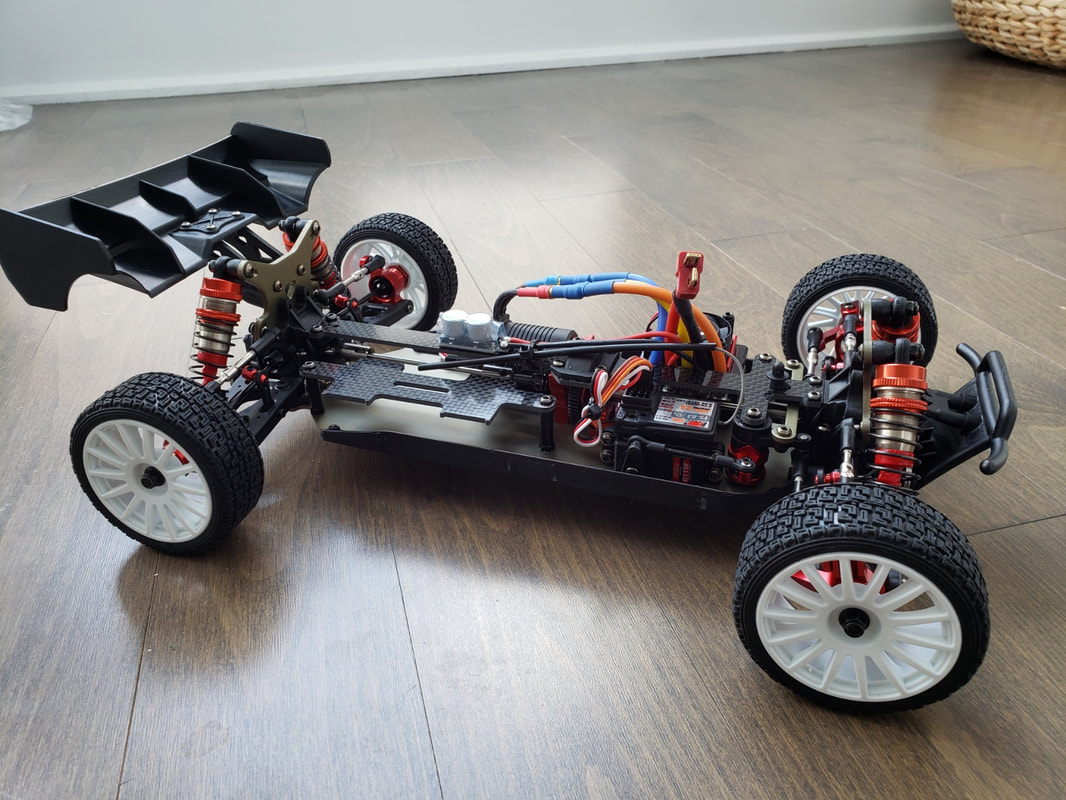
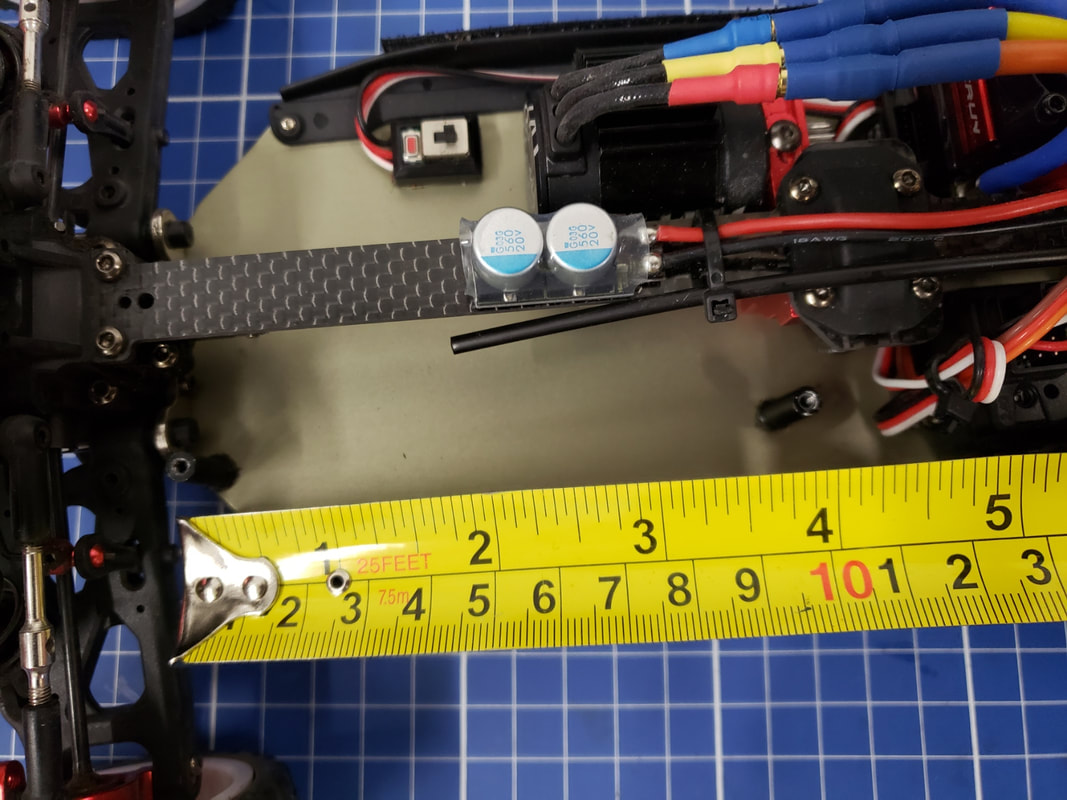
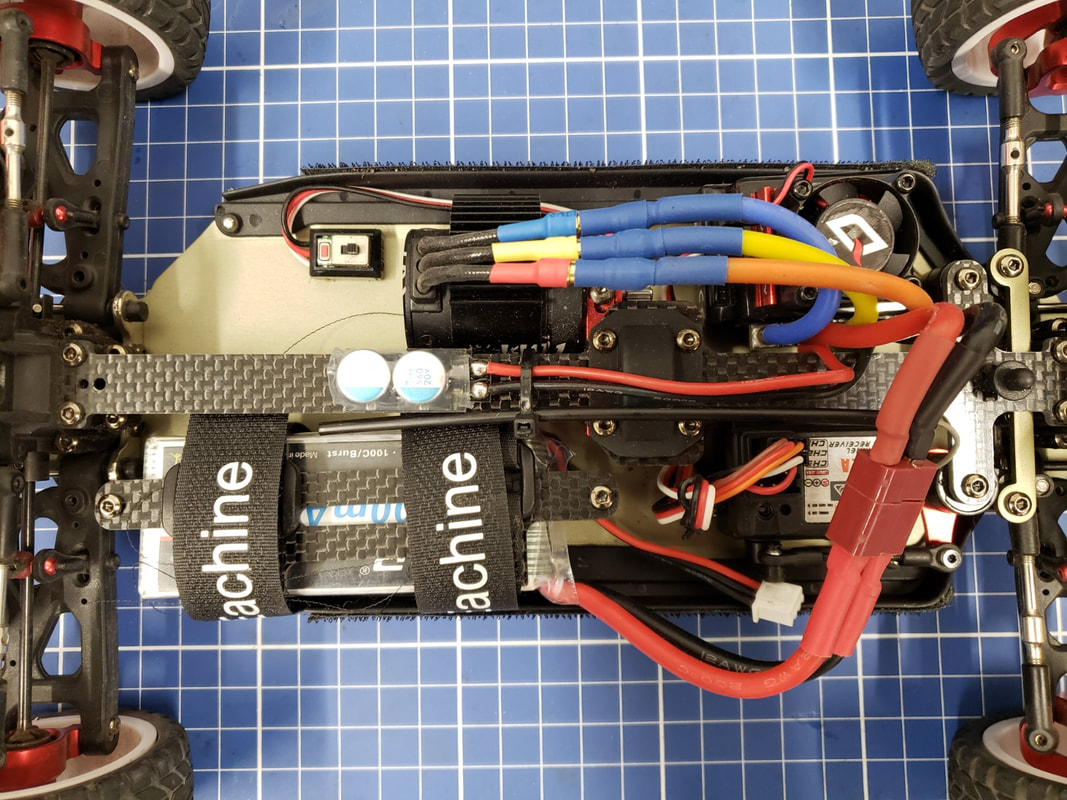
With the motor mounted into the chassis, I was able to mount the carbon fiber top deck support. I also put in the carbon fiber battery tie down in place. The use of carbon as a standard material for this kit takes the quality factor up a few notches and adds a bling focal point in the chassis. Not only is carbon light and stiff, but it looks bad ass in the car. Take note that I ordered the optional LC spur gear cover to protect my wires against any accidental mishaps. It’s a shame that this isn’t a standard item in the kit. A clever LC Racing community member recently shared a 3D printable design on Thingiverse.com if you have access to a 3D printer. 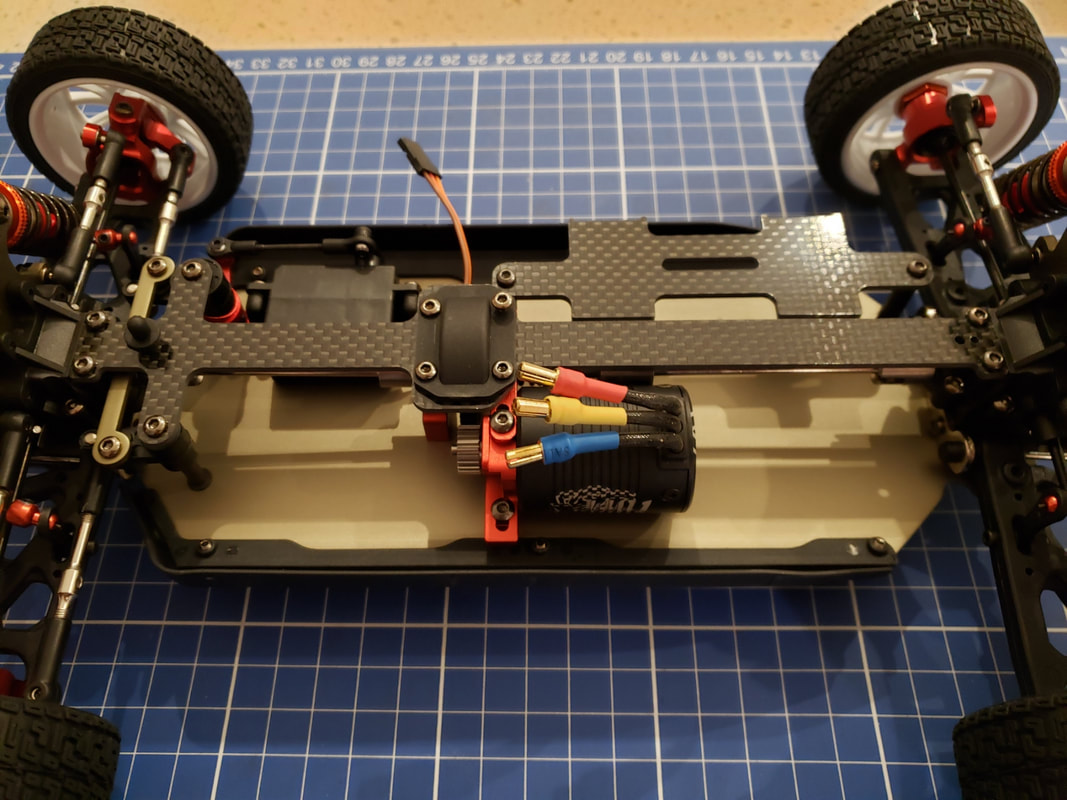 The ESC install is the next step. I chose the Quicrun 10BL120 as it is a favorite choice in the WLToys as well as the LC Racing community for the price point and performance. A 60A would have sufficed with the Tenshock X1401, but because the price difference between the 60A and 120A is so negligible, I decided to just get the higher rated ESC. I used the vice grips in the picture to hold the bullet connectors in place while I soldered. Pretty helpful if you don’t have a set of third hands. I pre-fitted the ESC and market off on the spaghetti long leads where I wanted to cut and made the connections. If you haven’t already, be sure to check out QuadifyRC’s article on soldering for tips on how to get better at this skill as it is a must have if you plan on staying in the RC hobby 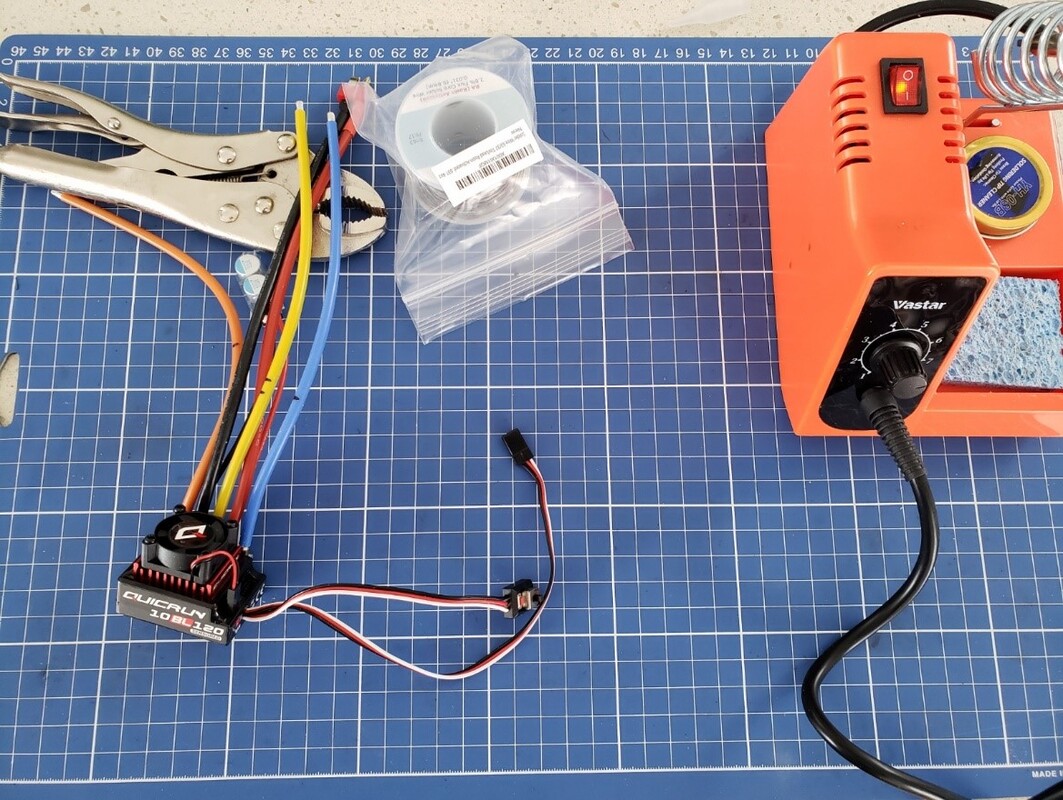 To optimize for weight balance in the car, I mounted the ESC in front of the motor to keep as much weight in the middle of the car as possible. With the ESC mounted, I also installed the Flysky 4-Channel FS-A3 receiver on top of the Batan servo. Everything fit in nicely with the antennae fed through the included piping to protect it, ran along the top deck. This takes care of the electronics for this build.
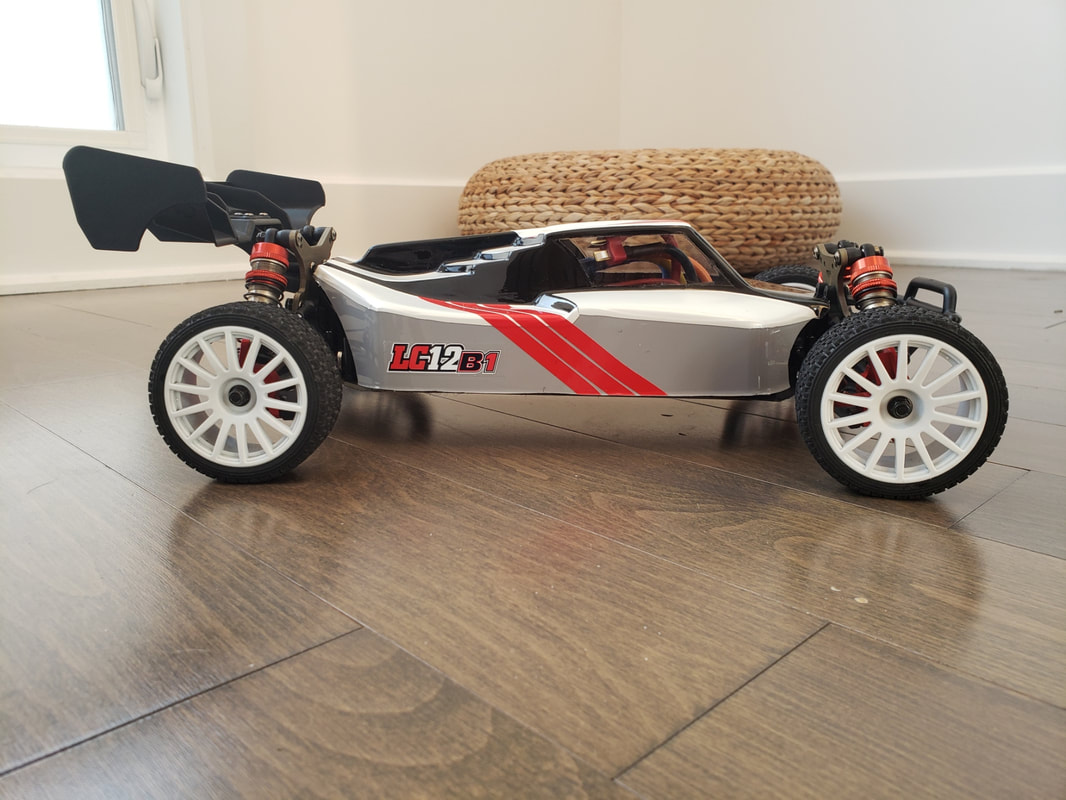
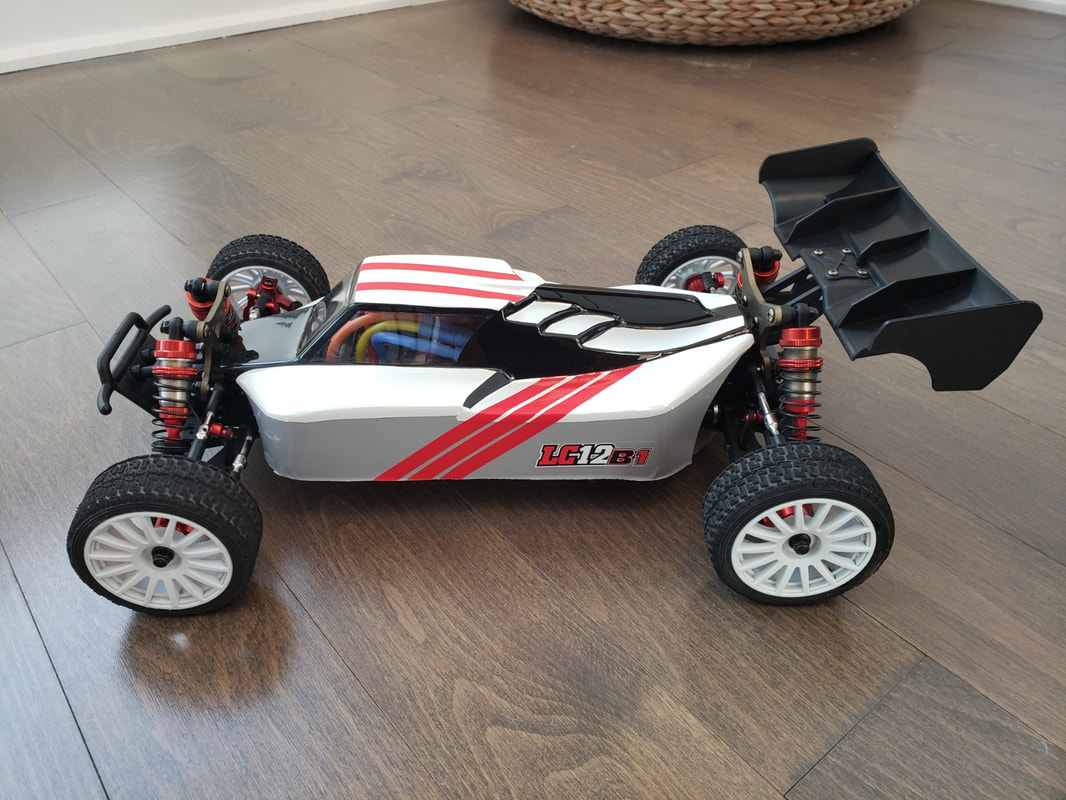
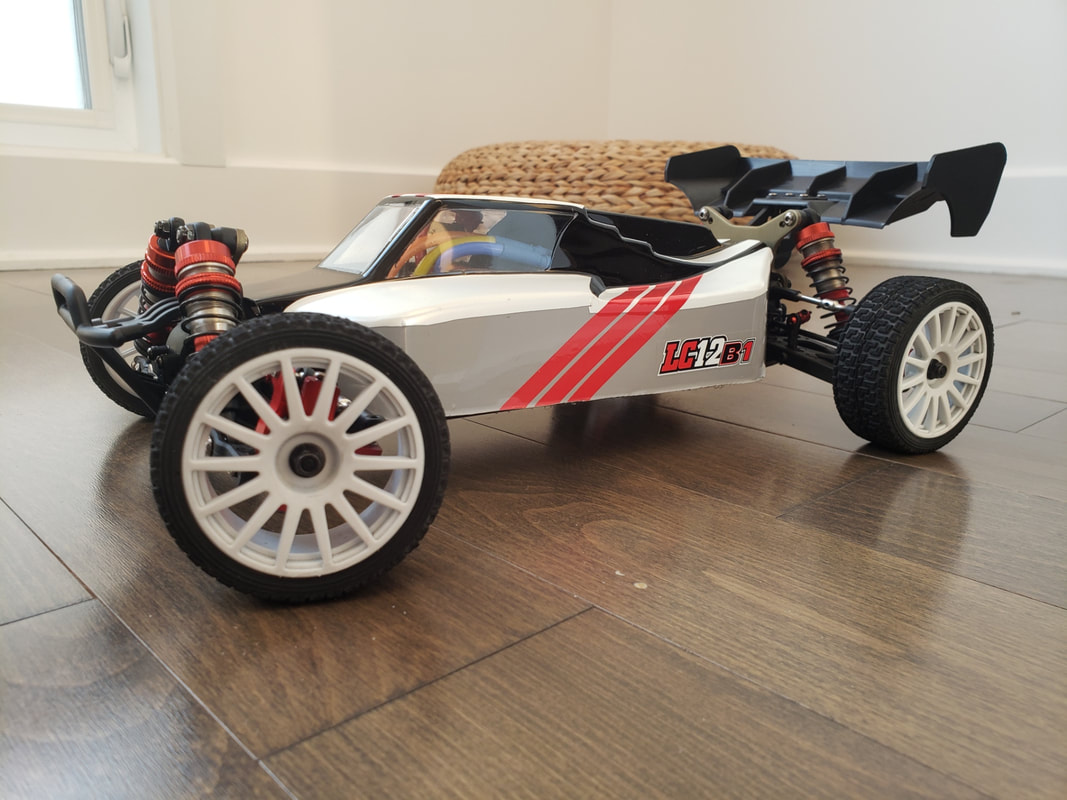
Customising the body, wing, bumper I installed several other LC Racing options parts to this build. A front bumper for me is a must to save the front end from unexpected impacts. I’m running this car outdoors and, in the streets, and you just never know when a bit of added protection will prevent a breakage. The LC EMB-MT is a go-to for me for price point as well as looks. I also, decided to use the LC EMB-T wing on this car instead of the Lexan one that comes with the LC12B1 kit as I didn’t feel that I needed the level of downforce that wing generated and it is made of a sturdier composite plastic that would hold up better in an impact or crash. The original wing is HUGE and is the same size as the one that comes on the WLToys 104001.  Instead of the stock disc buggy wheels and off-road tires, I wanted to test out the LC Racing EMB-WRC wheels and tires. The diameter is similar at 65mm to the stock off-road tires, but the tread pattern is not as aggressive or wide. I also wanted a different look, and these fit the bill nicely.
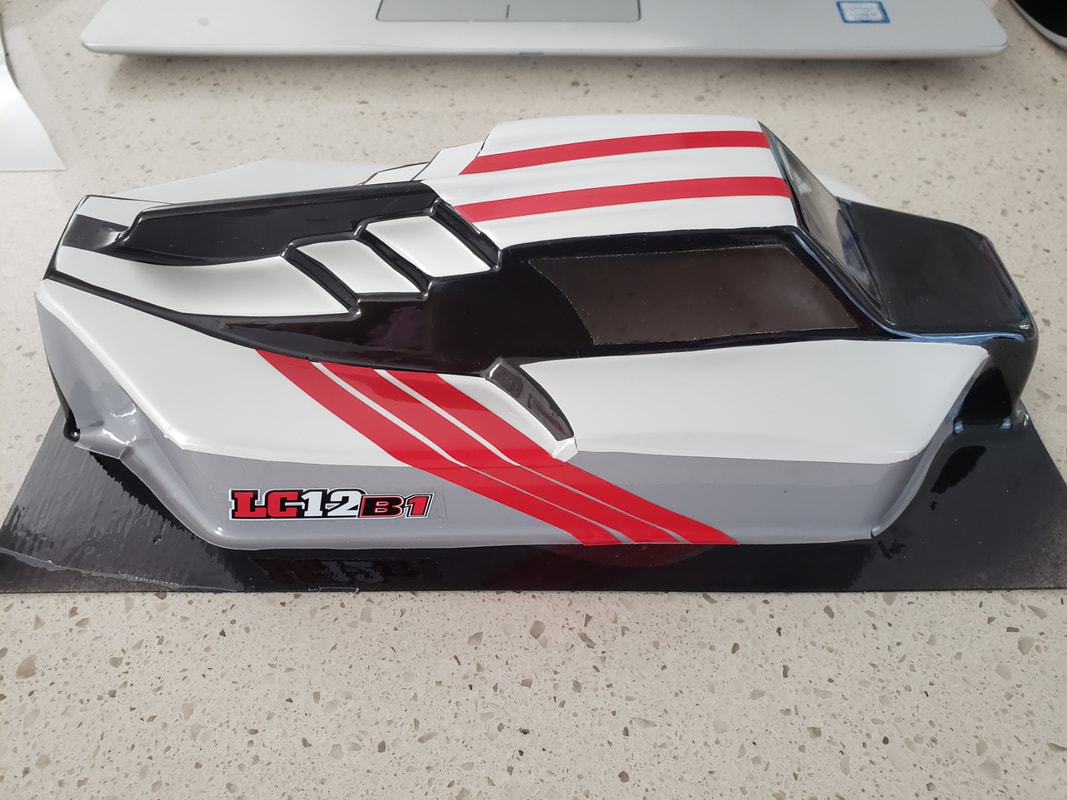
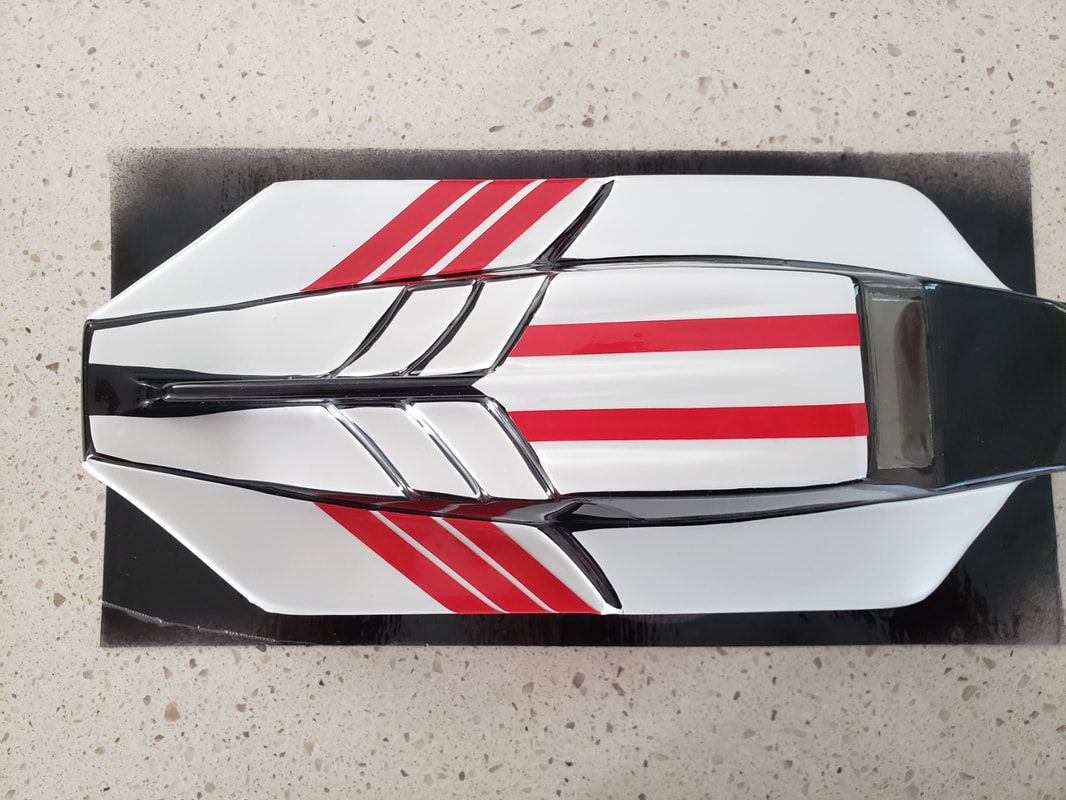
The last and final step to this build is the body shell. I do like the low profile look of the LC12B1 body, but I have been seeing the Phat Bodies Hammer on so many builds in the community that I really wanted one. The higher profile shell also makes it easier to fit over the electronics and wires and provides a bit more airflow for cooling. I have never painted a body shell before and knew I wouldn’t be able to get a decent result on this beauty of a shell with more than one color. I decided to do a base black paint underneath and used vinyl wrap for the other colors. Using light grey for the lower part of the body and shifting to a matte pearl white it gave the intended look. The red stripes finished off the Honda Type-R inspired color scheme nicely. The most difficult part was to mask the clear window area. It isn’t obvious in the photos, but in person upon close inspection, the line isn’t as clean or crisp as a pro paint job, but it turned out decent enough for me to be happy with it for my first time customizing an RC body.
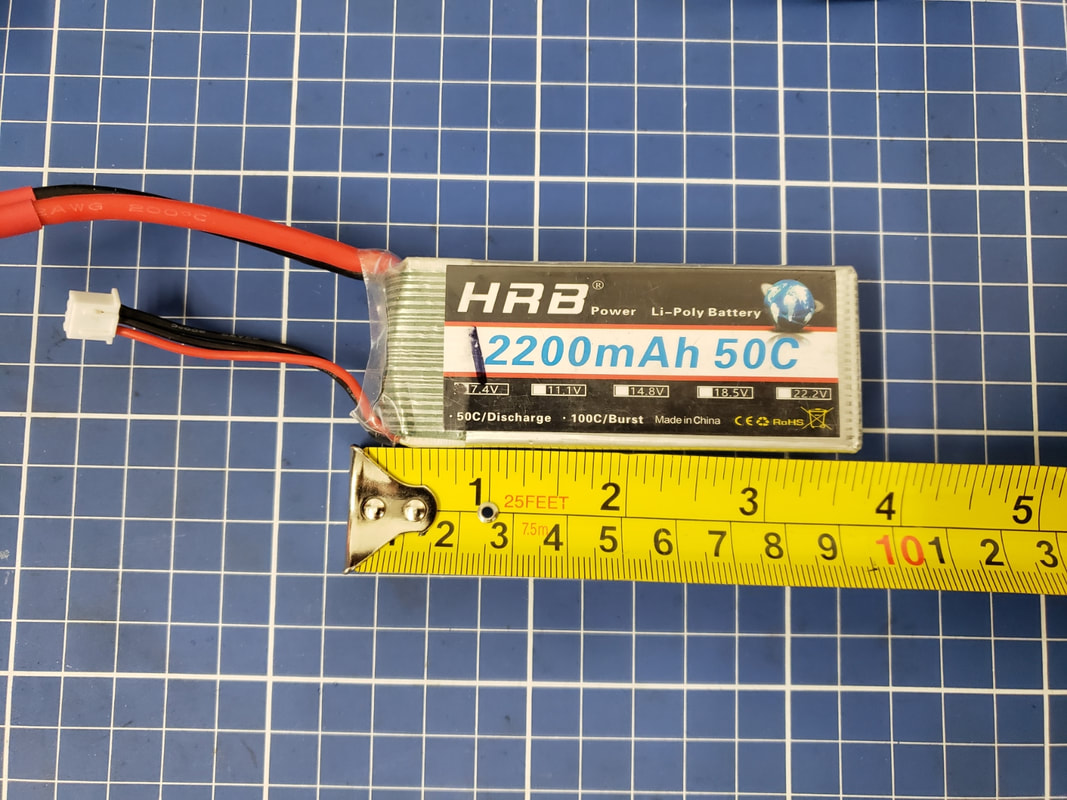
Battery
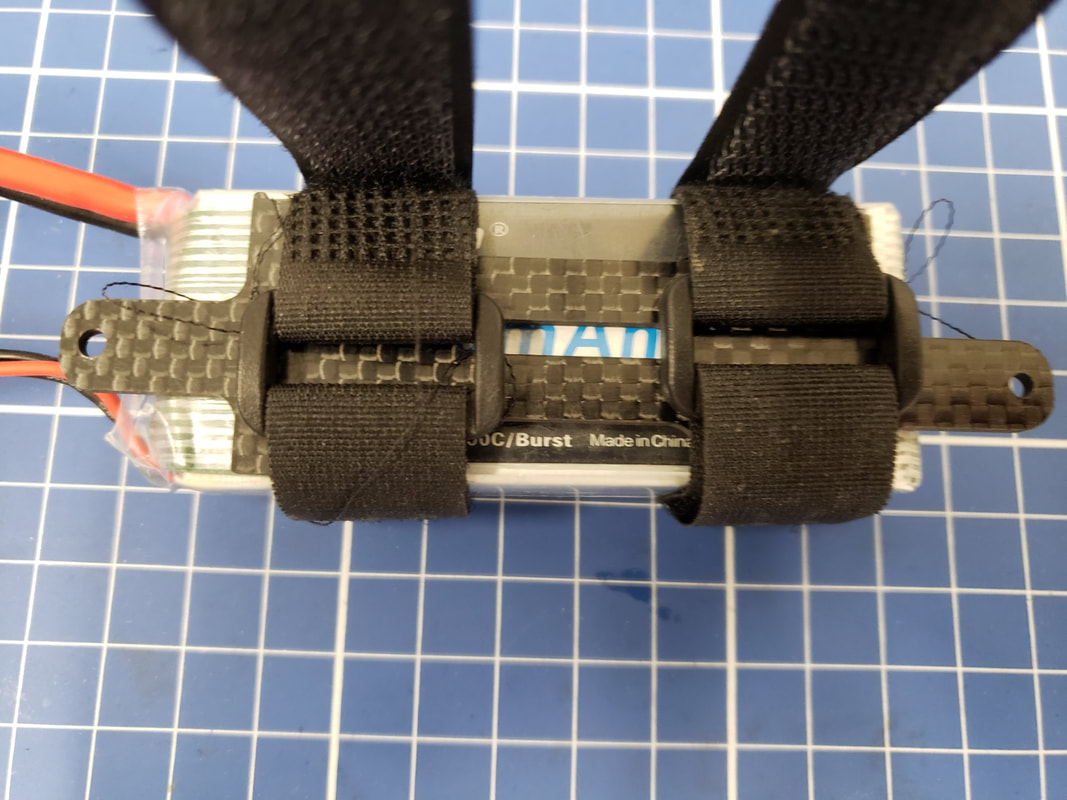
I’ve since ordered thumbscrews to make the task a bit easier without tools. The other issue is due to the limited space, there are only a few battery sizes that can fit in the spot. The maximum size that would comfortably fit in the stock configuration is a length of 90mm, a width of 35mm and 20mm in thickness. I was lucky that I had a pair of HRB 2200mAh 2S 50C lipos that I had purchased for my LC Racing EMB-T that fit and are perfectly up to task to power the Tenshock motor. These are great batteries, but a bit on the expensive side. I’m in the process of finding a different mounting methodology that is secure but more convenient. Stay tuned for updates in this area.
Final thoughts on the LC12B1 This is by far my favorite car in my stable at the moment. I am absolutely thrilled how this build turned-out. I think with the details I have shared from my perspective on this car, it should be clear why I feel this is the undisputed King of the 1/12 4WD race buggy category. It’s too bad there aren’t more manufacturers dipping their toes into this arena as I would love to see more competition in the market. Until then, I’m going to go and enjoy ripping this little buggy and tinkering with the suspension, gearing and drivetrain to get it dialed into my preferences for handling and driving dynamics.
Thanks for reading, if you found this article useful please feel free to like or share, the facebook links below directly link/like this article. I don't believe in asking for money by patreon nor by paypal but if you do wish to help me, the affiliated links in these articles help me buy the bits and services I need to produce this type of content. If you are looking for RC cars, quads or parts check out my coupons and discounts page which I keep updated with only the RC cars, parts and quads I like at a proper discounts
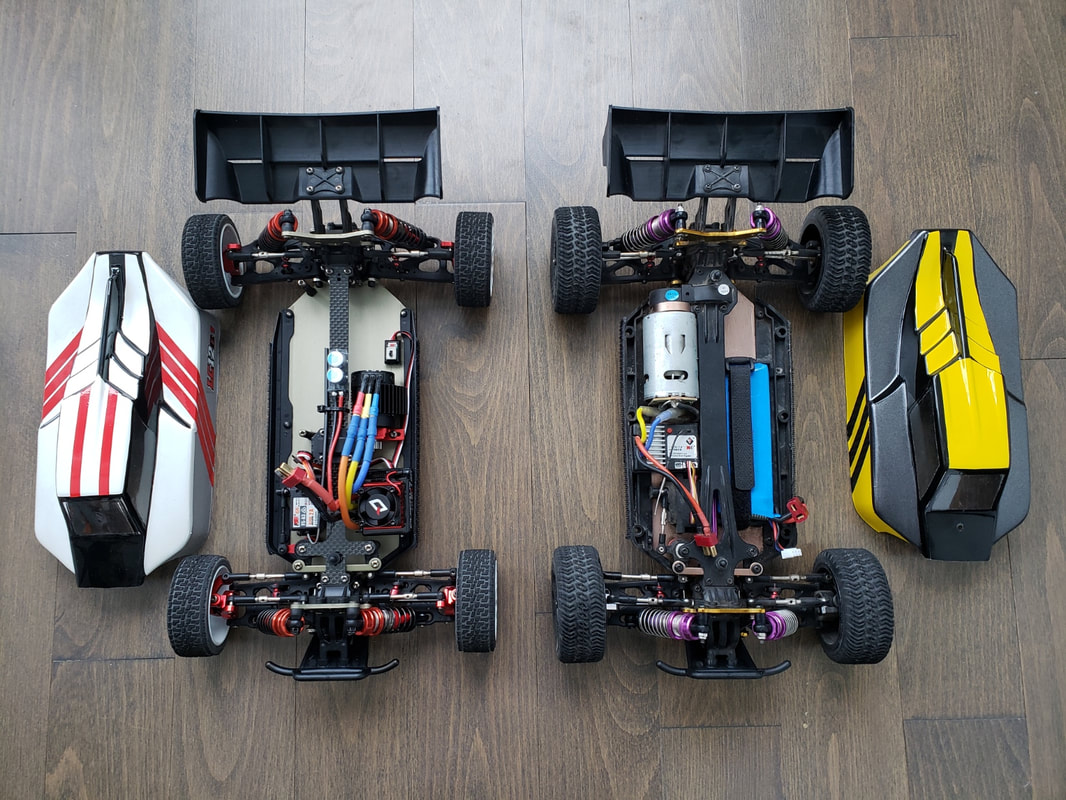
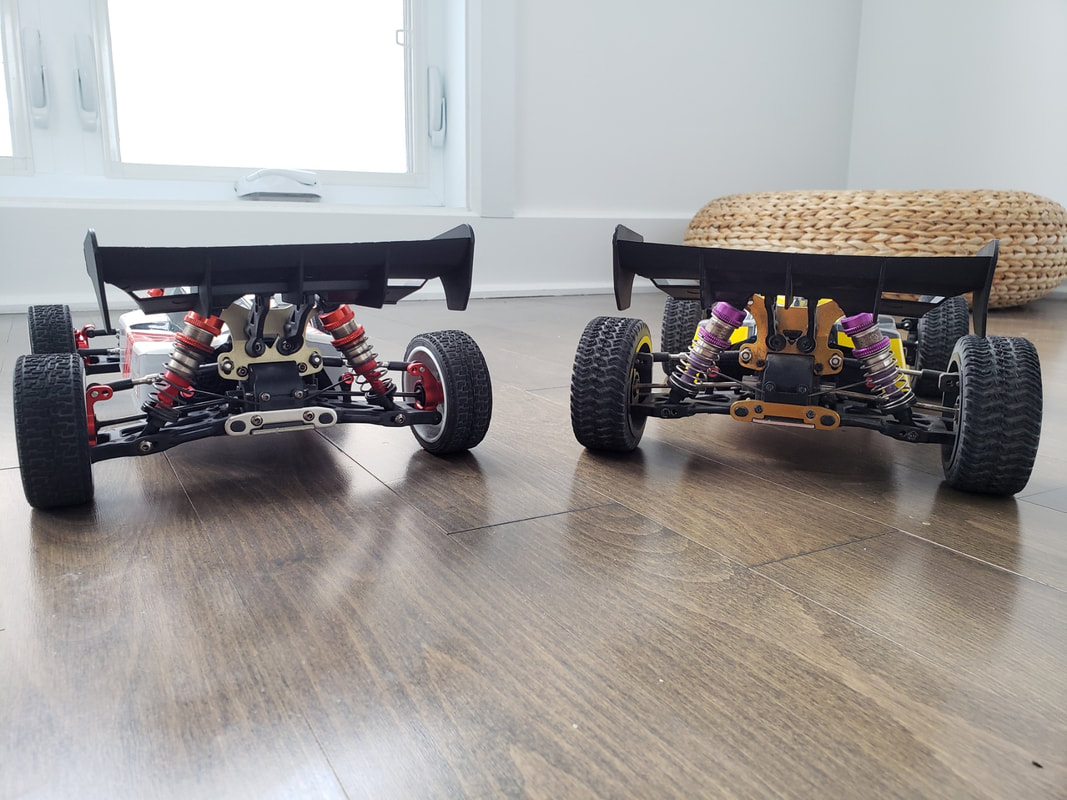
Comparison to the WL Toys 124019 Bonus content of a side-by-side comparison between the LC12B1 and a WLToys 124019 that I overhauled and customized for my neighbor that is still running the stocked brushed electronics. There can’t be two bigger contrast between the King of the Track monster and the King of the Smiles per Dollar category. The photos also really highlight how closely WLToys cloned this platform in terms of dimensions. However, what is not so obvious in photos is the fit and finish, tolerances and materials that you can only feel with the product in your hands. The 124019 is running the same Phat Bodies Hammer shell, LC EMB-T Wing, LC EMB-MT Bumper and a set of LC EMB-SC Wheels.
|
Categories
All
|


 RSS Feed
Thanks for visiting QuadifyRC.com Follow us on facebook below to get all the latest updates